


Table of Contents
- How to Start the Jupyter Notebook Server
- How to Create a New Jupyter Notebook
- How to Change the Name of Your Jupyter Notebook
- How to Add, Remove, and Select Cells in Your Jupyter Notebook
- How to Write and Run Code in Your Jupyter Notebook
- What Types of Cells Are in a Jupyter Notebook?
- How to Run Multiple Lines of Code at Once on Jupyter Notebook
- How to Use Jupyter Notebook Menus
- How to Save and Close a Jupyter Notebook
Jupyter notebook is a powerful environment for both writing and running code, which you can also use for other things, such as writing formatted text like you would in a Microsoft Word Document, or inserting pictures or videos alongside Python code. Jupyter notebook is particularly good for beginners because you can both write and run code in the same place.
Most text editors - even the ones designed for programming - don't typically allow you to do this. In this blog series, I will mostly be using Jupyter notebook, and the best thing about it is that if you read and followed my previous post about how to set up your Python system, you have installed the Anaconda distribution, so you already have Jupyter notebook installed too, and if you haven't, please read it first:
How to Start the Jupyter Notebook Server
- NOTE: I put together a detailed guide on how to start the Jupyter notebook server on Mac or on a PC. The screenshots below were taken on a Mac computer. While the commands and steps involved are the same between the two operating systems (OS X and Windows), it might still be easier to follow my detailed guide linked above.
- Quick Guide: How to Start a New Jupyter Notebook
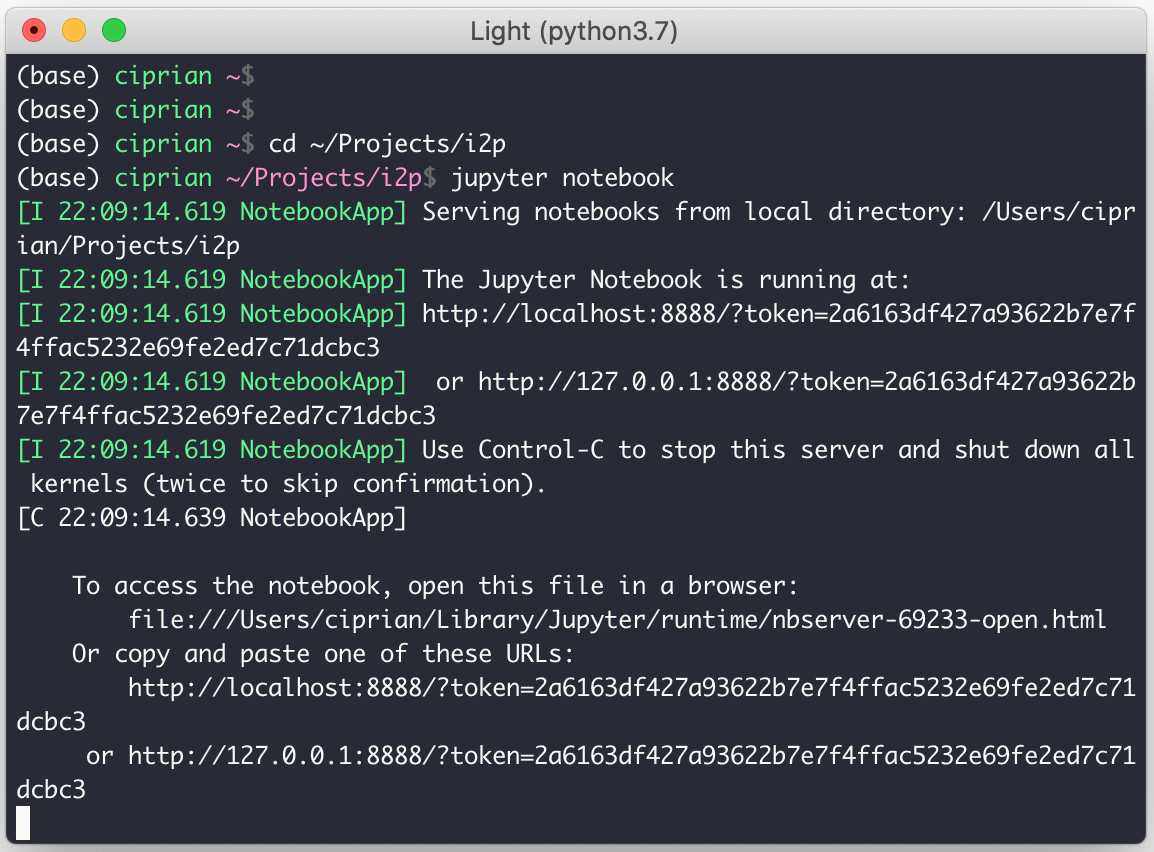
To launch Jupyter notebooks, I have to first launch the command line. I will then navigate to my desired folder, which for me is ~/Projects/i2p. Once I'm here, all I have to do is type Jupyter notebook and hit Enter.
Image Source: Screenshot of Jupyter notebook, Edlitera
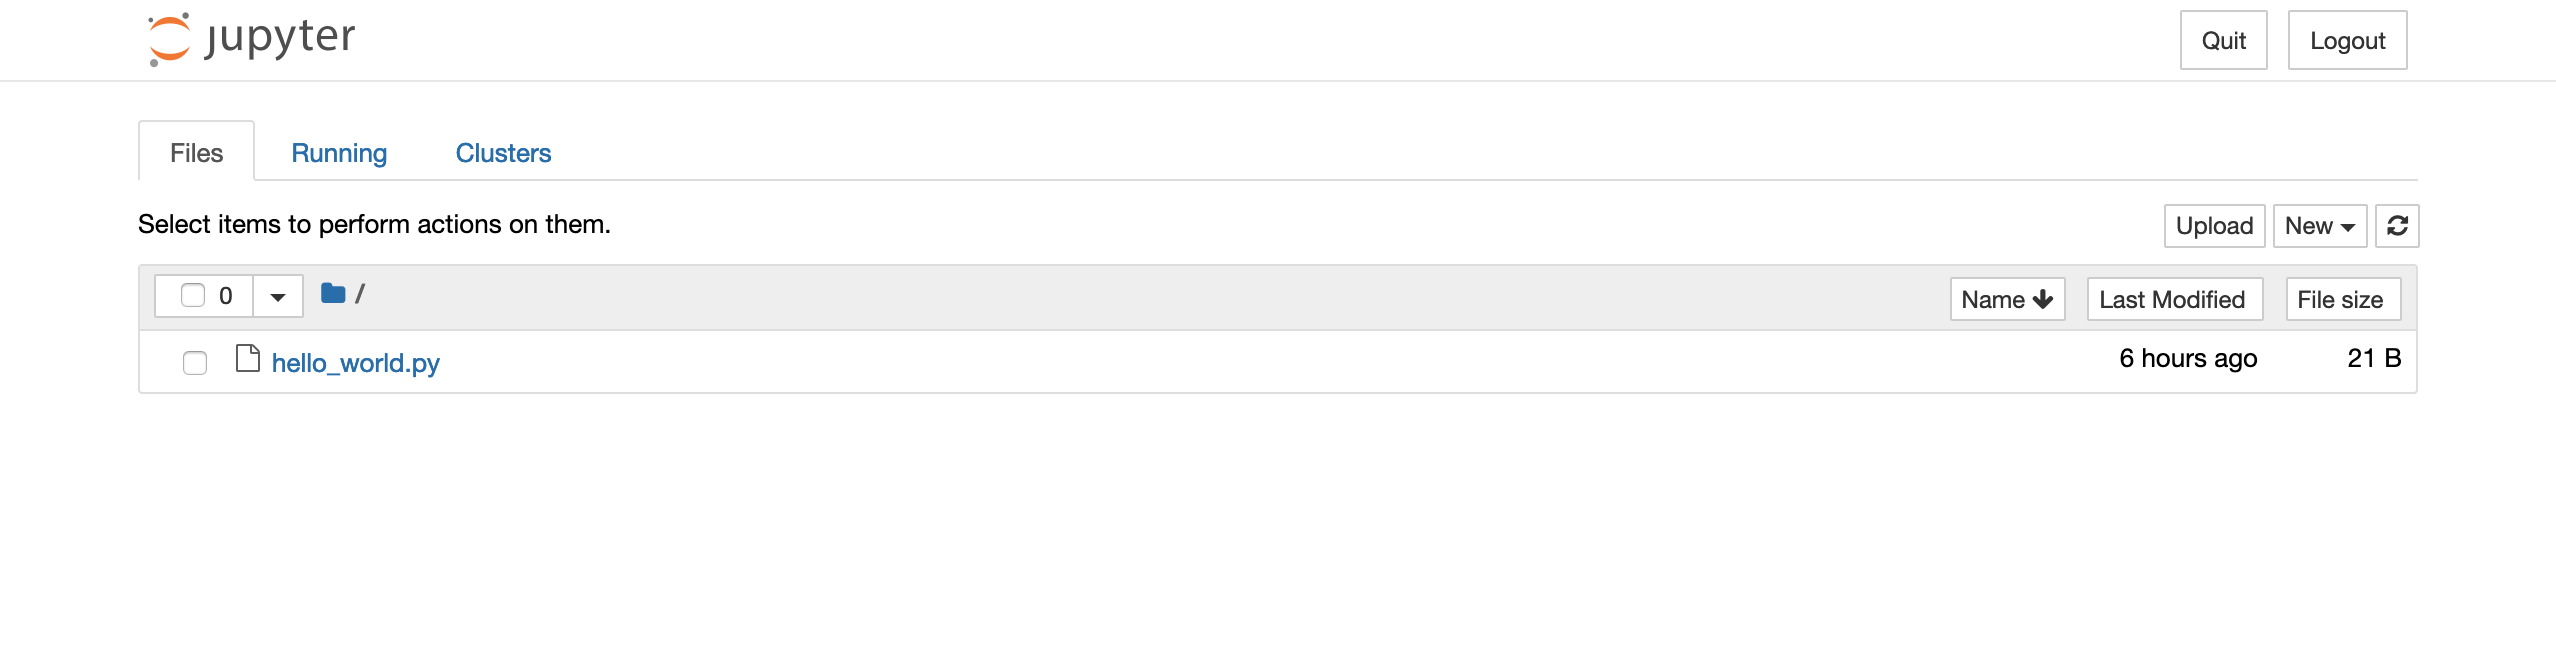
After I run the command, it should automatically open a browser window. In my case it opens a Firefox window, because Firefox is my default browser. In your case it might be Chrome, Safari, or another browser. What you can see right here is the starting page for Jupyter notebook, which just shows the files that are present in the directory where I typed the command that launched the Jupyter notebooks environment.
In my case, I was in my ~/Projects/i2p folder, which had the hello_world.py script I wrote earlier using the Atom text editor:
Image Source: Screenshot of Jupyter notebook, Edlitera
So why did I have to use the command line to launch a Jupyter notebook? Why is the web page automatically launched? One thing you need to understand about Jupyter is that it has a server-client architecture, similar to other online services you might use. Whereas most desktop applications you might use (Microsoft Excel, Atom, Sublime etc.) are standalone, Jupyter notebook have two parts: a server and a client.
In this way, they are more similar to say, Gmail or Twitter. The webpage is the client - it displays an interface you can use to interact with a server that sits in some data center somewhere. Unlike Gmail or Twitter, Jupyter's server is running on your own computer in this case (however, the Jupyter server can also run remote, in a data-center or in the Cloud, if your laptop is not powerful enough for your computational needs).
- Intro to Programming: What Are Different Data Types in Programming?
- NOTE: If you are still confused about the server-client interaction, think about a restaurant. When you visit a restaurant, you are a client. You interact with a server, who takes your "commands" (orders) and gives you back "responses" (food, drinks etc.). This analogy mimics how the internet works to some extent. Though, of course, the internet is quite a bit more complicated than that.
When it comes to websites, the web page is the client and the server is usually some computer that sits somewhere in a data-center, sometimes on the other side of the planet (however, it can also be a server that runs locally, on your computer!). When you click on a button on a web page, that button typically translates into some command that is sent to the server. The server receives the command, performs some actions and sends back a response.
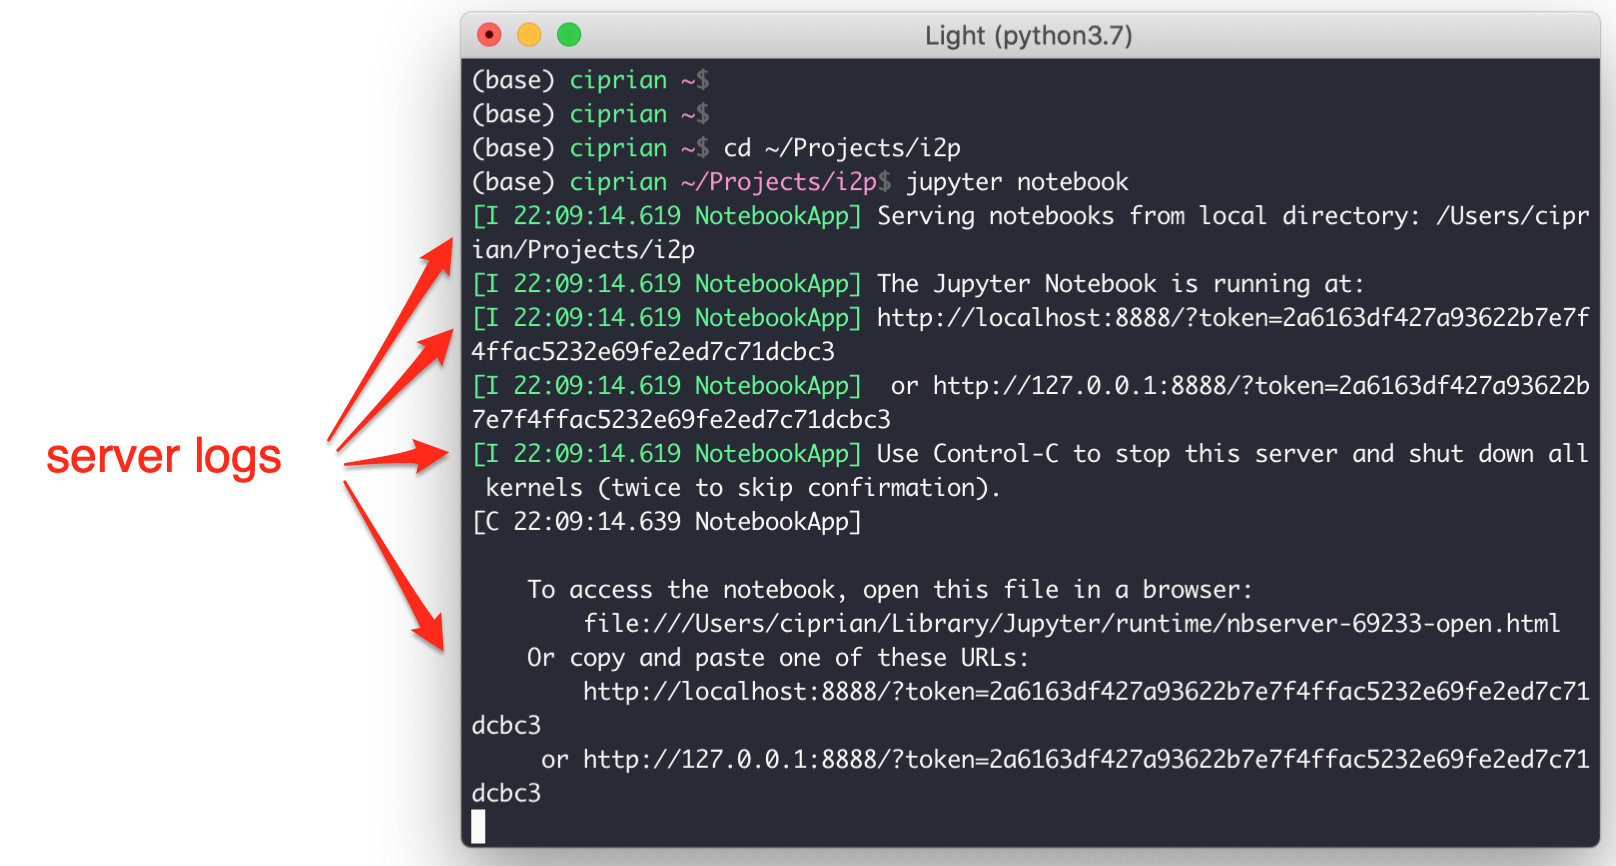
Jupyter notebooks use a similar architecture to that of web based services: you have a web page that you can see in the screenshot above, and you have a server that runs locally on your computer. When you run the Jupyter notebook command you are actually starting that server and the text you see right below the command is the server log:
Image Source: Screenshot of Jupyter notebook, Edlitera
The server log tells you what the server is doing. For example, serving notebooks from local directory: /Users/ciprian/Projects/i2p informs me that the server is looking for notebooks that are located in this directory on my computer. You will see what a notebook is in just a moment.
How to Create a New Jupyter Notebook
A notebook is a collection of code cells as well as some meta data. Notebooks are files that store code that you can run using a Jupyter server.
Let's go back to that webpage that was launched automatically when you started the Jupyter server. You know now that the web page is connected to the Jupyter server, which is running locally on your computer.
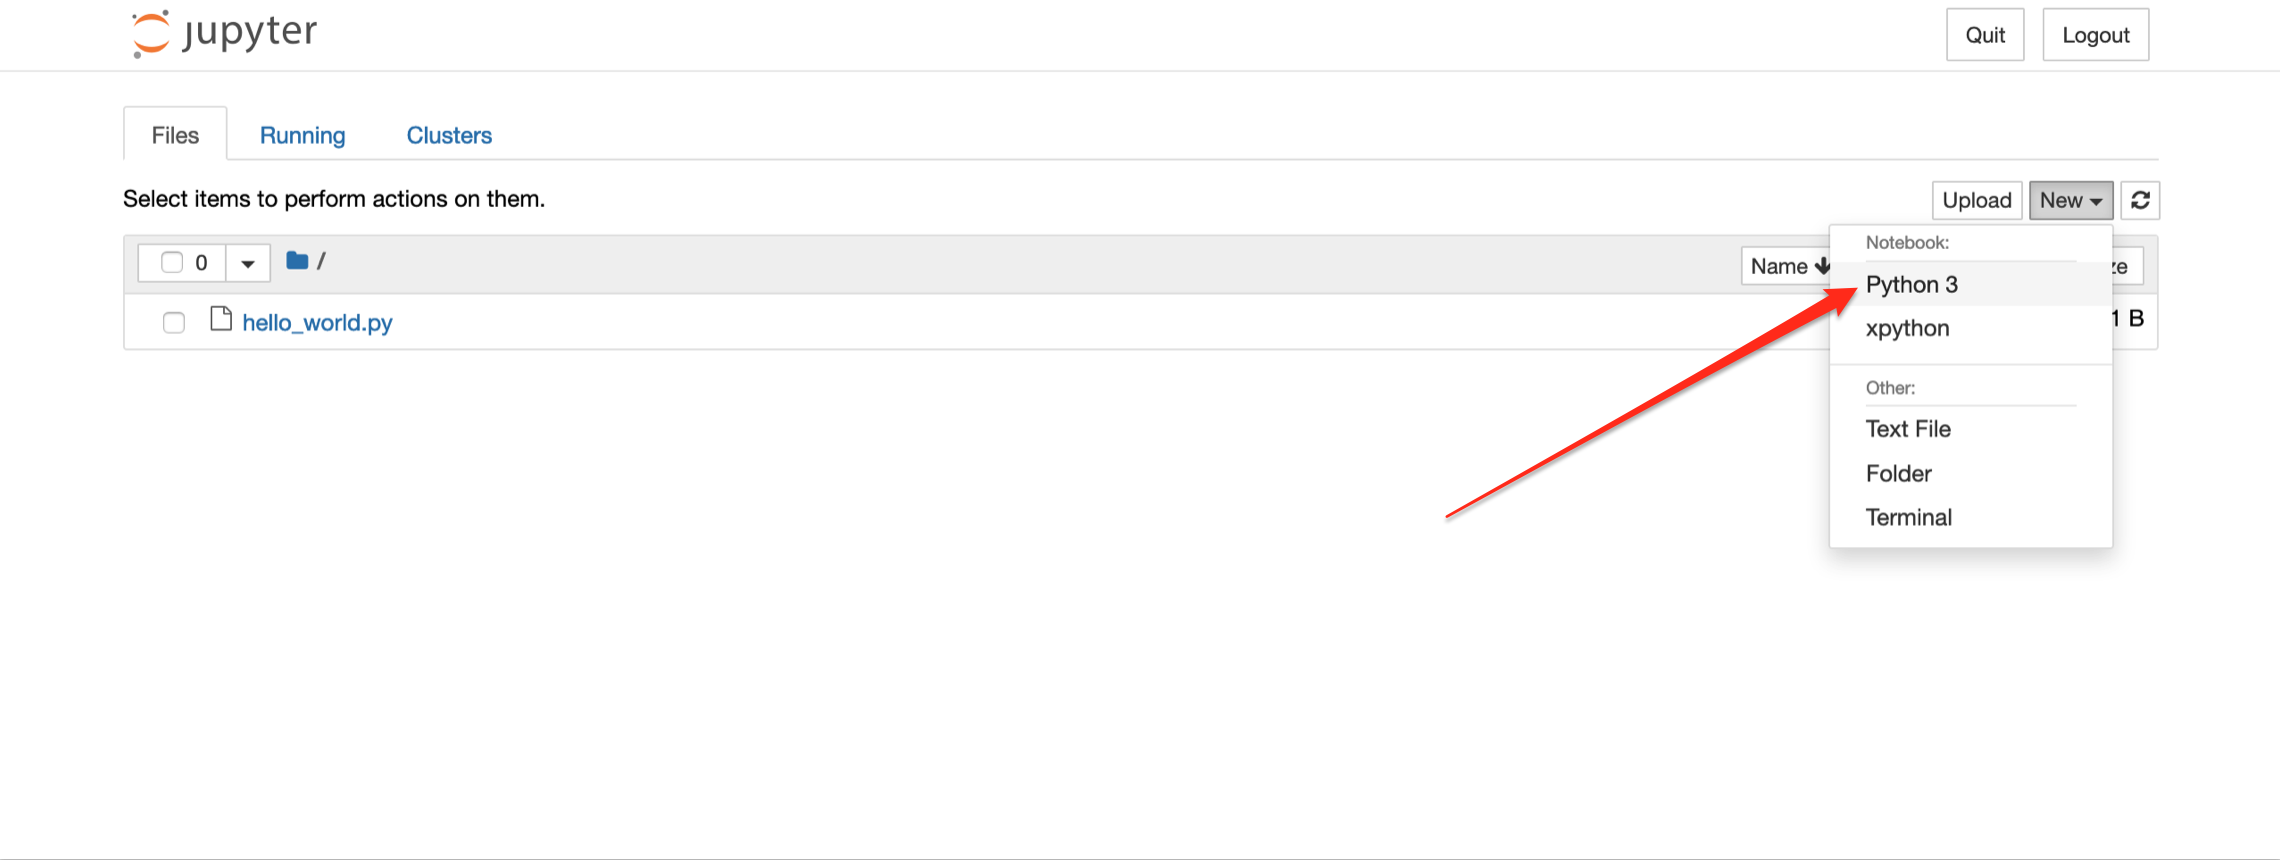
Now, let's go over to the top right corner and click the New button and from here I'll select Python 3.
Image Source: Screenshot of Jupyter notebook, Edlitera
- NOTE: One thing to note here is that Jupyter notebooks are very powerful and allow you to write code in many languages. They're also widely used in data science and data analysis. It's a really good tool to get comfortable with and invest some time into. In this blog series, I'll only use it to write Python code. But remember, it can do much more than that.
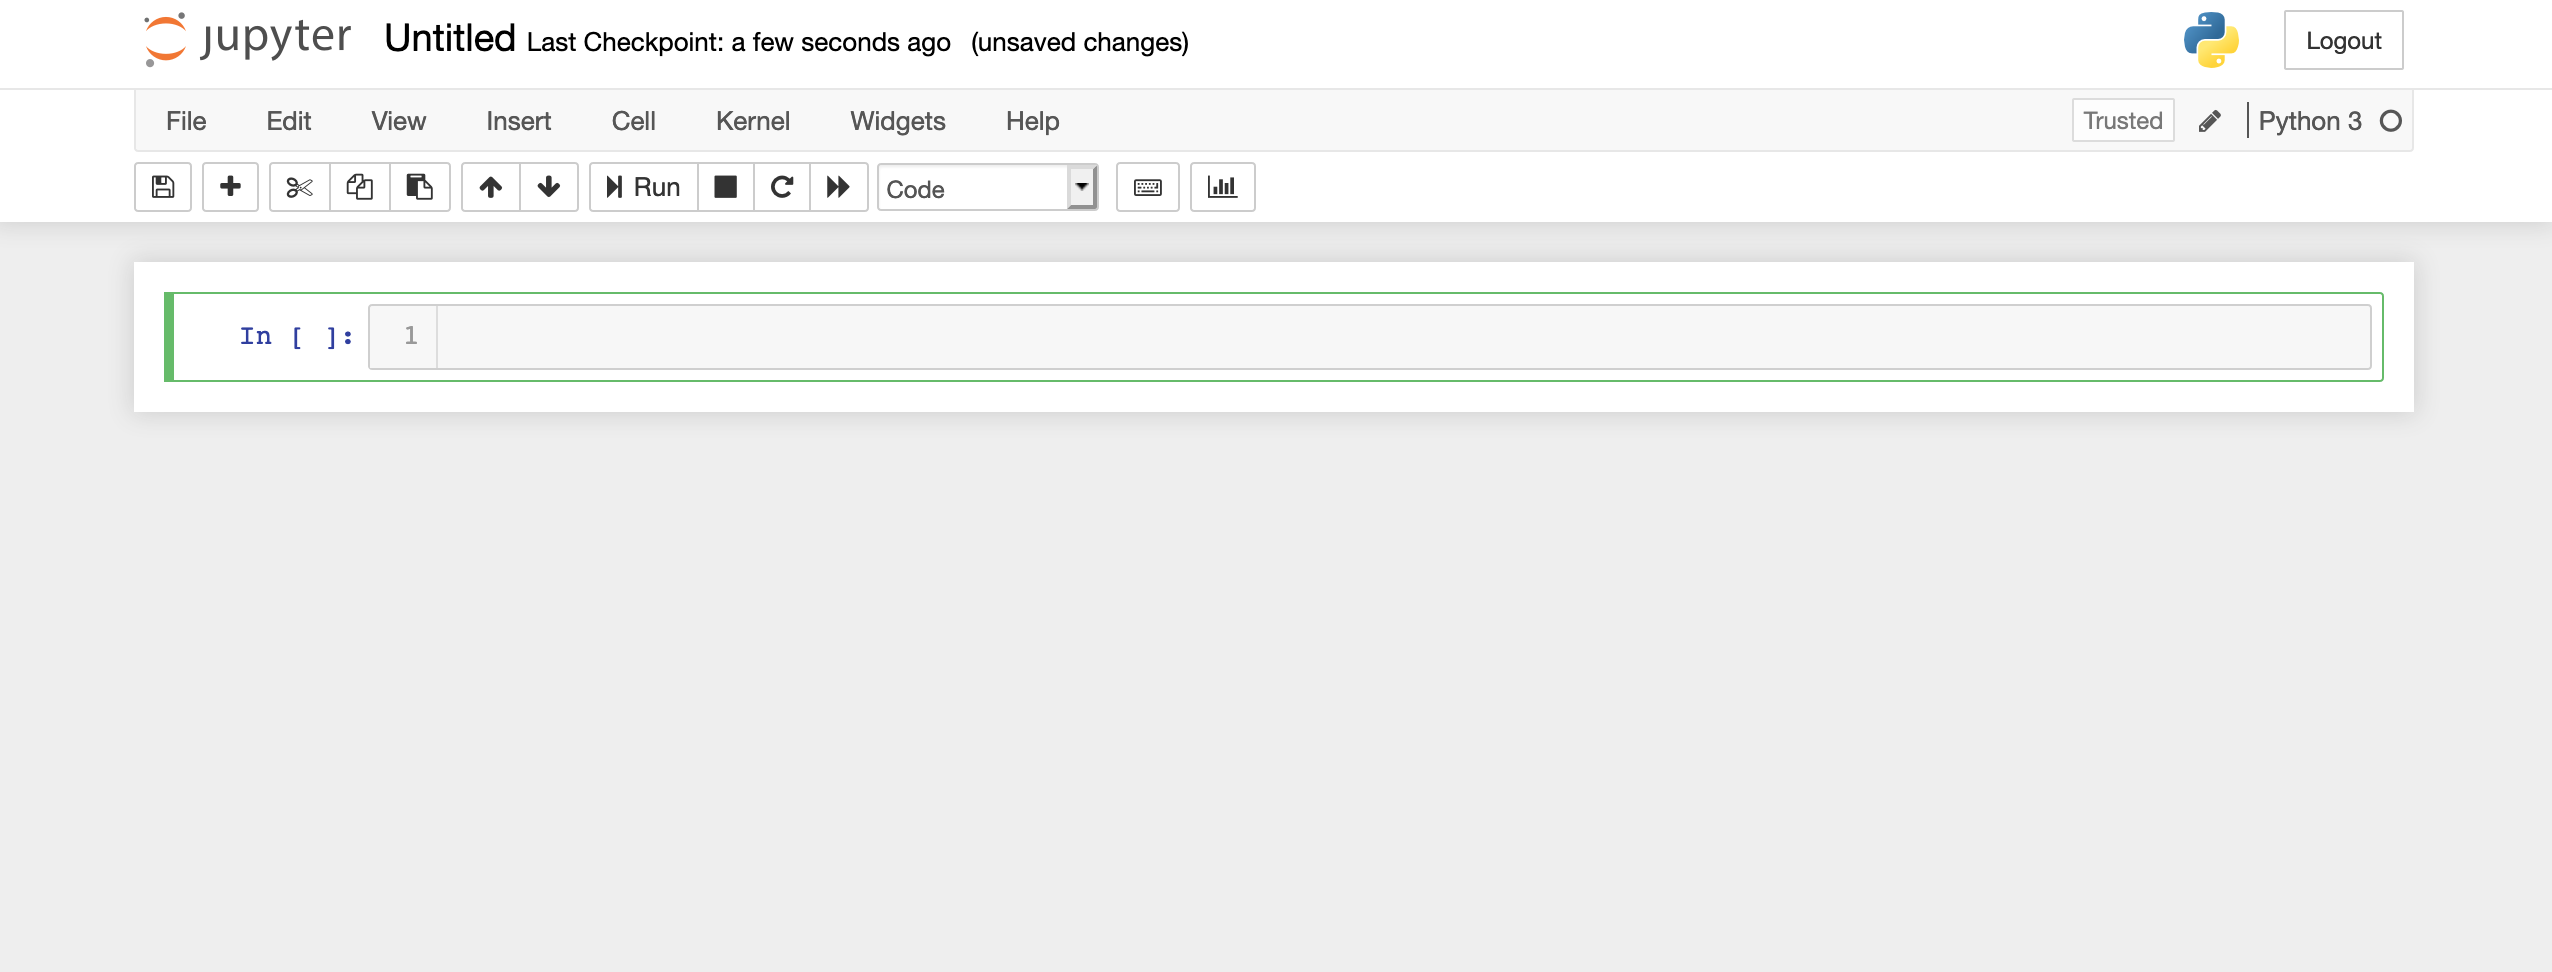
After I select Python 3, a new notebook will be created, which will understand Python 3. Depending on your Jupyter notebook version, you should see something more or less similar to the screenshot below:
Image Source: Screenshot of Jupyter notebook, Edlitera
How to Change the Name of Your Jupyter Notebook
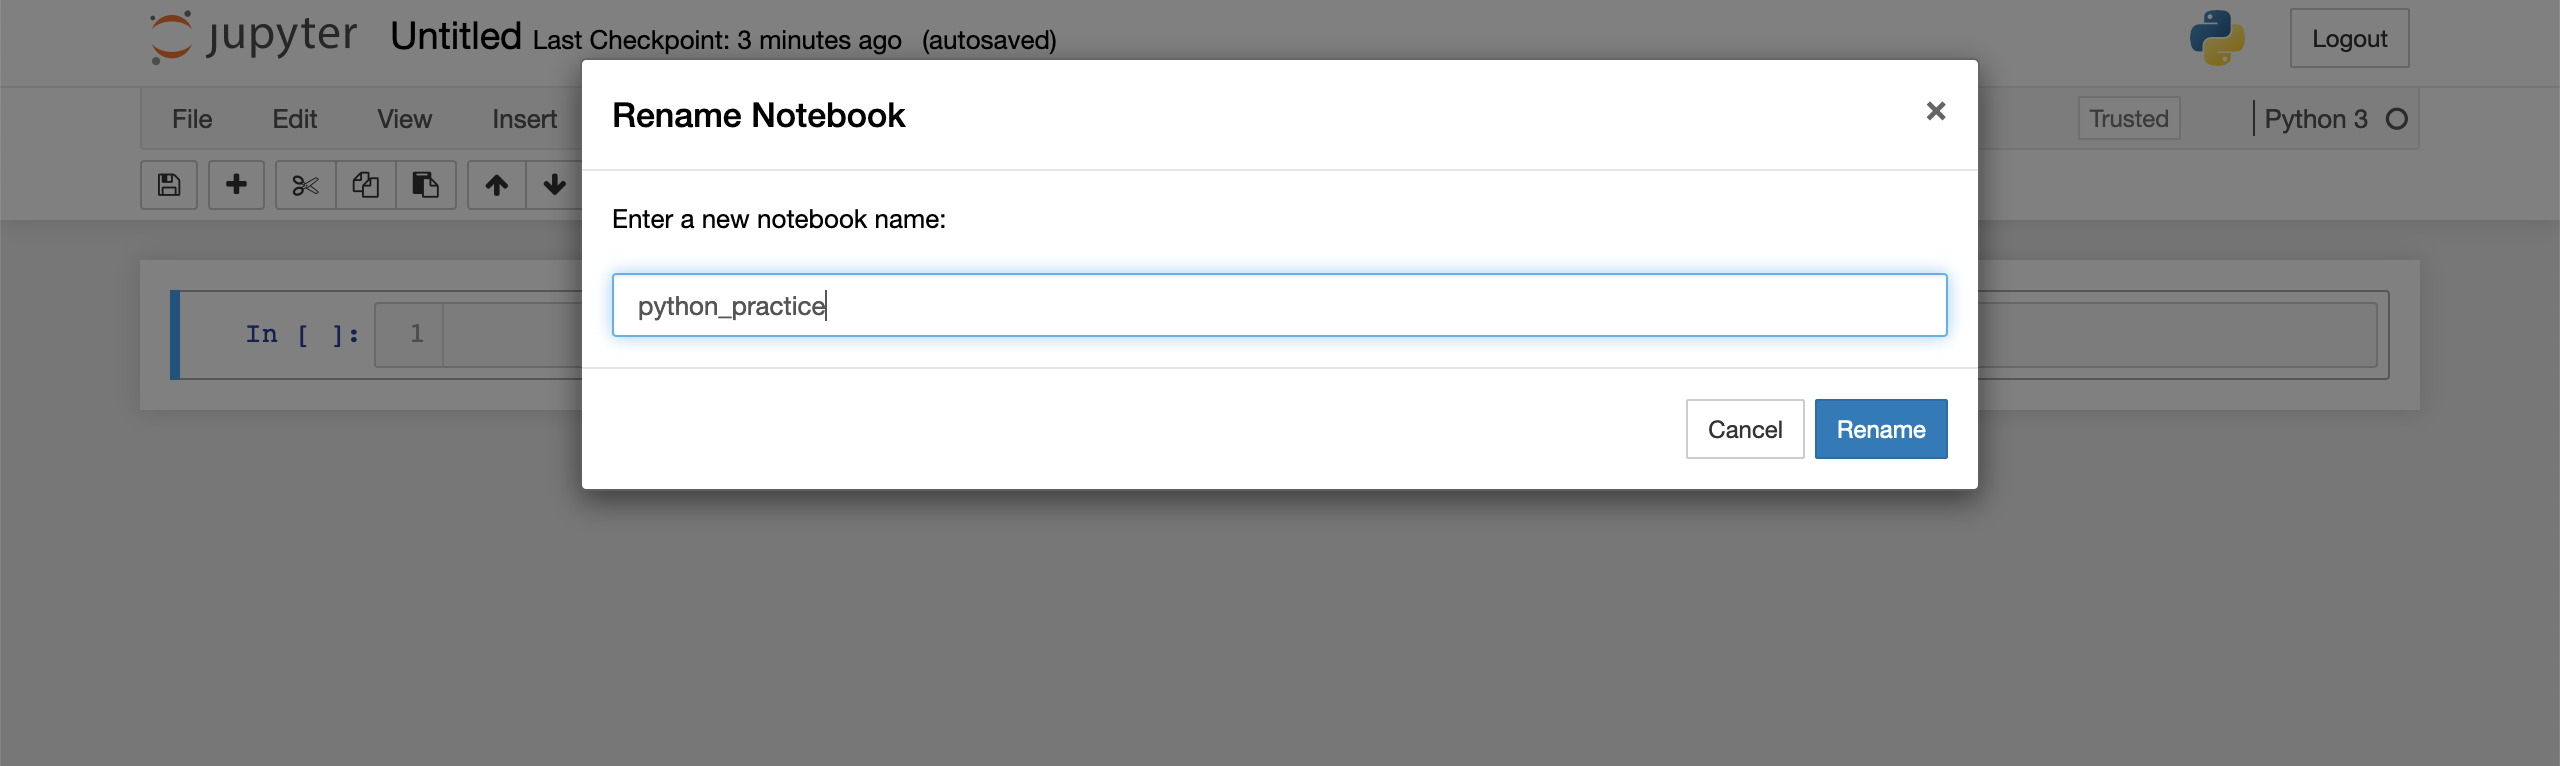
Let's take a few moments to familiarize ourselves with some of the features of Jupyter notebooks. First of all, let's give this notebook a name. You can do this by moving your mouse over the top left corner, right here where it says Untitled and clicking on it. A window will pop-up and you can enter a name here.
I'll put python_practice. You can see that I avoid using spaces in my file names. That's just good practice whenever you create any files that contain code.
Image Source: Screenshot of Jupyter notebook, Edlitera
Now, unlike the text editors, I don't have to specify a .py extension when naming the file. You'll just enter python_practice and click Rename.
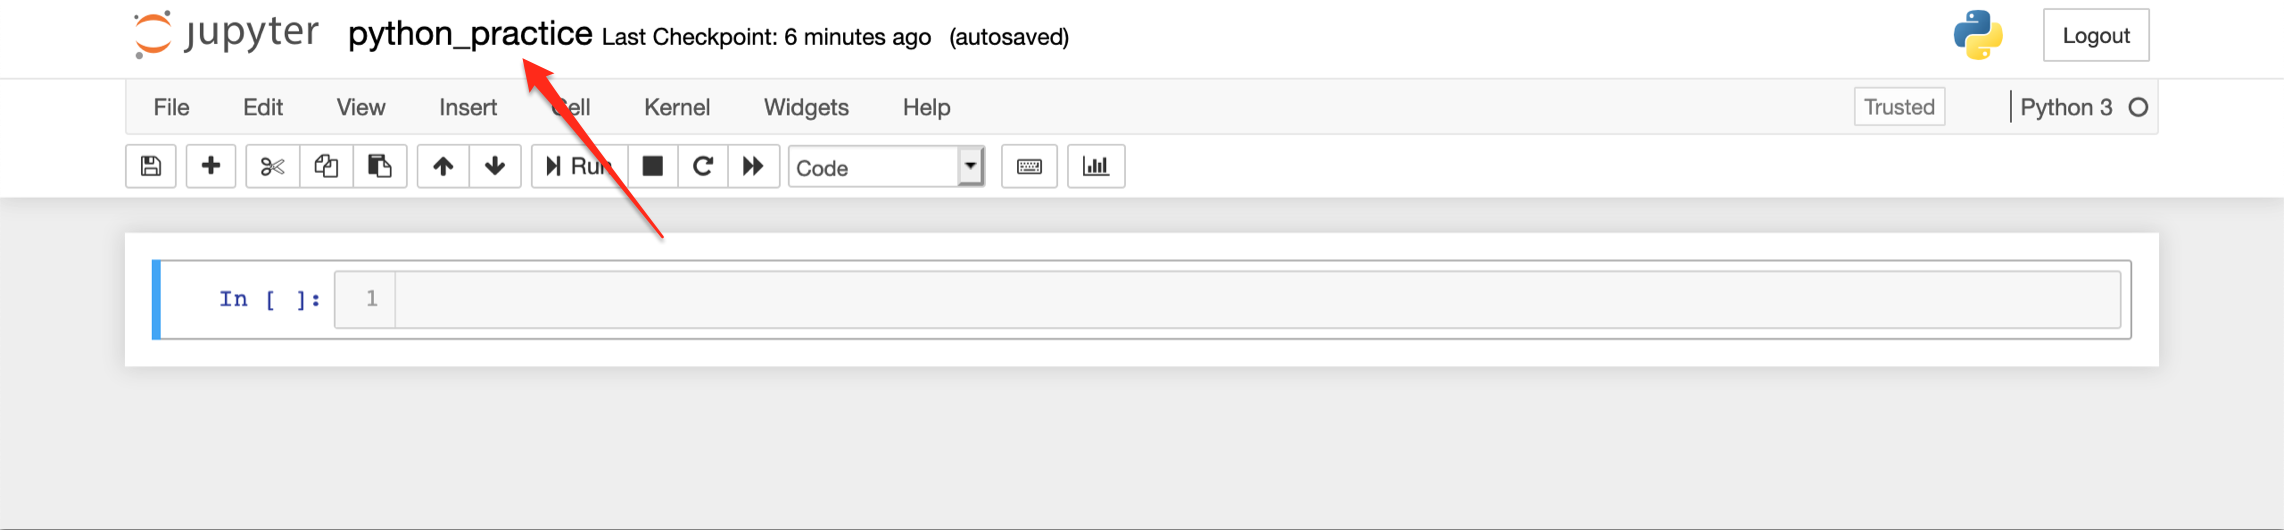
You can see that the name of the Jupyter notebook has been updated:
Image Source: Screenshot of Jupyter notebook, Edlitera
How to Add, Remove, and Select Cells in Your Jupyter Notebook
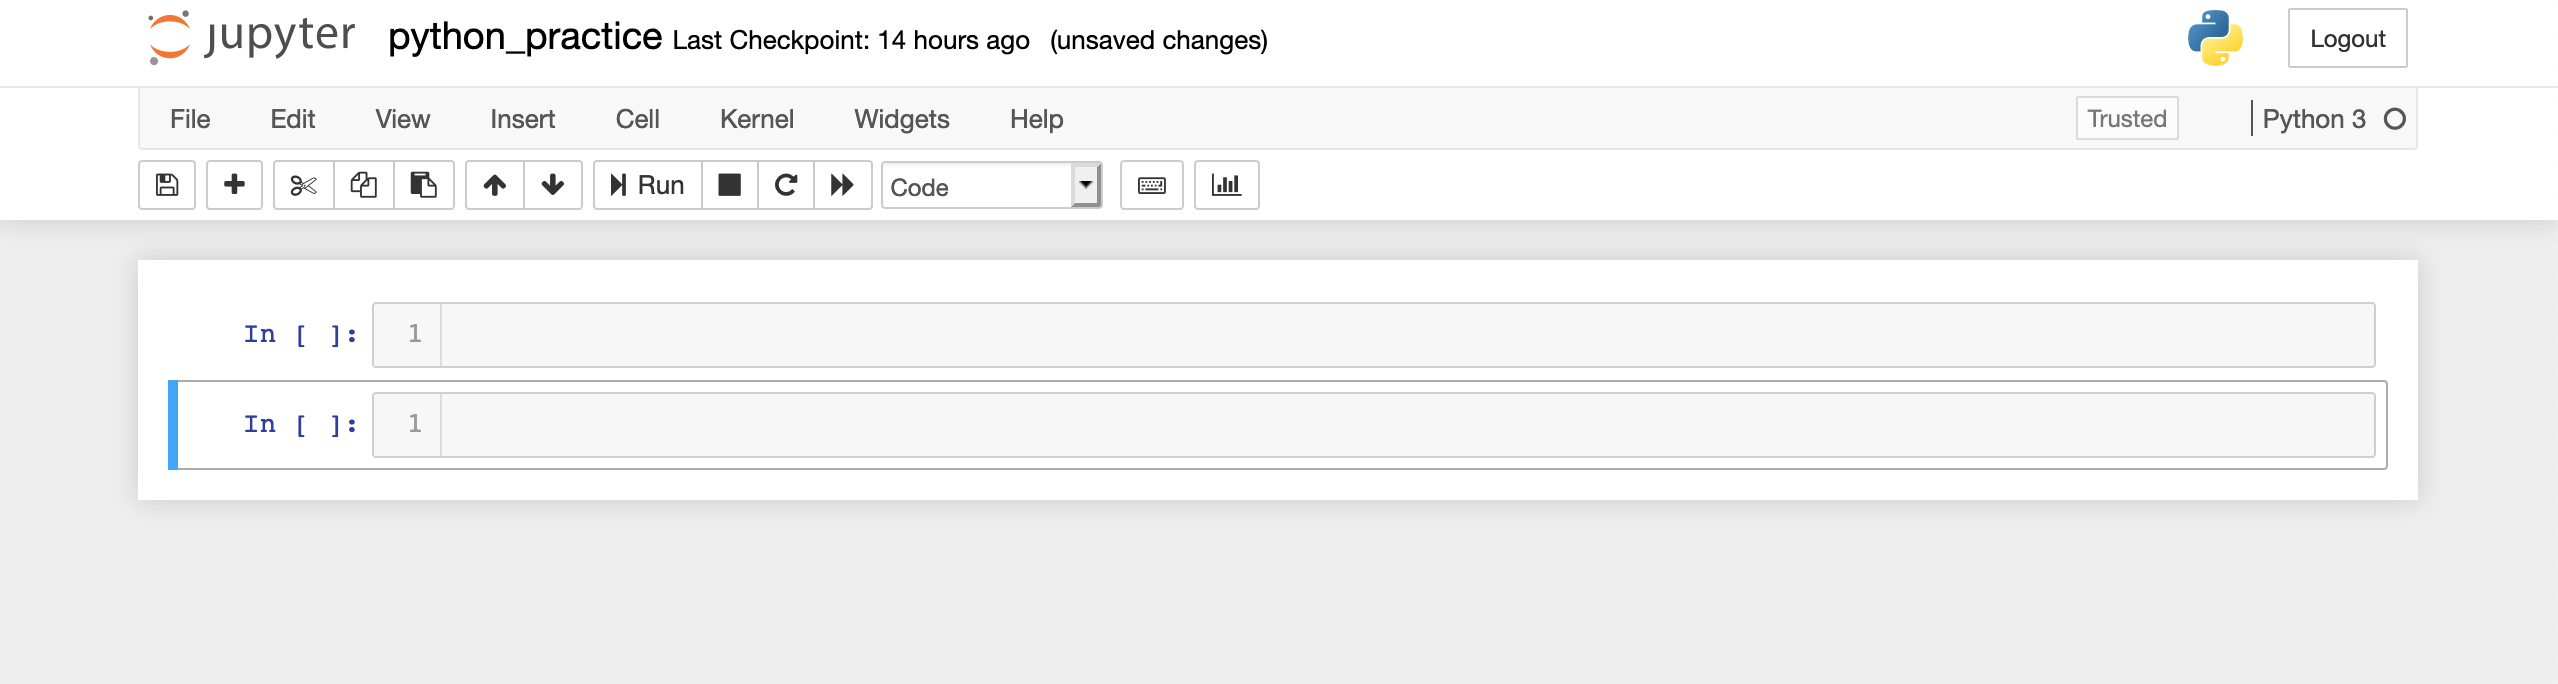
Next, I'll talk about the input box you can see in the screenshot above. It is called a cell and this is where you'll write code. Before you write any code though, there's something I want you to notice about this cell.
If I click inside it, it turns green. If I click outside it, it turns blue. I can also make it blue by pressing the Escape key. When a cell is green, I can actually edit it and write code inside it, but when it's blue, I can't.
Image Source: Screenshot of Jupyter notebook, Edlitera
When all the cells in my notebook are blue, however, I can do other things, like insert other cells in my notebook or delete cells from my notebook.
To insert a new cell in a notebook, simply press the Esc key, to make sure there are no green cells, and then the B key on your keyboard to insert a new cell below (B for below), or press A to insert a new cell above (A for above). You will notice that generally only one cell is blue (selected) at a time, just how only one cell is green (meaning its ready to edit) at a time.
Image Source: Screenshot of Jupyter notebook, Edlitera
There you go, a new cell was added below the previous one. If I want to delete this cell, I will first press Escape, and then press D twice. Doing this will delete all the cells that were blue (selected).
I use these keyboard shortcuts a lot, but if they're a bit hard to figure out in the beginning, you can also use the menu.
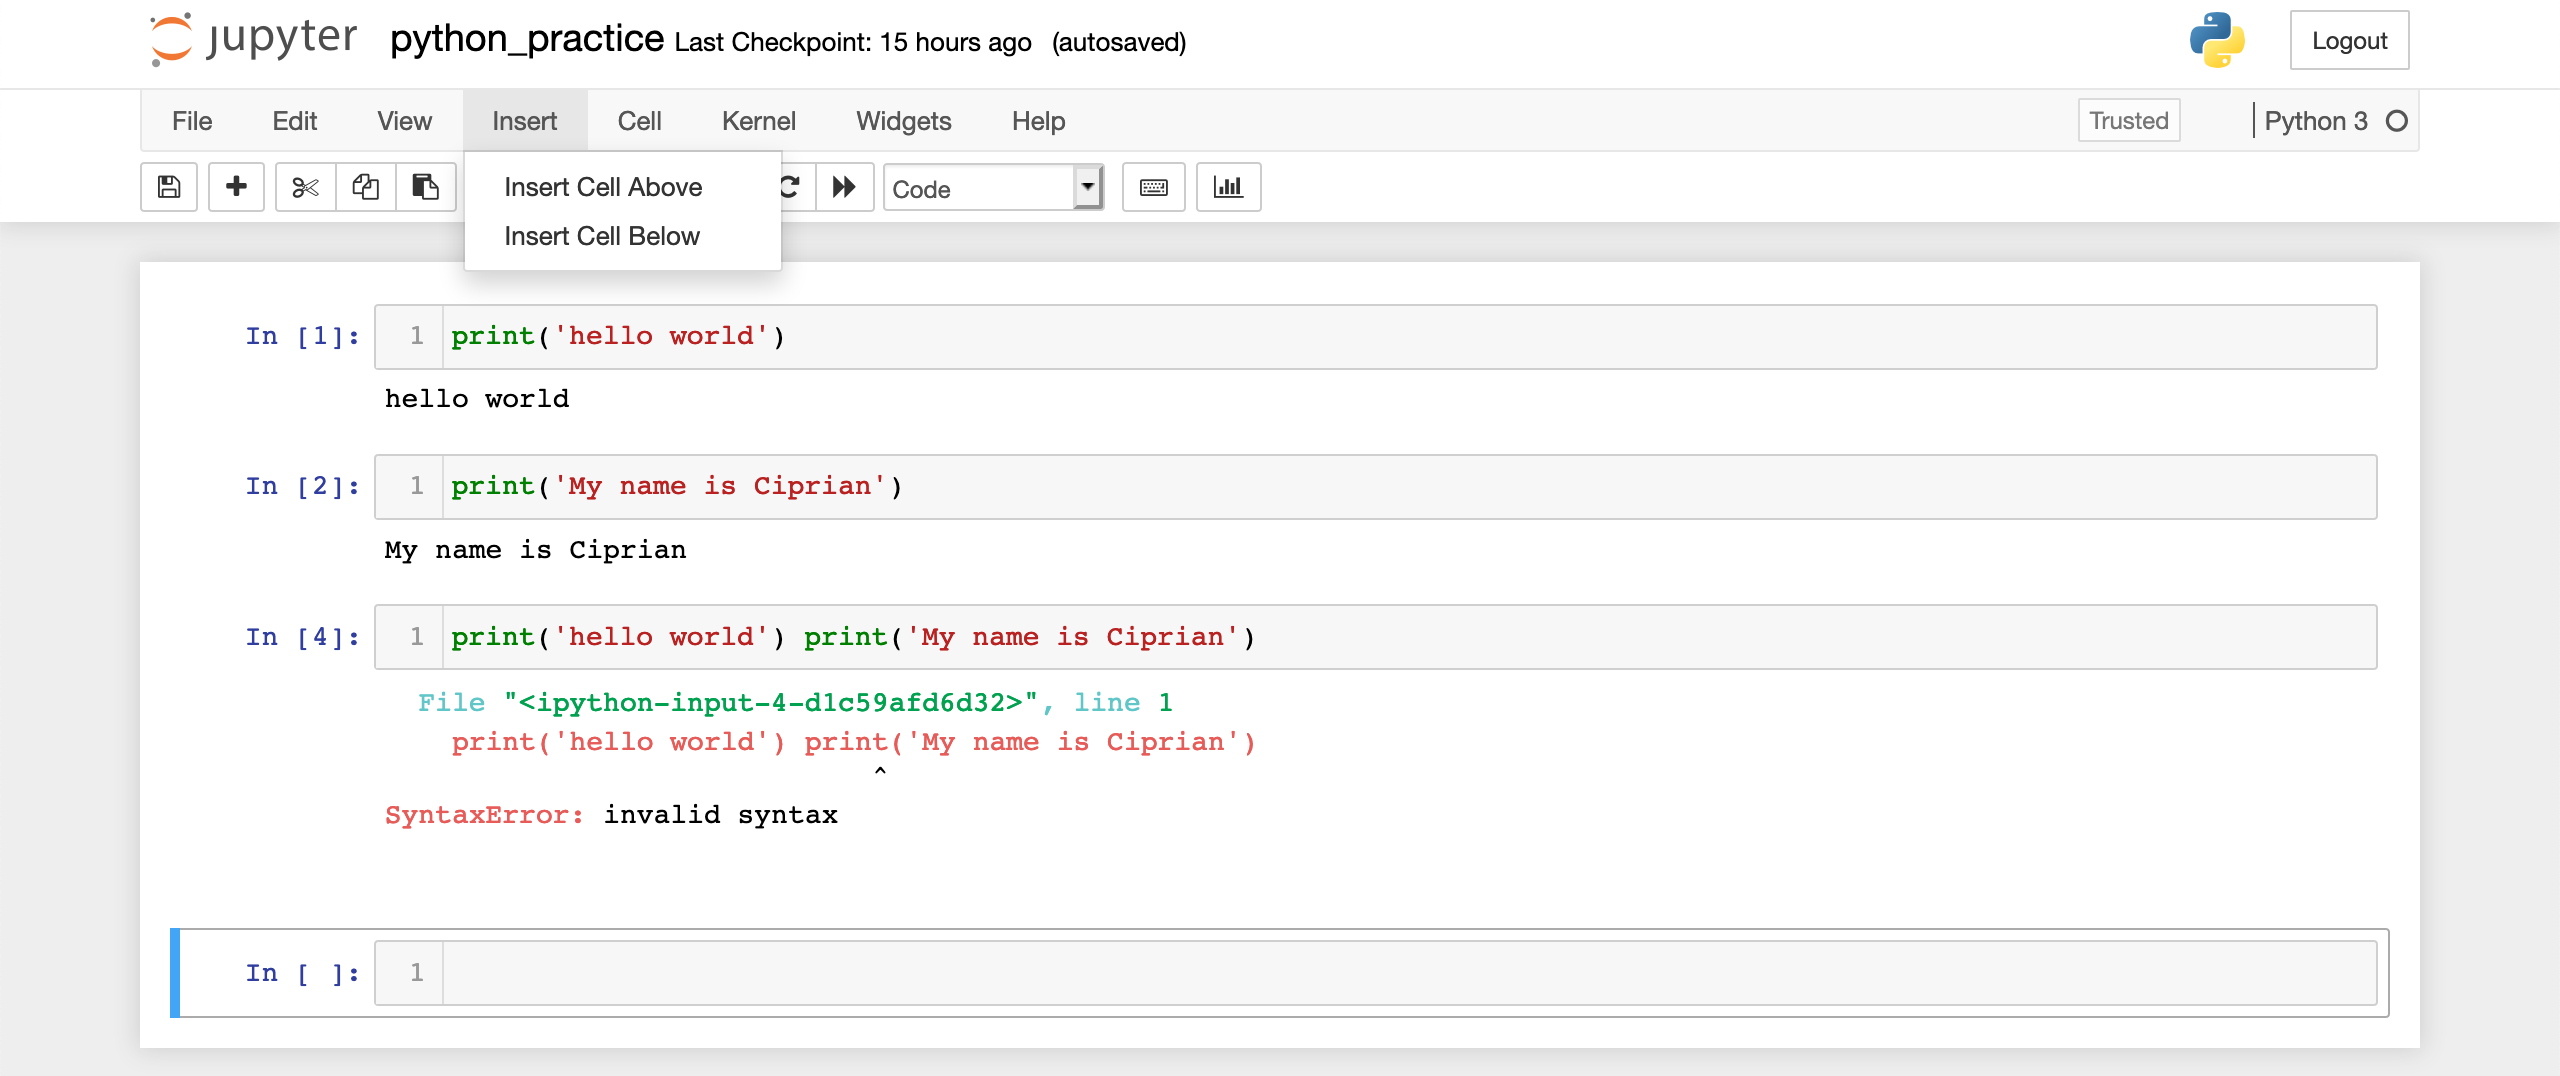
To add a new cell below the currently selected (blue) cell, you can use the Insert > Insert Cell Below menu. To add a new cell above the currently selected (blue) cell, you can use the Insert > Insert Cell Above menu.
Image Source: Screenshot of Jupyter notebook, Edlitera
If you are following along, take a break from reading this article and practice adding and removing cells.
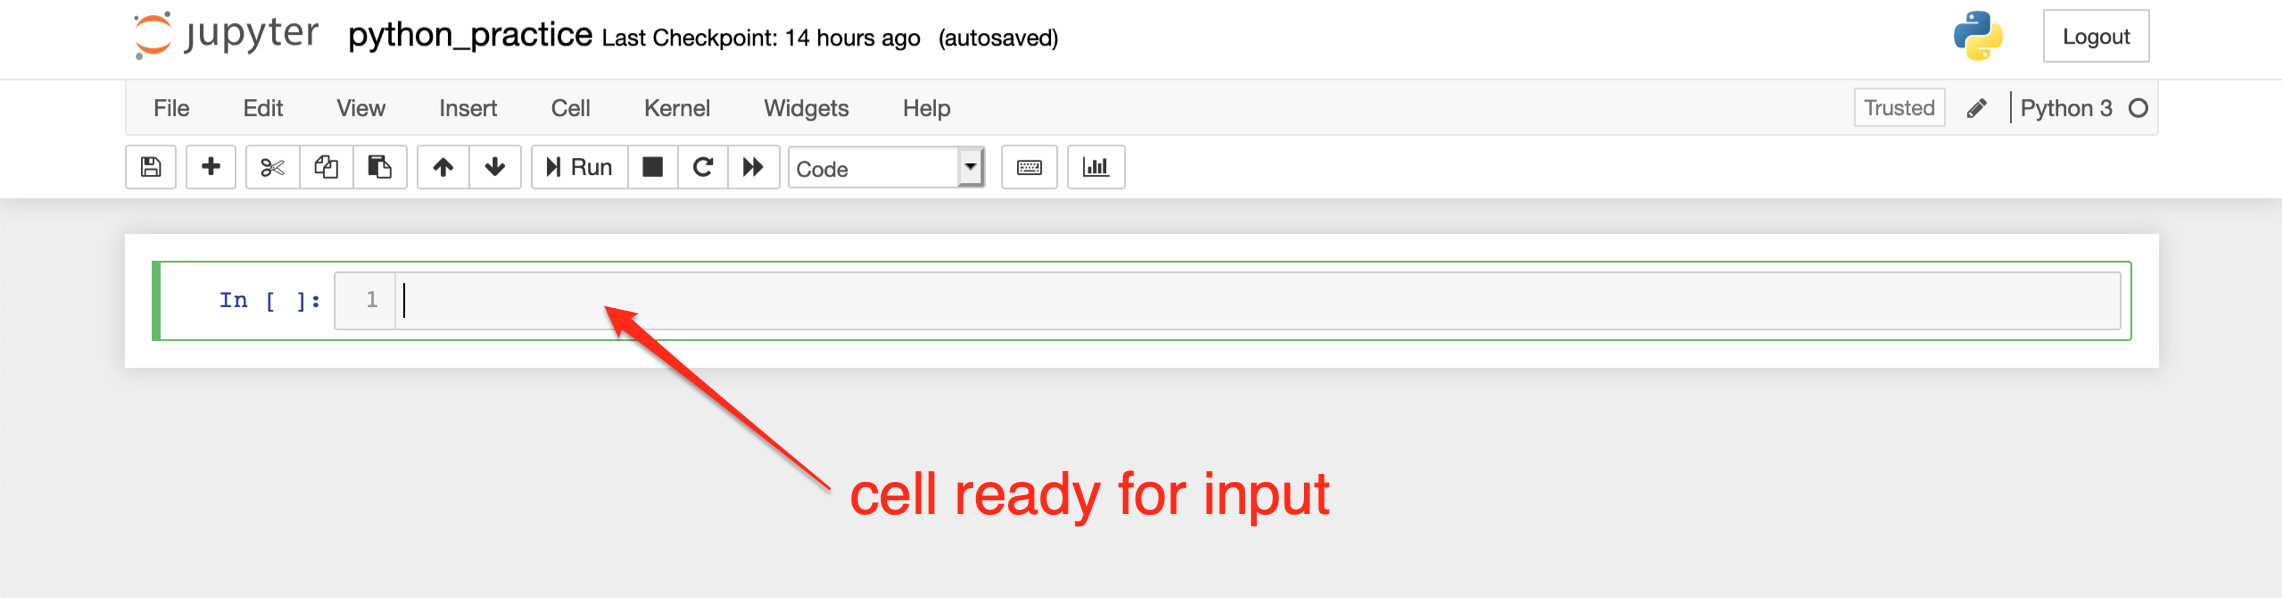
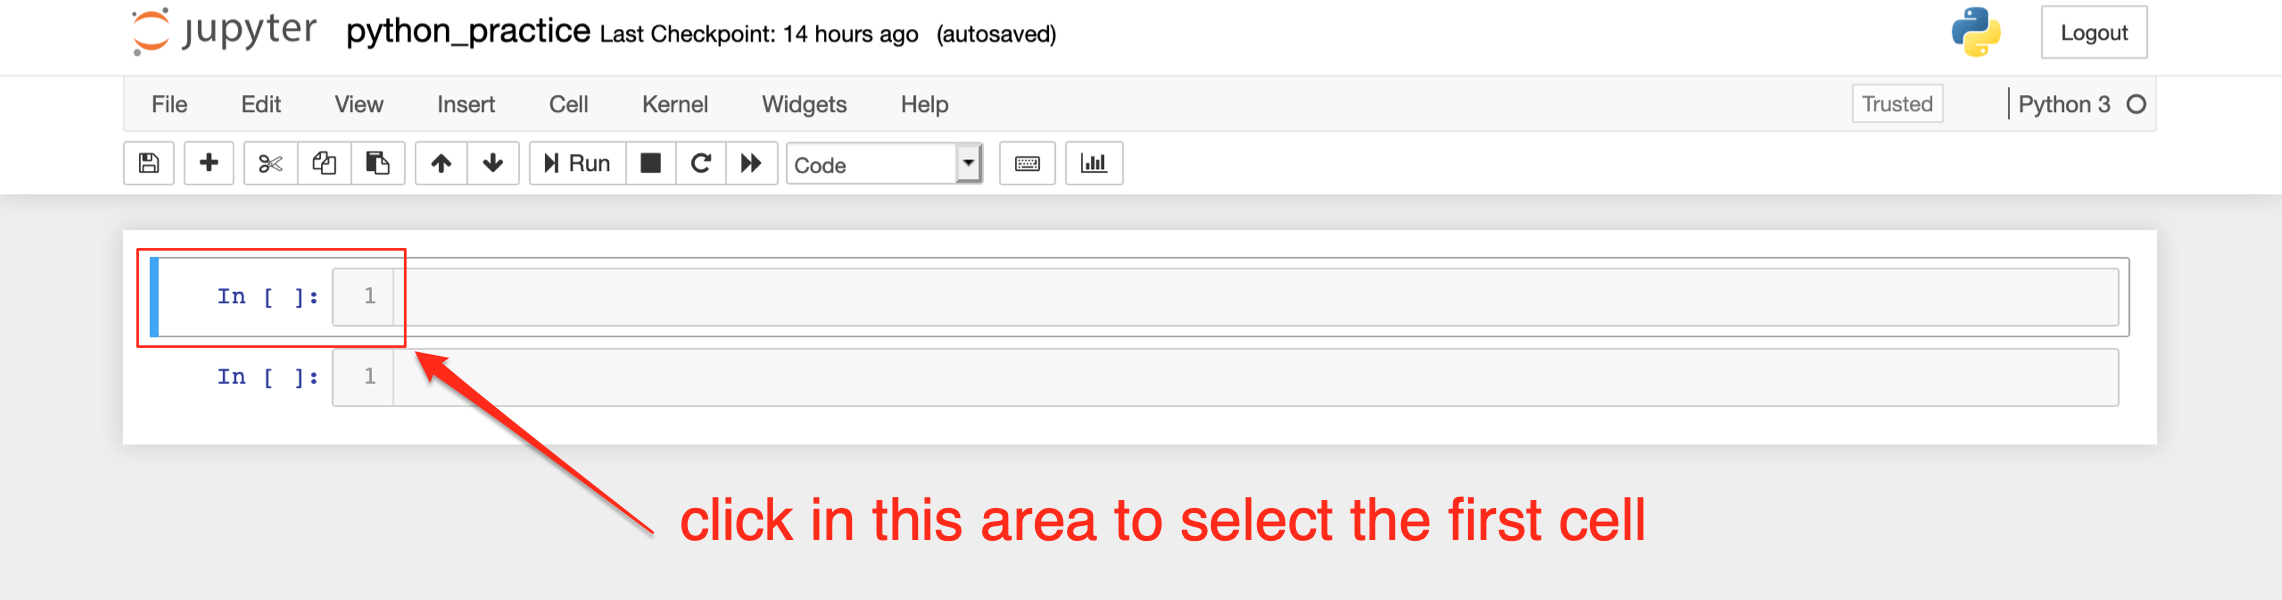
Another useful thing to know is how to select a cell. You can select a cell (make it blue) by clicking in the area shown in the screenshot below.
Note that clicking inside the cell will make it green (ready for edit).
Image Source: Screenshot of Jupyter notebook, Edlitera
Article continues below
Want to learn more? Check out some of our courses:
How to Write and Run Code in Your Jupyter Notebook
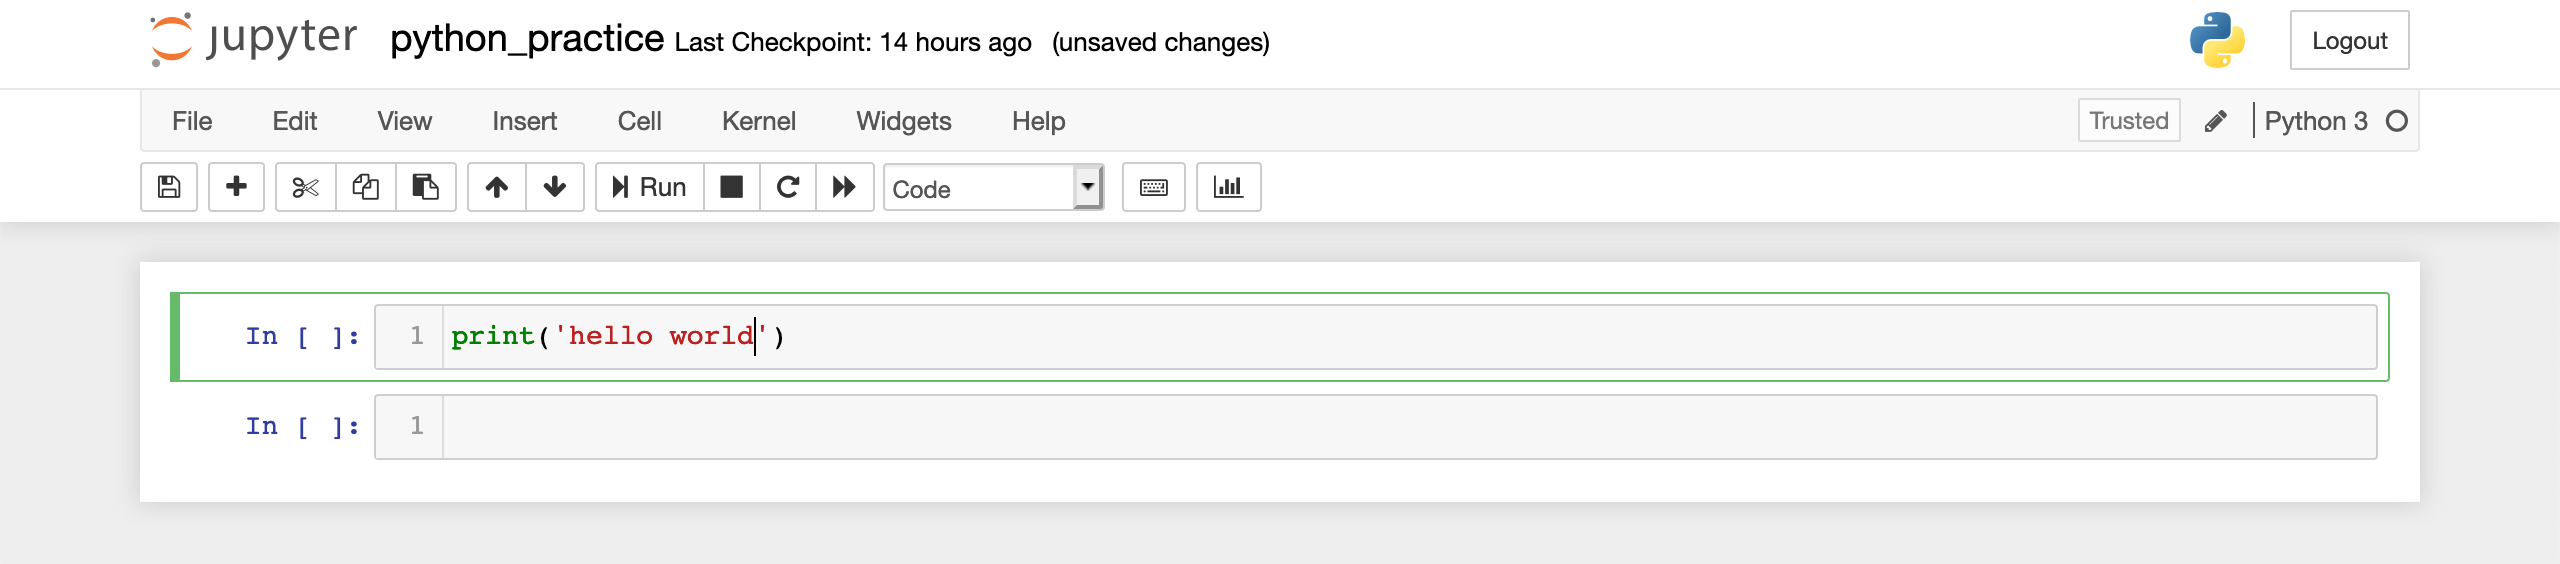
Now you know how to insert, delete, and select cells. It's time to write some code in your Jupyter notebook. Let's first click inside the first cell and write code that prints the text 'hello world.' Again, that's just:
print('hello world')Image Source: Screenshot of Jupyter notebook, Edlitera
You can already see that the code has the nice syntax highlighting that you might be familiar with from using a code editor.
But how do we run this code? If you were in the Python command line, as I discussed in my article on how to write and run Python code, you just type Enter. If you type Enter inside that cell, it will just add a new row inside it. So instead, what I need to type is Shift + Enter at the same time. Alternatively, you can click the Run button on the Header (in my screenshot, it's right under the Cell menu).
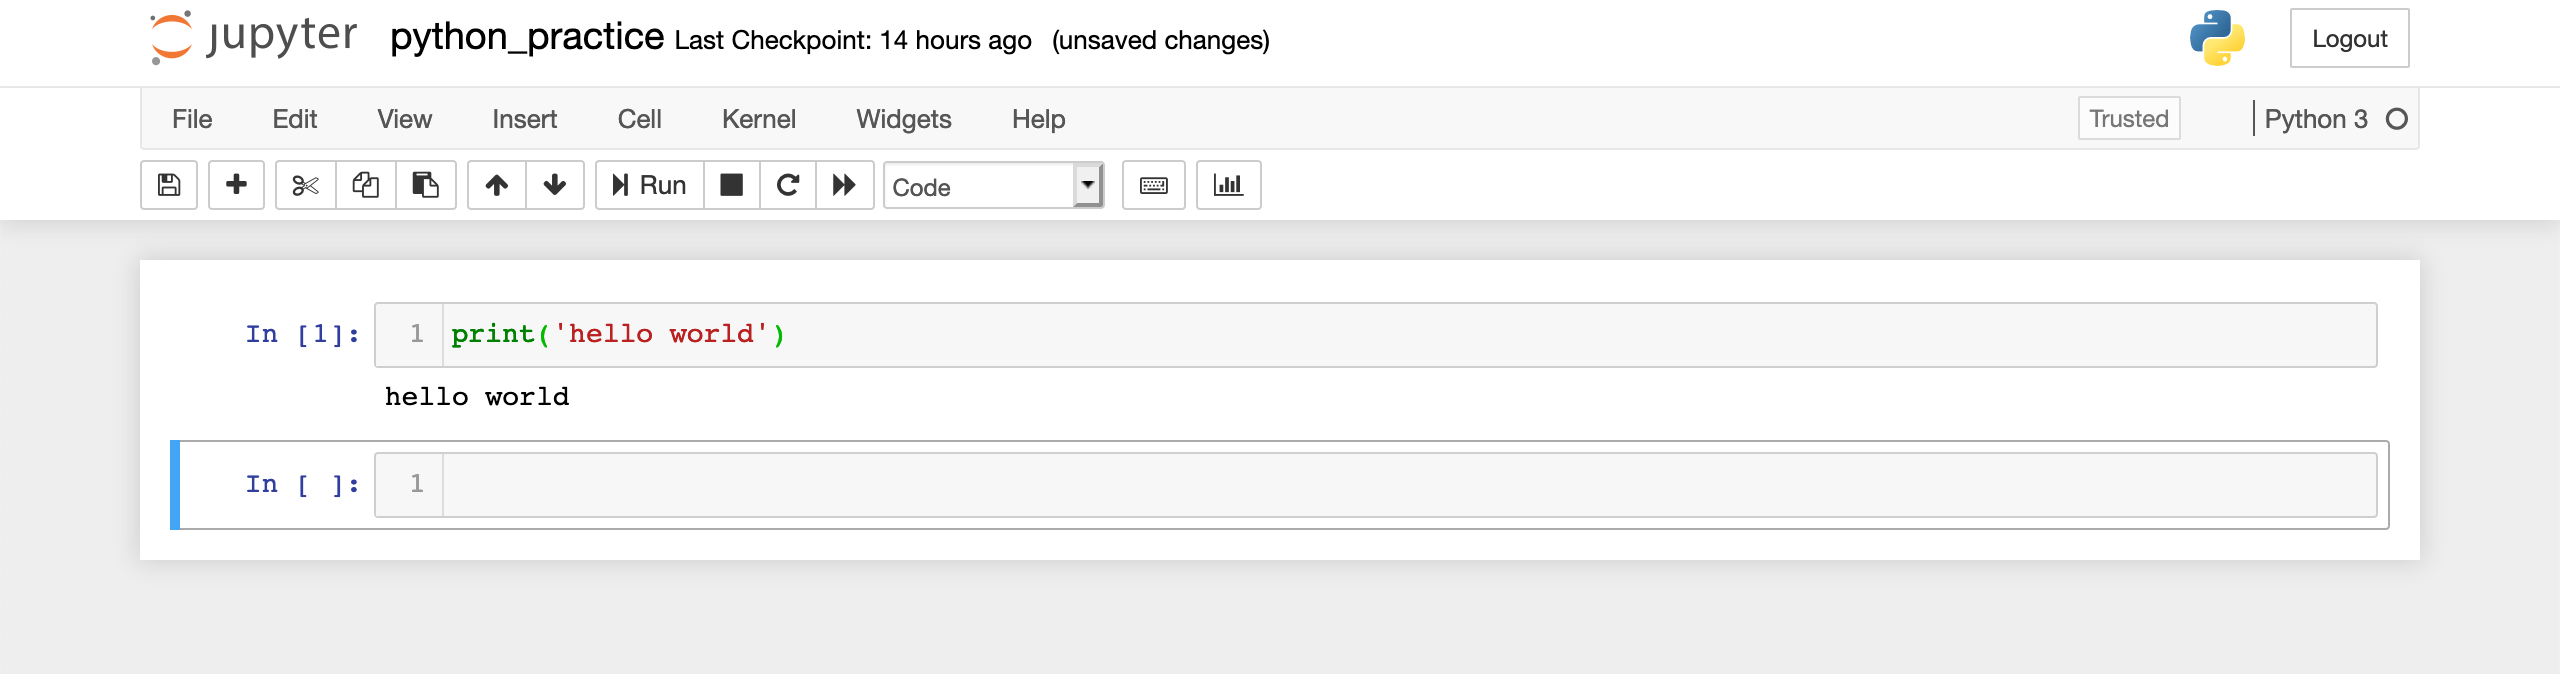
As soon as you type Shift + Enter (or click the Run button), your code gets executed and the result is printed out immediately underneath the cell that contains the code. You can see here my 'hello world' phrase:
Image Source: Screenshot of Jupyter notebook, Edlitera
More than that, Jupyter is being extra helpful and, if you don't have an empty cell underneath (I already had one), it will automatically add a new cell below, so I can quickly write some more code.
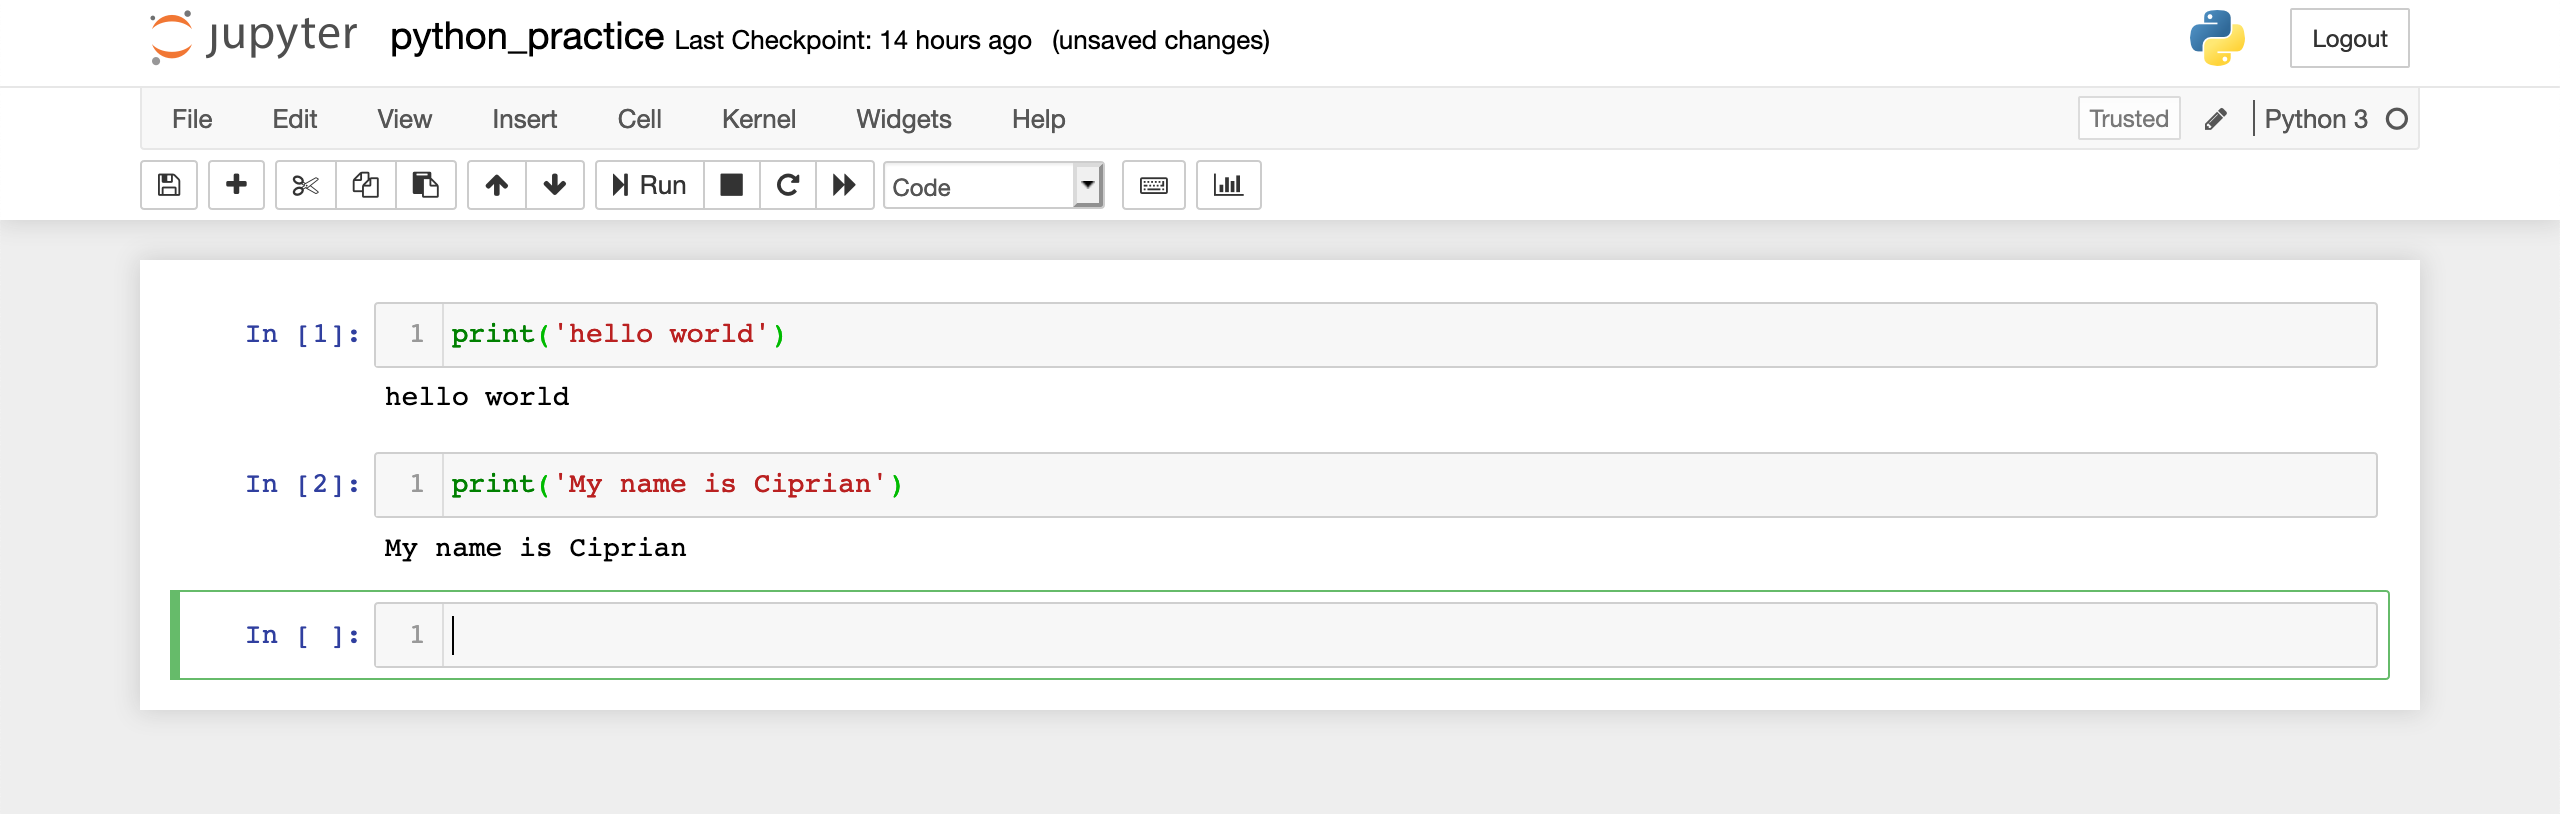
Let's write a different program. Instead of 'hello world' I'll print my name. First, I'll make sure the cell is green by clicking inside it, and then I'll type:
print('My name is Ciprian')And again, I'll type Shift + Enter and again, my code gets executed and the result is printed:
Image Source: Screenshot of Jupyter notebook, Edlitera
That's pretty cool.
As you can see, Jupyter notebook combines the ease of writing and immediately executing code that you saw when I used the Python command line, with the benefits of having a text editor. In this blog series, I will mostly be using Jupyter notebooks precisely because of these great benefits.
- Intro to Programming: How to Use the Command Line (Part 1)
- NOTE: I would not be thorough if I didn't point out that, for most programming tasks, code editors are preferred. There are several reasons for that: Complex programs usually involve many files and you need an editor that can make it easy to search and edit code across multiple files. The Jupyter notebook interface, while very forgiving for the beginner, is a bit annoying for the more advanced user because mixing the code and its output can create confusion. More complex programs cannot be run piecemeal, so the benefit of executing each code line at a time is lost.
This being said, Jupyter notebooks are excellent (and generally preferred to code editors) for data analysis, data science and some machine learning tasks.
What Types of Cells Are in a Jupyter Notebook?
So far I have only written Python code inside the Jupyter notebook cells. But there is one more type of content you can add inside a Jupyter cell: markdown. If you are not familiar with it, this markdown tutorial is an excellent place to learn more about it. In short, markdown is a way to write formatted text.
To understand why having the ability to add formatted text inside a Jupyter notebook is useful, you have to keep in mind the heritage of Jupyter notebooks. Notebook interfaces are actually rather old. They originated in the 1980s with the Mathematica software, and their main purpose was to make technical computing easier. Initially mostly used by scientists, they served as a kind of digital lab notes. In a lab note, you have results of computations, but you also have lots of explanatory text.
Today, data analysts and data scientists still need to explain in their Jupyter notebooks what their hypotheses are, why they took a certain approach to their analysis, and what their results mean. This is mostly text. To be able to insert this text next to code, you need cells that can display formatted text. Hence, the support for markdown in Jupyter notebooks.
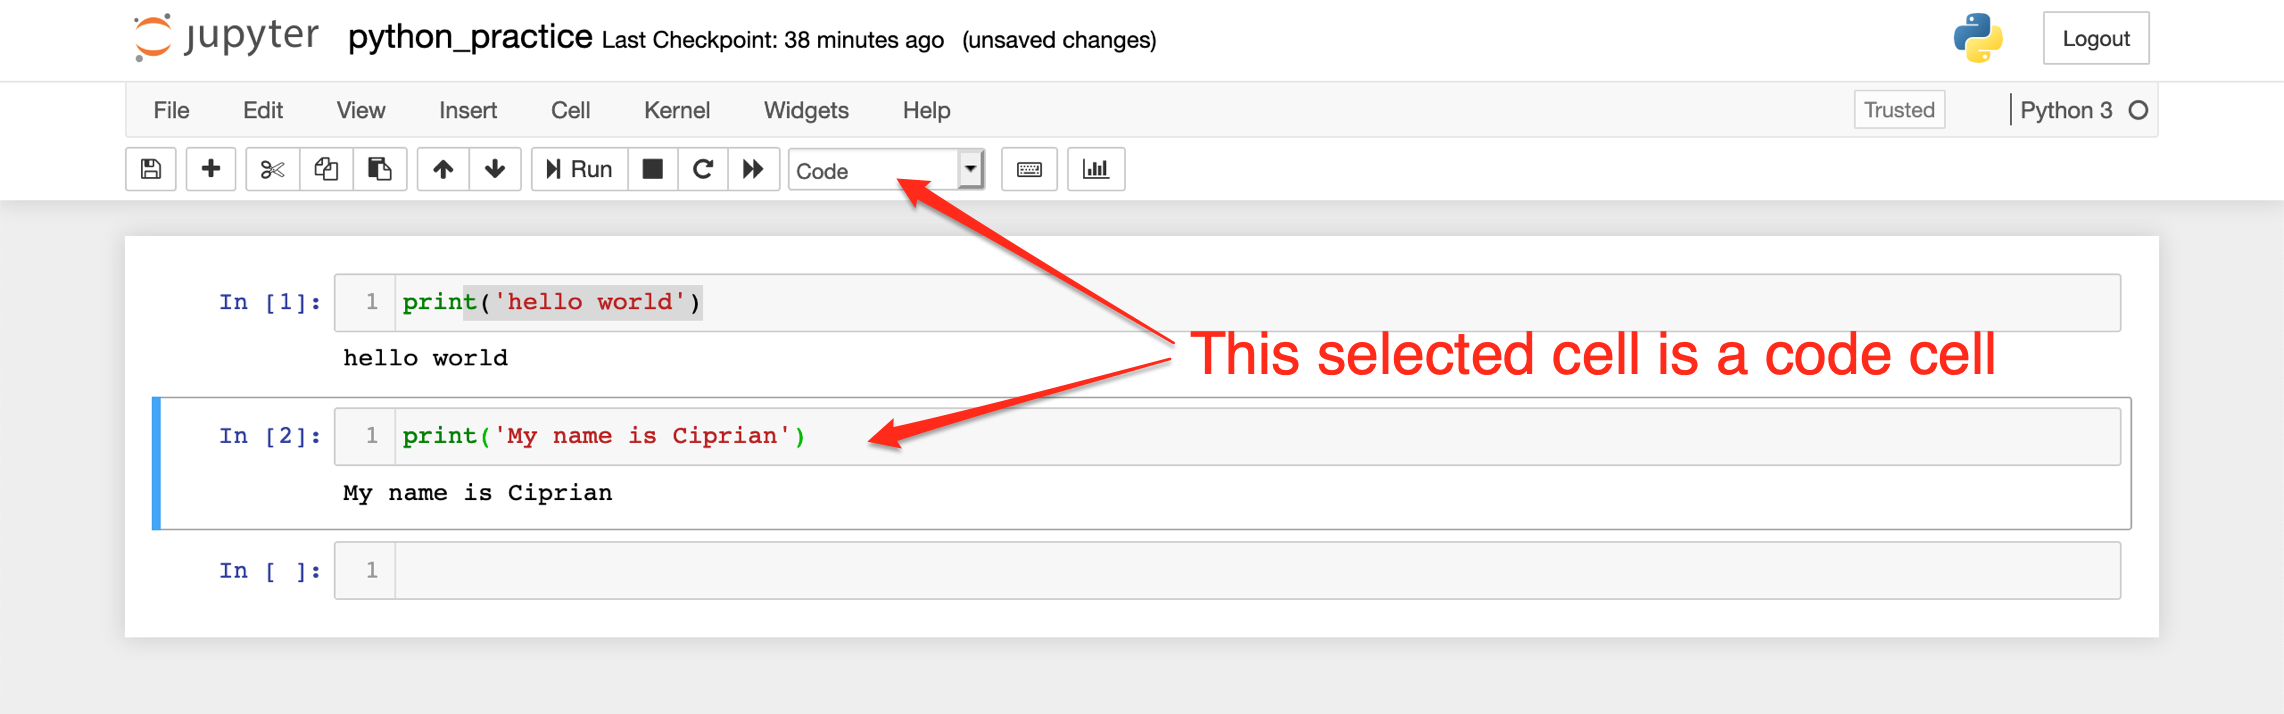
By default, any given cell in a Jupyter notebook is a code cell. You can tell the type of a cell by looking at the cell type dropdown menu:
Image Source: Screenshot of Jupyter notebook, Edlitera
Remember, a code cell contains code that can be executed. A markdown cell contains text that can be displayed.
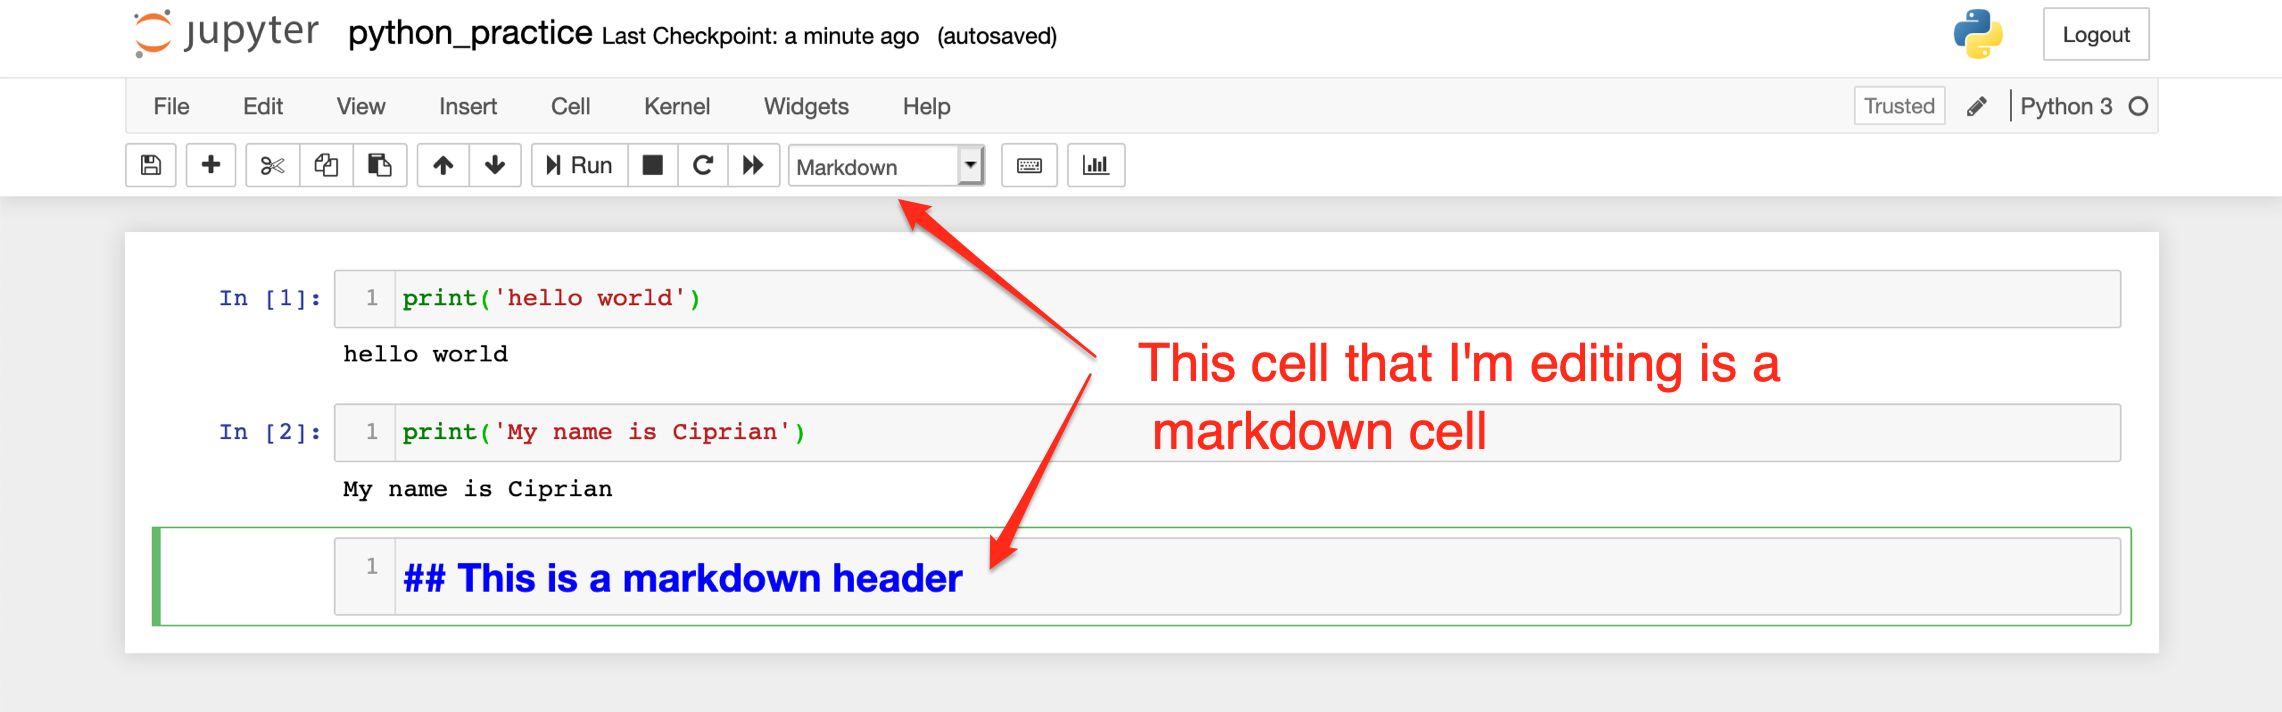
Let's make the empty cell at the bottom of the notebook a markdown cell and add some text:
Image Source: Screenshot of Jupyter notebook, Edlitera
Notice how I had to change the cell type to markdown in the dropdown menu in the header. If I now press Shift + Enter, instead of running code, the Jupyter notebook will simply display the formatted markdown.
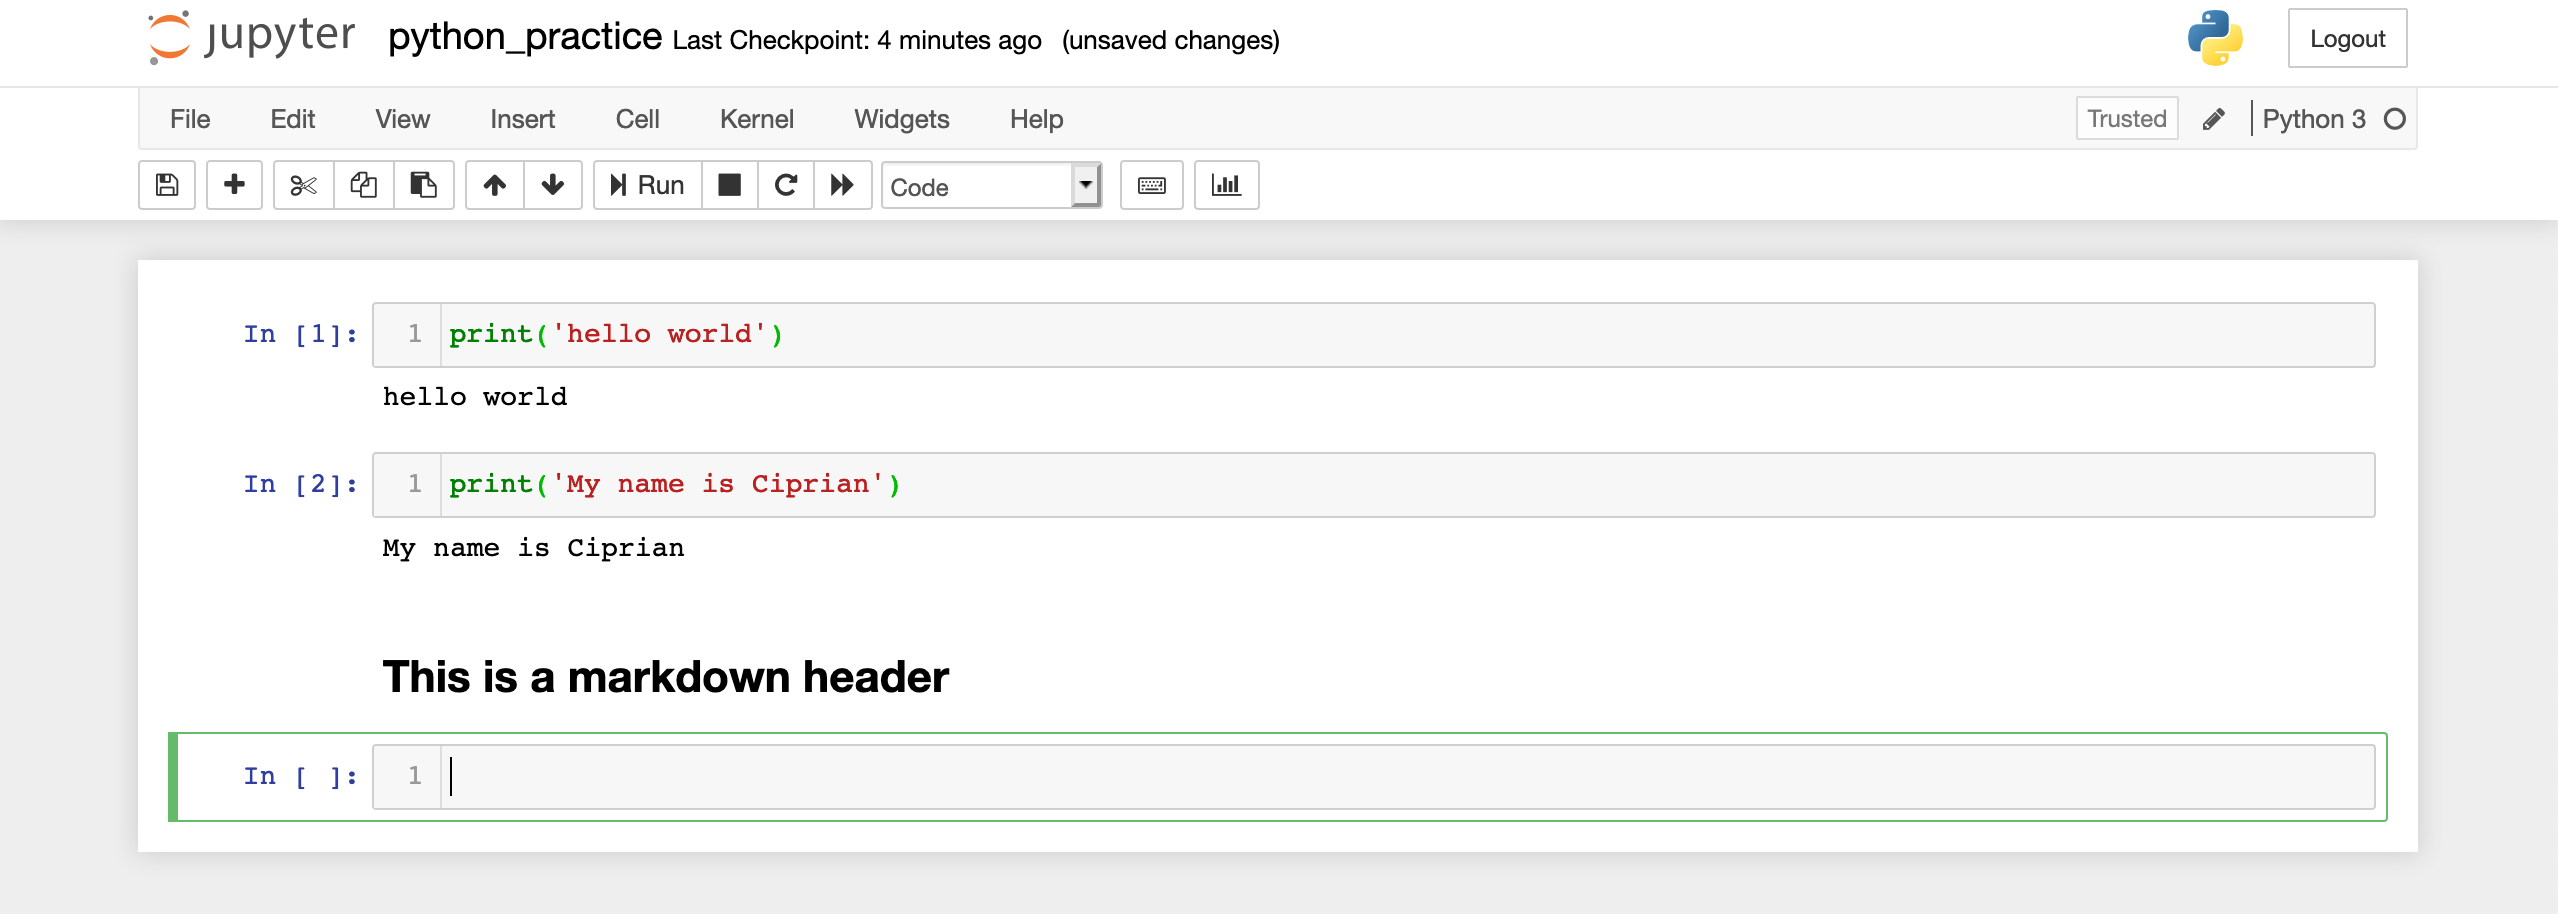
The two # symbols indicate a type of header in markdown:
Image Source: Screenshot of Jupyter notebook, Edlitera
Using markdown, you can:
- Write headers
- Write Paragraphs
- Include links to other websites
- Embed images or other media
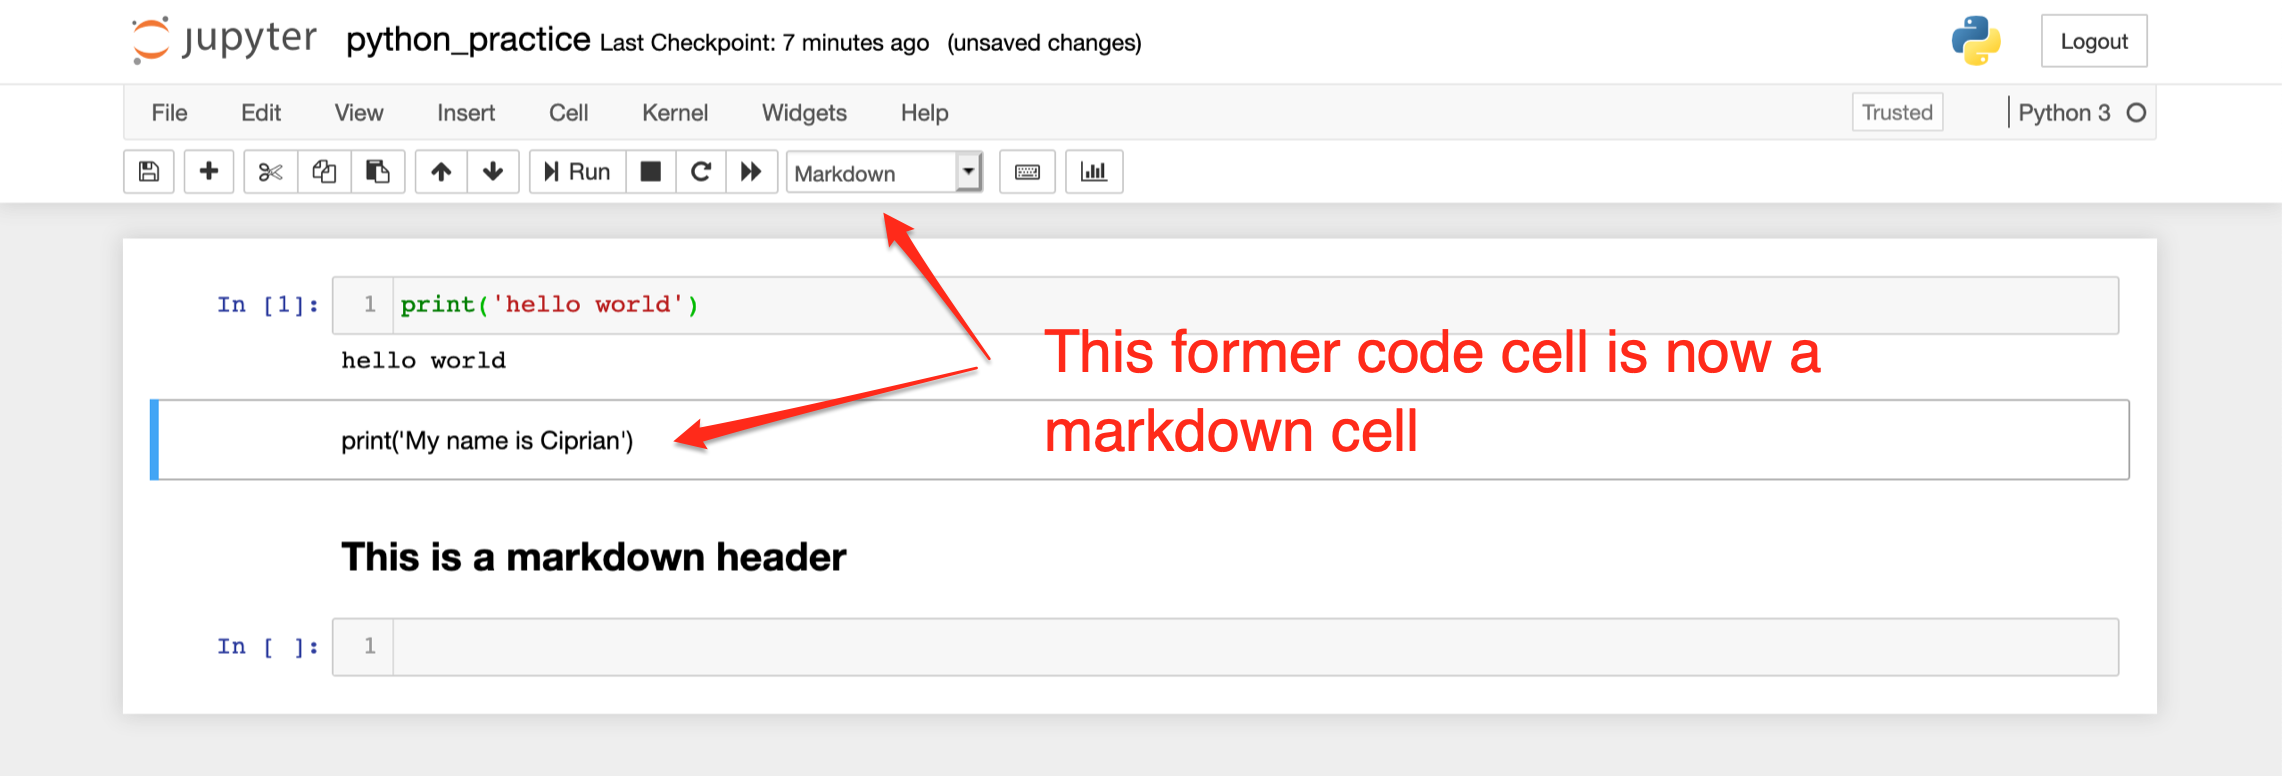
Gotcha #1: what if you accidentally change the type of a cell that has code to markdown? Well, rather than interpreting it as code, the Jupyter notebook is going to assume it's just markdown text. Not only that, but you'll also lose the syntax highlighting, and if you don't pay attention, especially in the beginning, you'll be wondering why your code is not running.
Image Source: Screenshot of Jupyter notebook, Edlitera
Gotcha #2: is the corollary of the first one. If you have a cell containing markdown text and you change the cell type to code, when you try to run that cell you might get syntax errors because the text is interpreted as code, when in fact it's just plain English. So be very careful with the cell type and make sure you check it if you run into these issues!
How to Run Multiple Lines of Code at Once on Jupyter Notebook
I want to show you one more thing that makes Jupyter notebook quite powerful compared to the Python command line. You can actually include multiple lines of code in one cell. Let's say I want to write some code that prints 'hello world' and then on a new line 'My name is Ciprian.' I could do that in two different cells, but that takes up quite a bit of space and besides, I want those two phrases to show up one next to the other. Jupyter notebook allows me to do that.
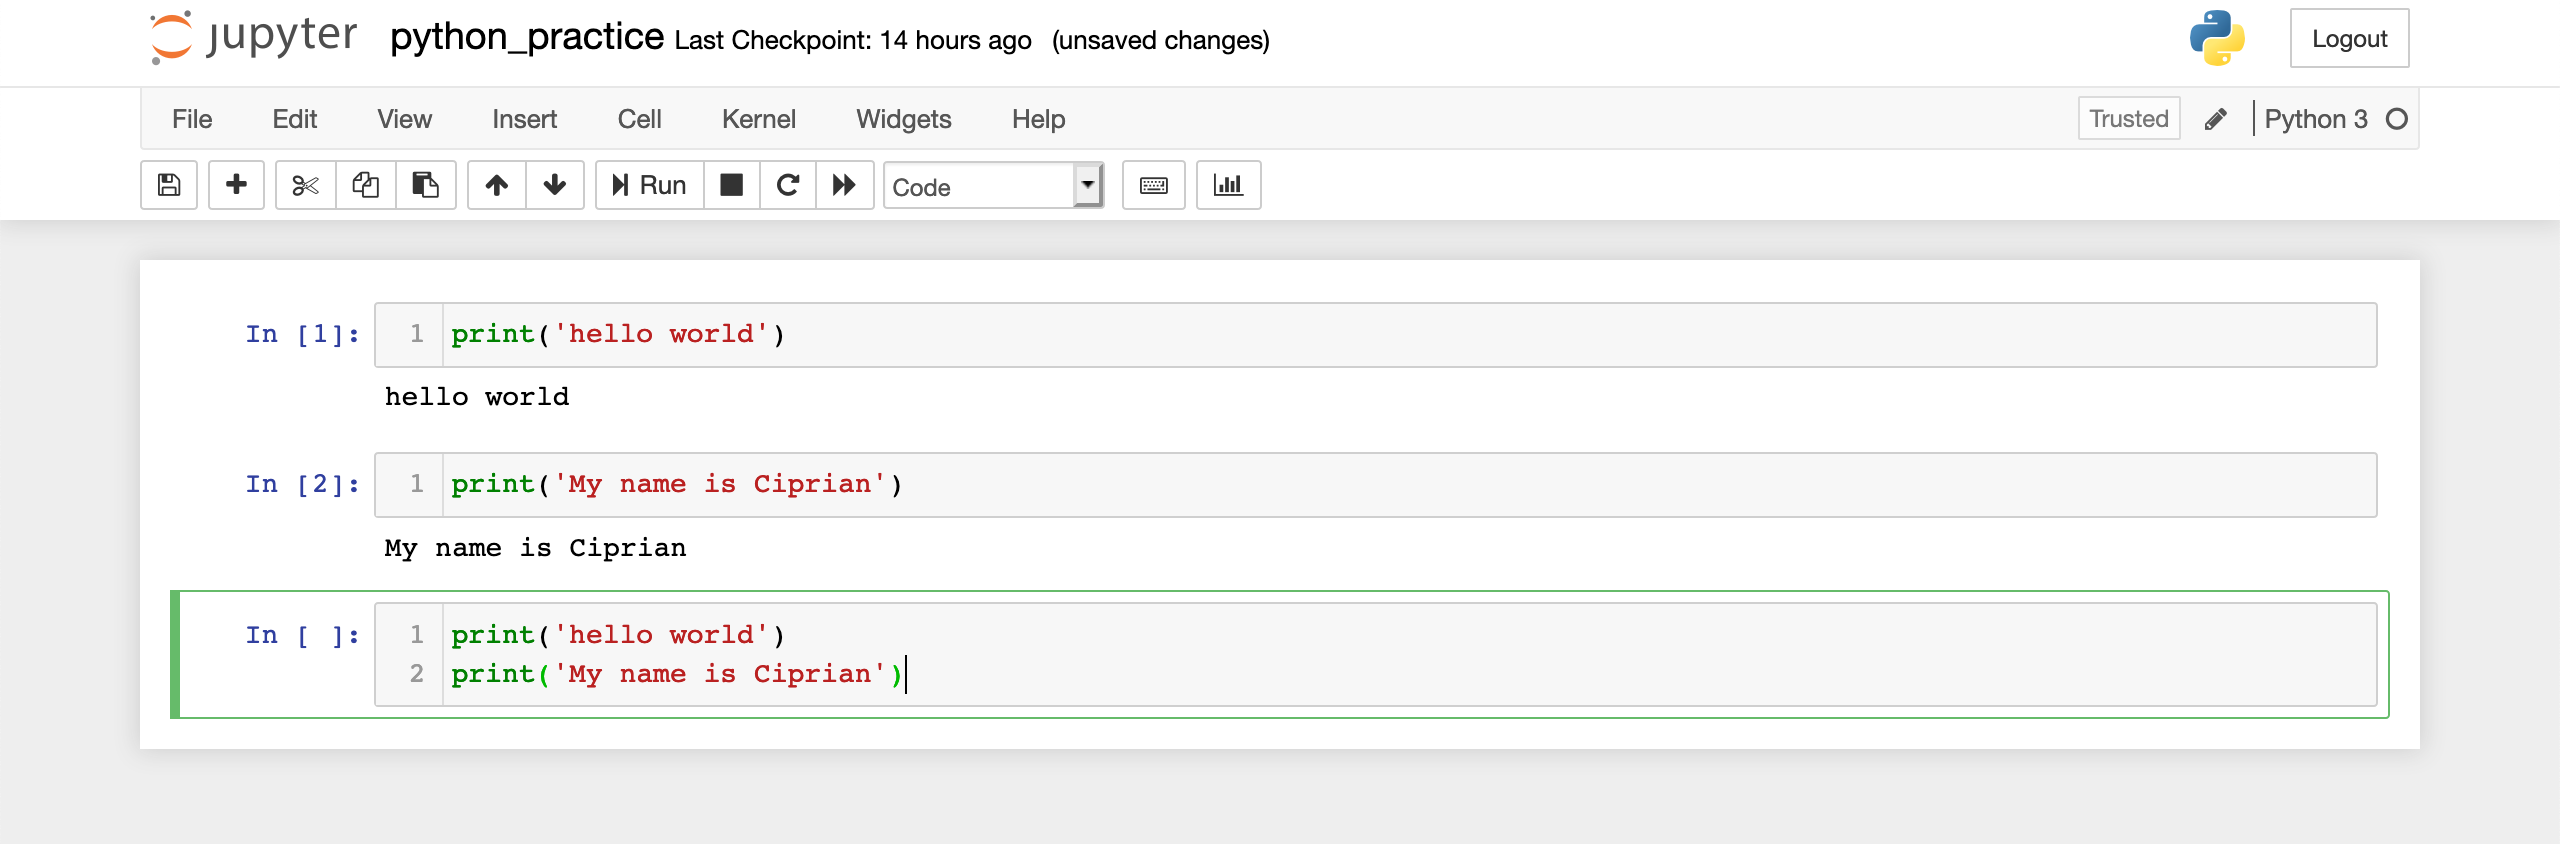
Let me show you how: first, I click inside an empty cell to make sure it's green and now I type print('hello world') and then hit Enter. Once I do that, I will still be inside the same cell, just on a new line, so here, I can write print('My name is Ciprian').
Image Source: Screenshot of Jupyter notebook, Edlitera
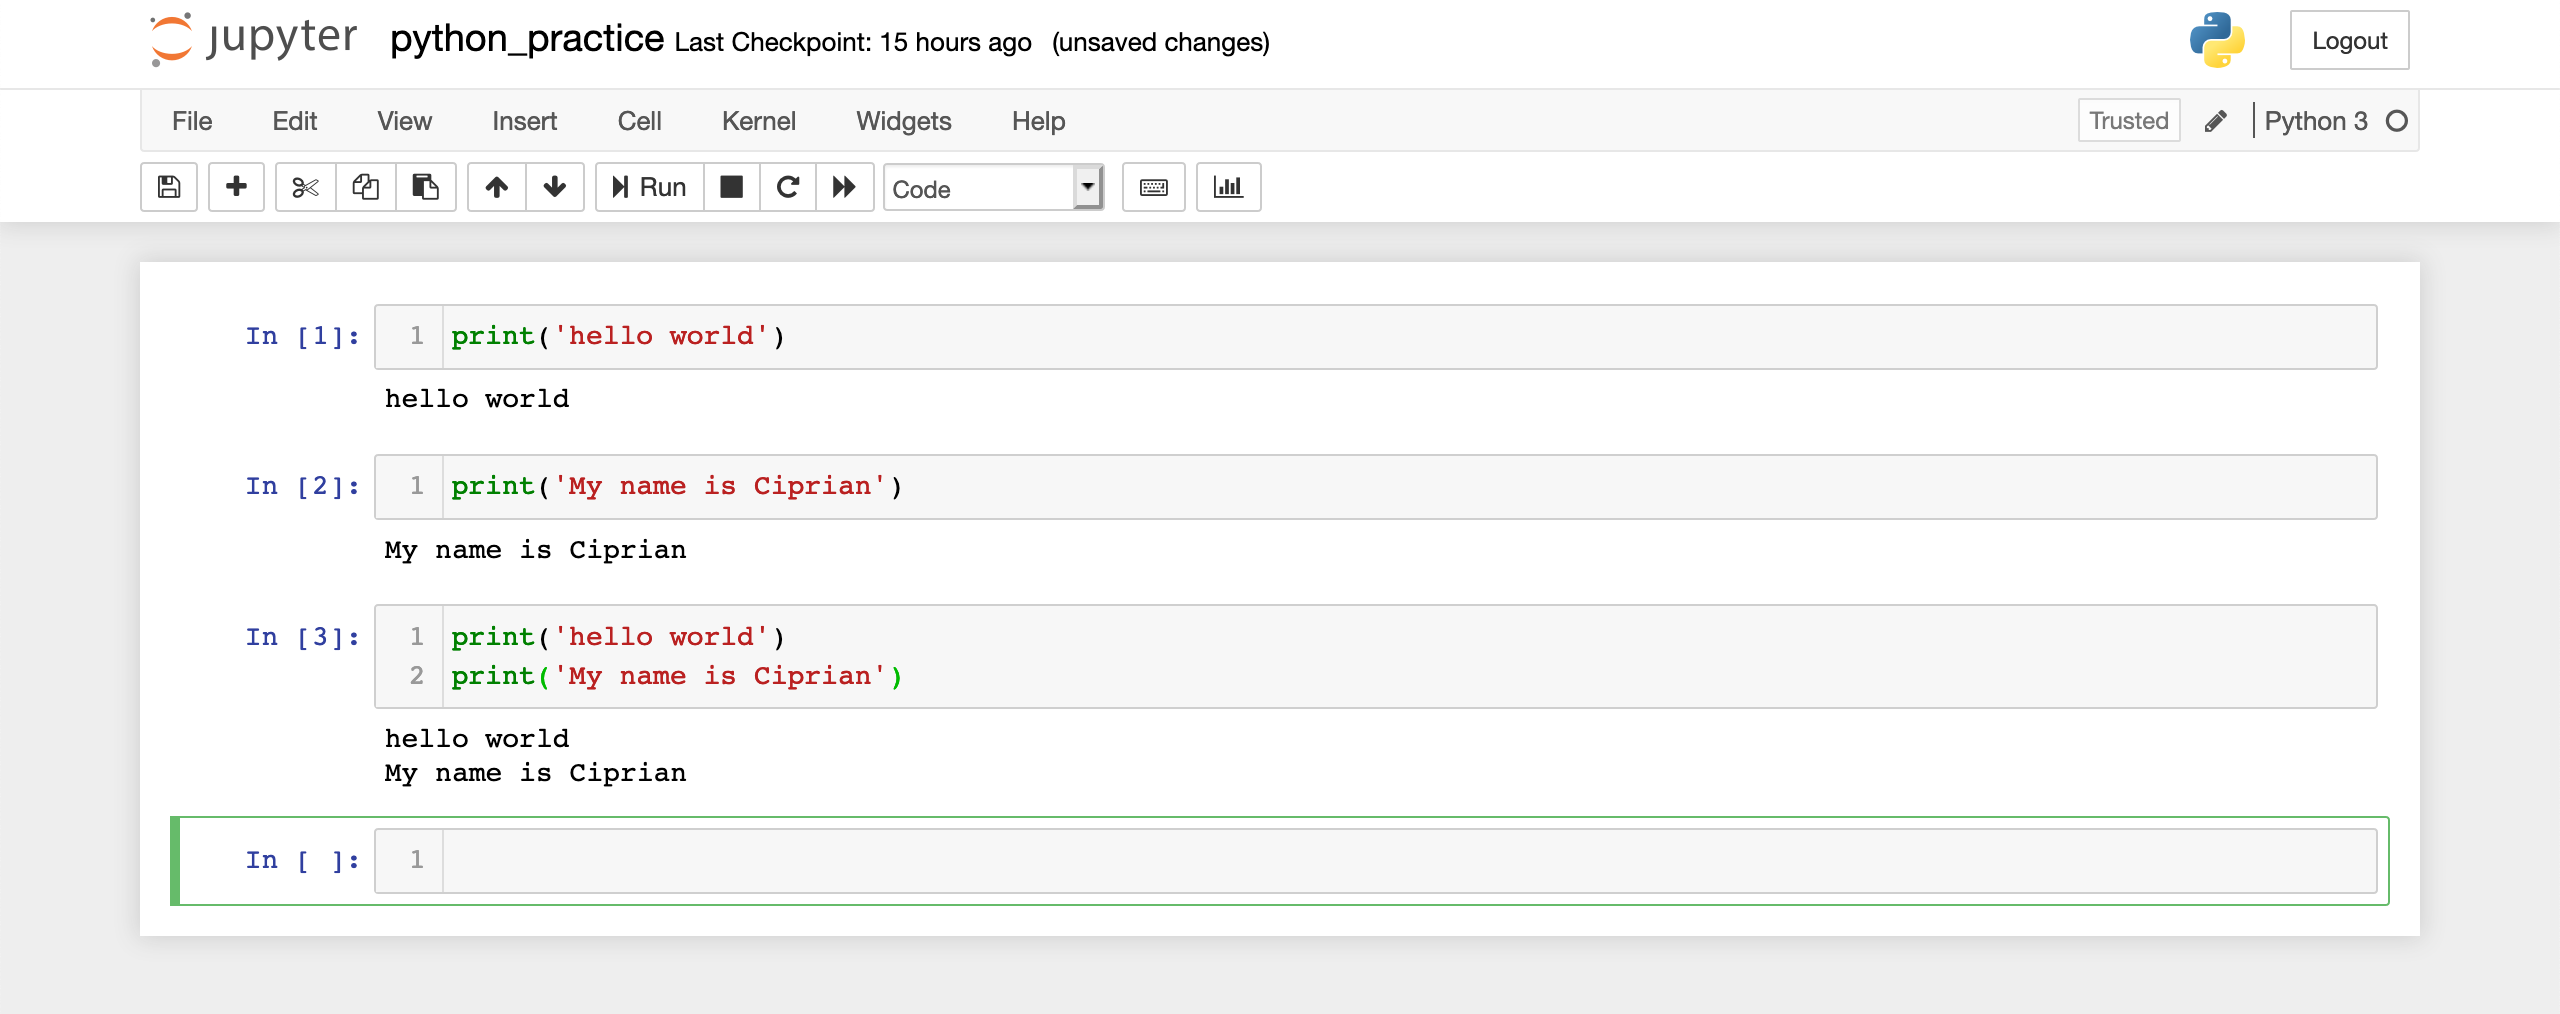
Now, I type Shift and Enter to run this code and just like that, the Jupyter notebook sends these two lines of code to the Jupyter server, which runs them and returns the response (the text to print on the screen), which the Jupyter notebook then shows on the screen:
Image Source: Screenshot of Jupyter notebook, Edlitera
- NOTE: You may wonder why you can't write the two phrases on the same line. I'm glad you asked, because this is a very important first lesson when it comes to writing programs. In Python, each command, or instruction, if you will, must be on a separate line. That's simply because the interpreter is not complex enough to understand what you mean when you write multiple commands on the same line. If you don't believe me, try it out.
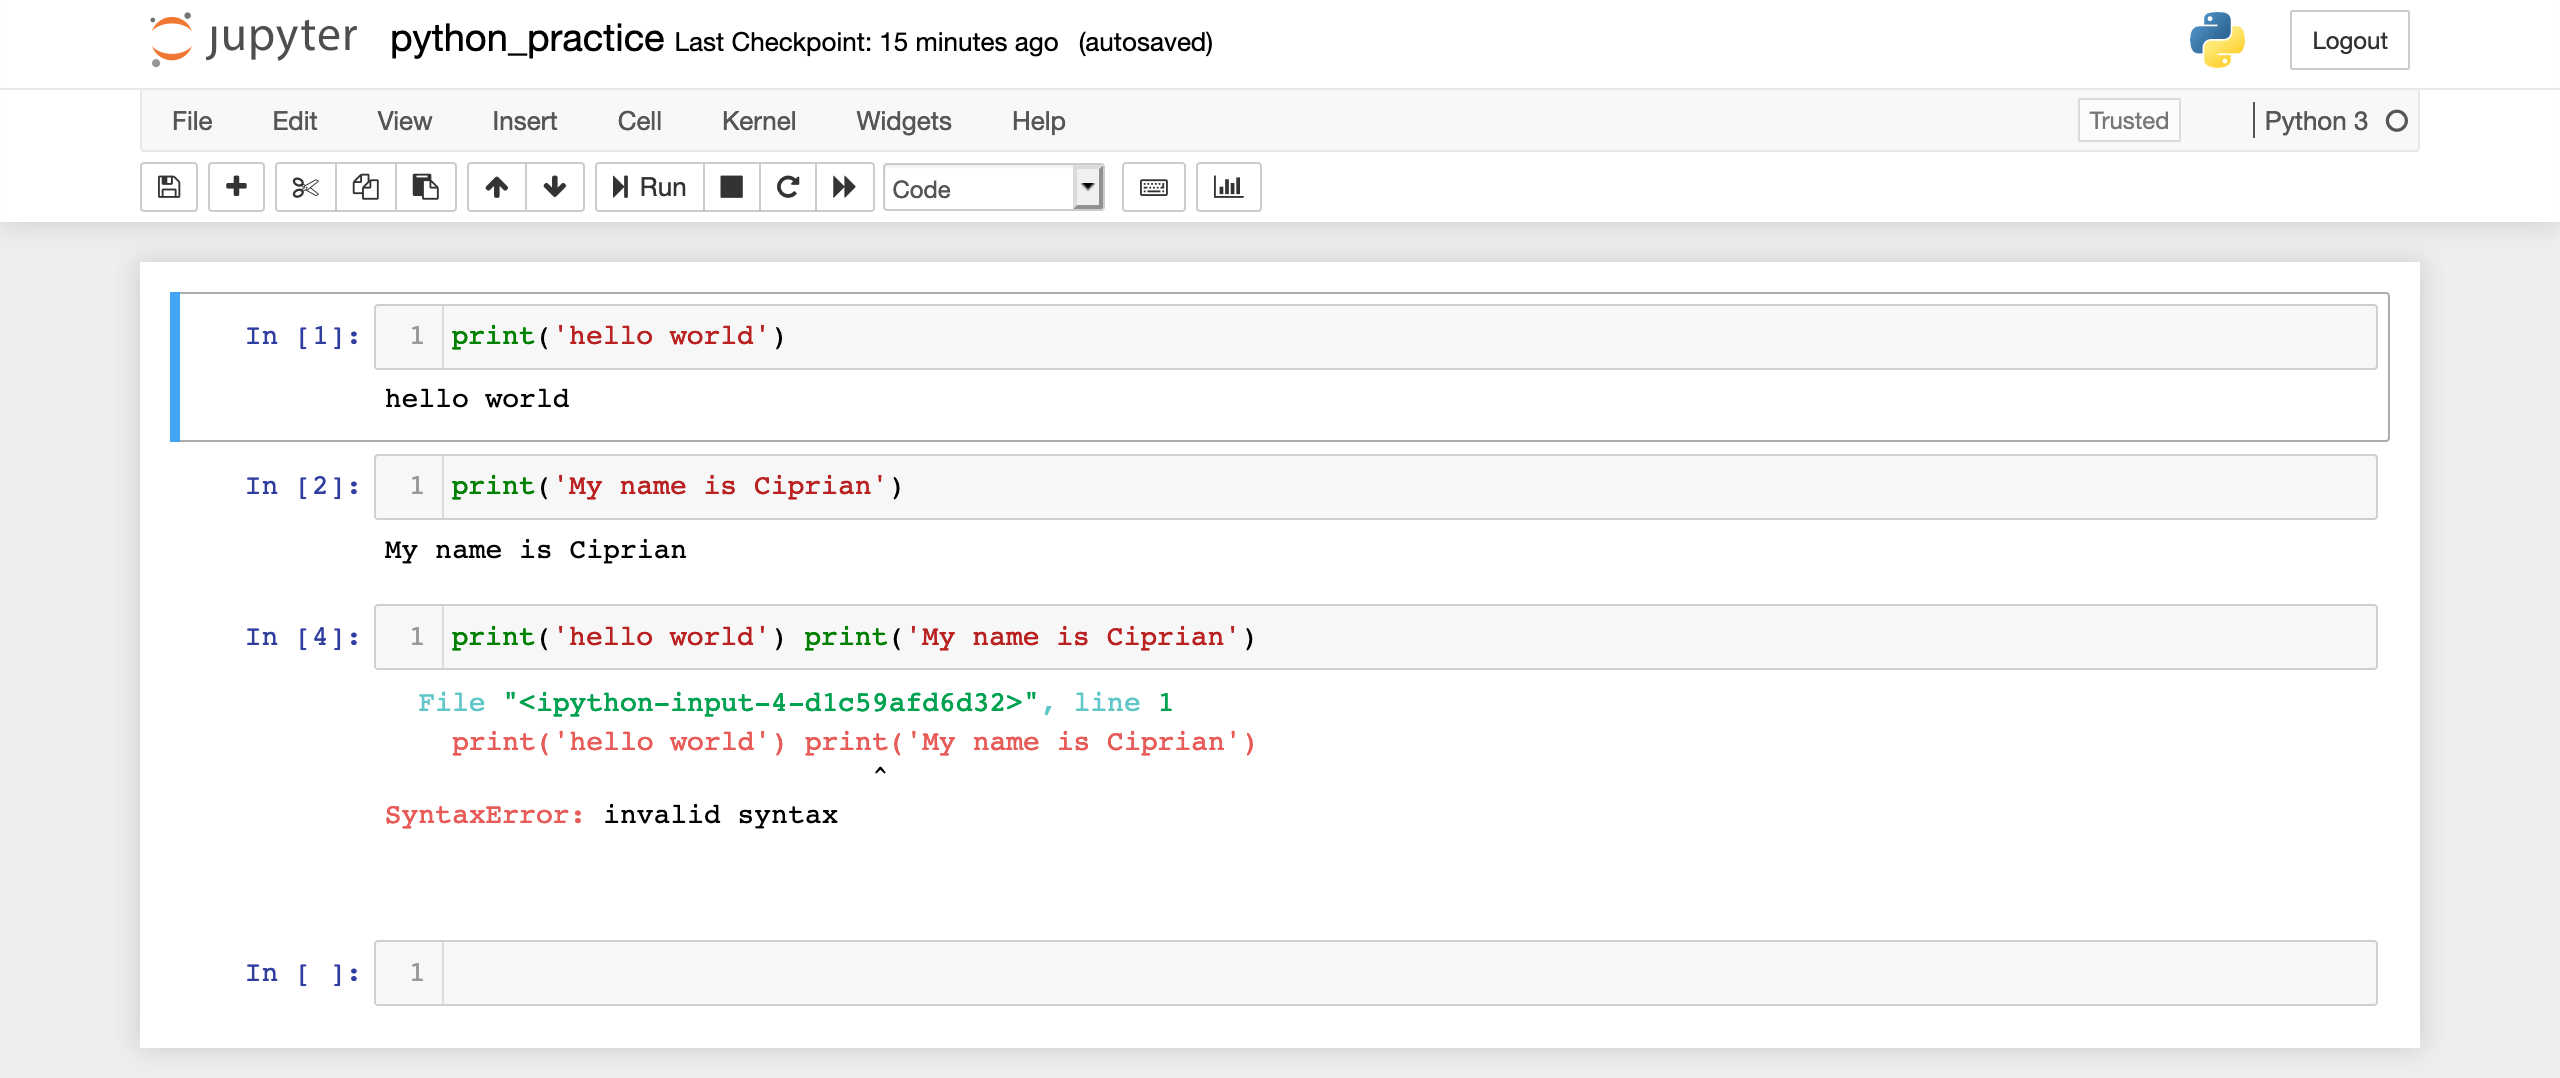
Let's edit the code cell above and write the following code:
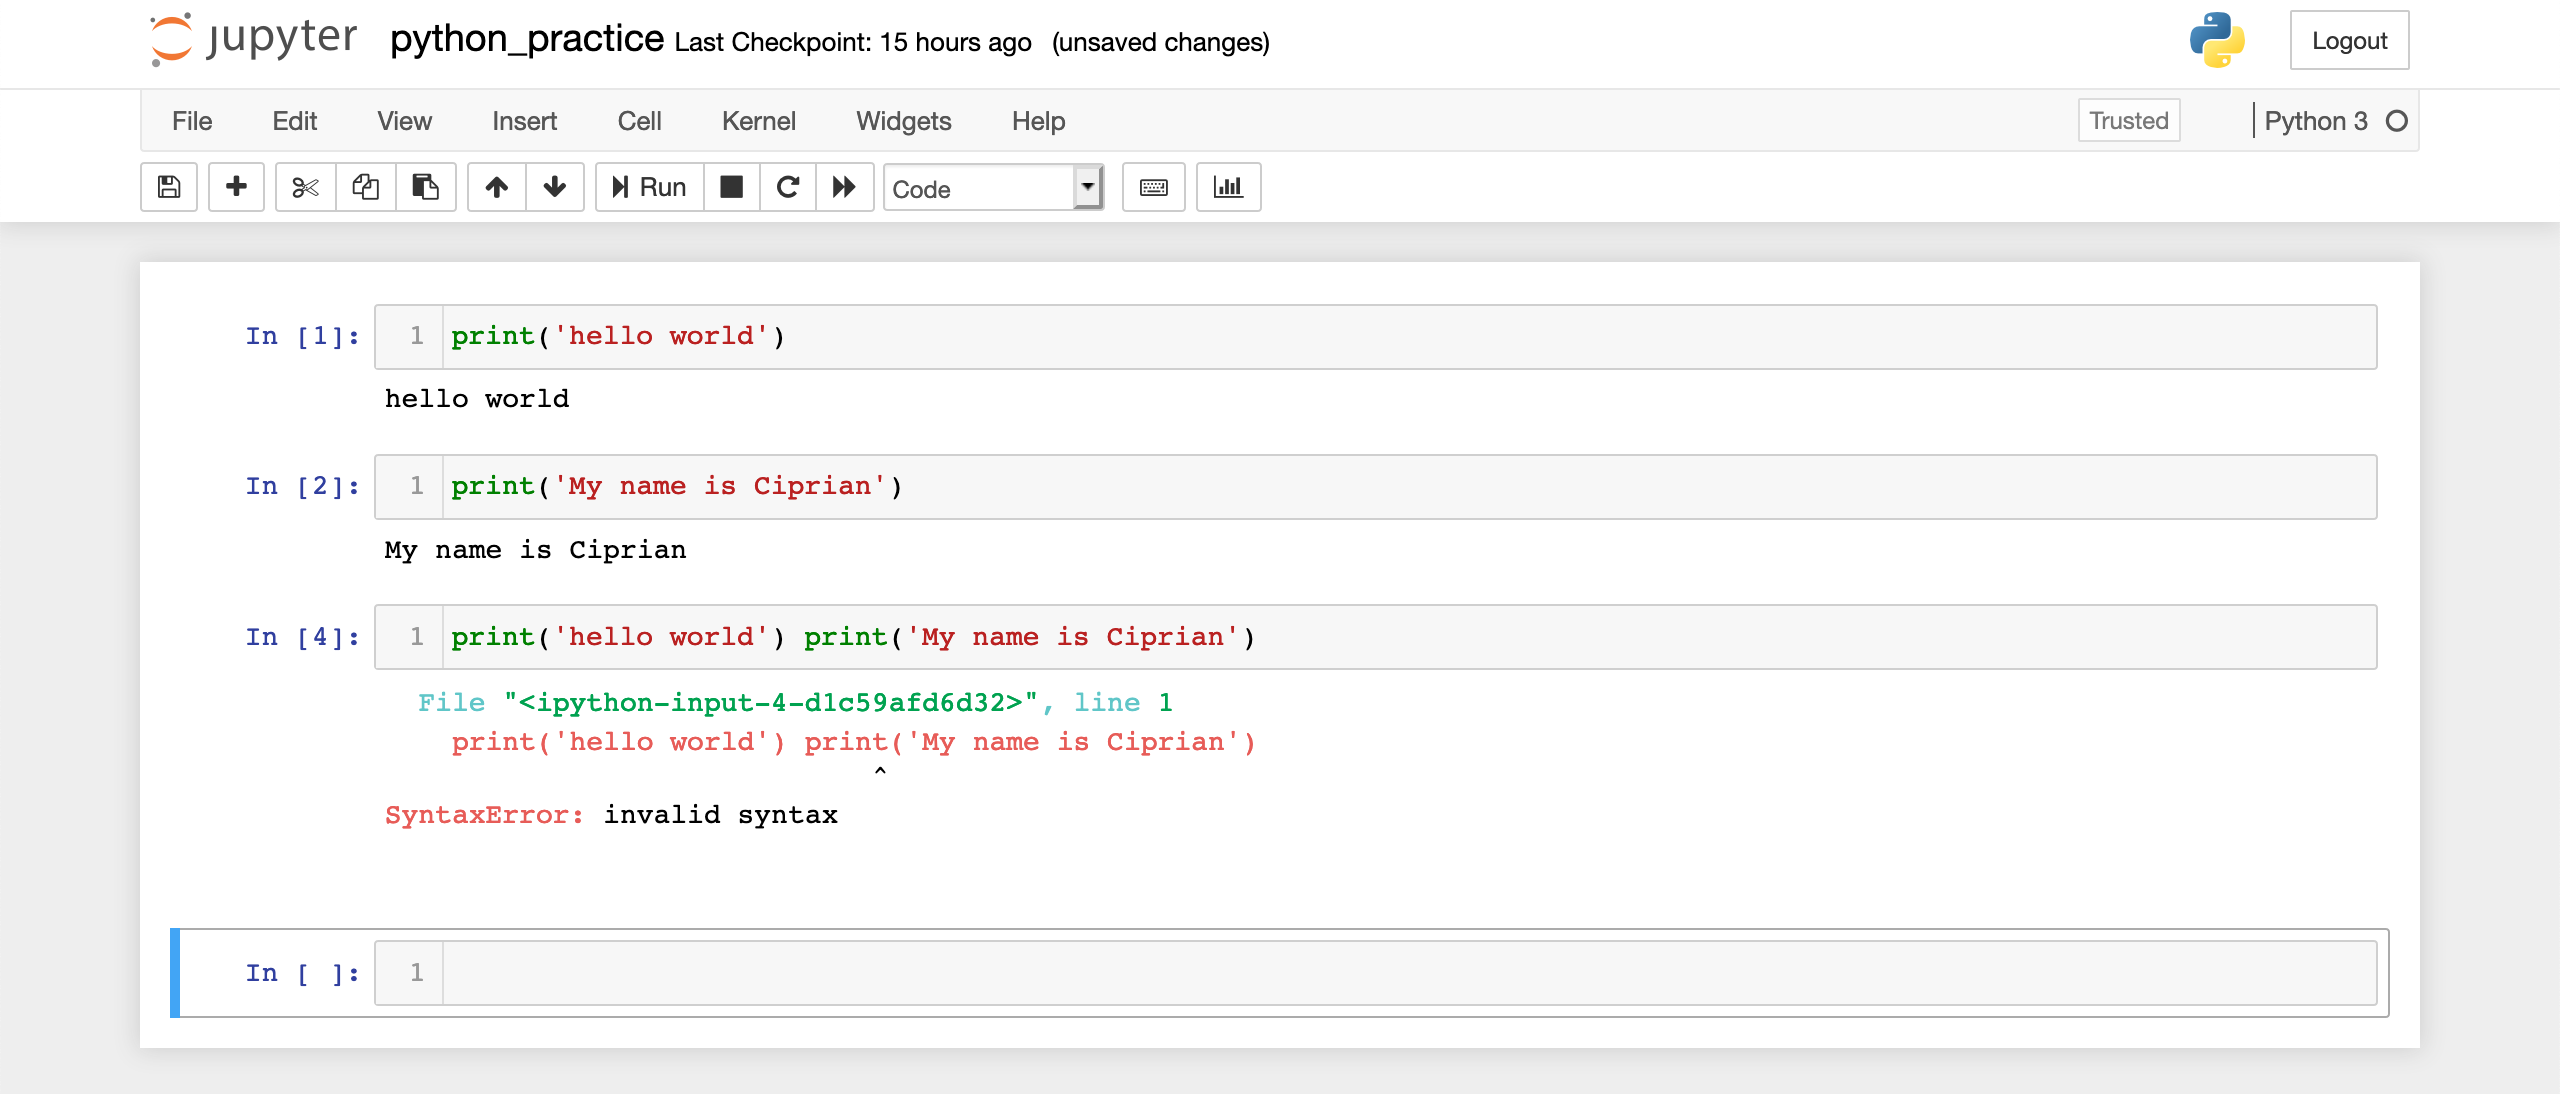
print('hello world!') print('My name is Ciprian')This seems very similar to the code above, except, I have a single line here. If I press Shift and Enter, you can see that Python complains that my syntax is invalid:
Image Source: Screenshot of Jupyter notebook, Edlitera
This word syntax is borrowed from grammar and you may have run into it in school. This message just tells you that what you're trying to do is not correct, similarly to how some phrases just don't sound like correct English, even though they do use English words. It's like saying, "I want not breakfast" instead of "I don't want breakfast". Python is very helpful here and it informs me that what I'm trying to do doesn't make sense. So remember, each Python command needs to be on a separate line.
How to Use Jupyter Notebook Menus
The Jupyter notebook menus are at the top of the page. You can click on them to explore what's inside each one of them. You probably won't need most of them in the beginning, but it's good to go over them.
File Menu
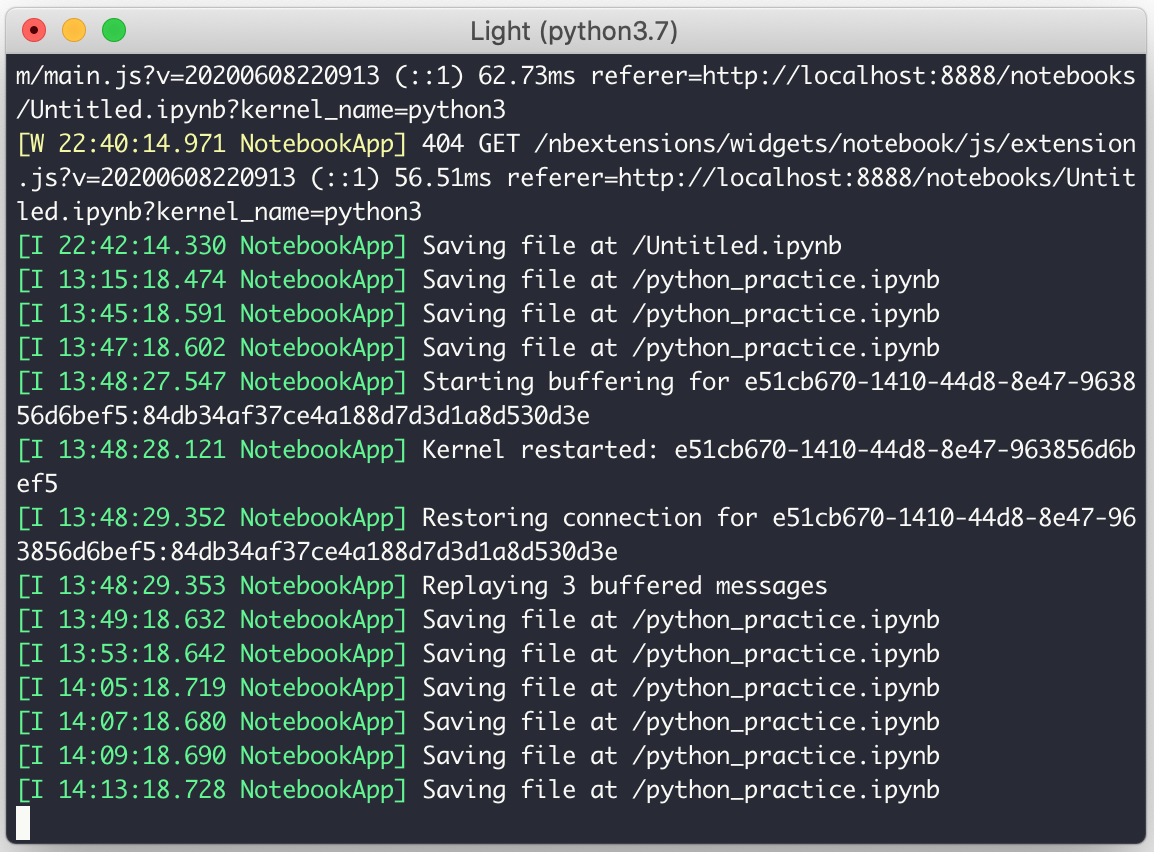
First, the File menu. This gives you the ability to start a new notebook, rename your notebook, and save it. One thing to also note is that Jupyter notebooks are automatically saved every once in a while. In fact, if you look at the Jupyter server logs, you will see a lot of Saving file at... log entries - that's just the server confirming the fact that it autosaved your notebook.
Image Source: Screenshot of Jupyter notebook, Edlitera
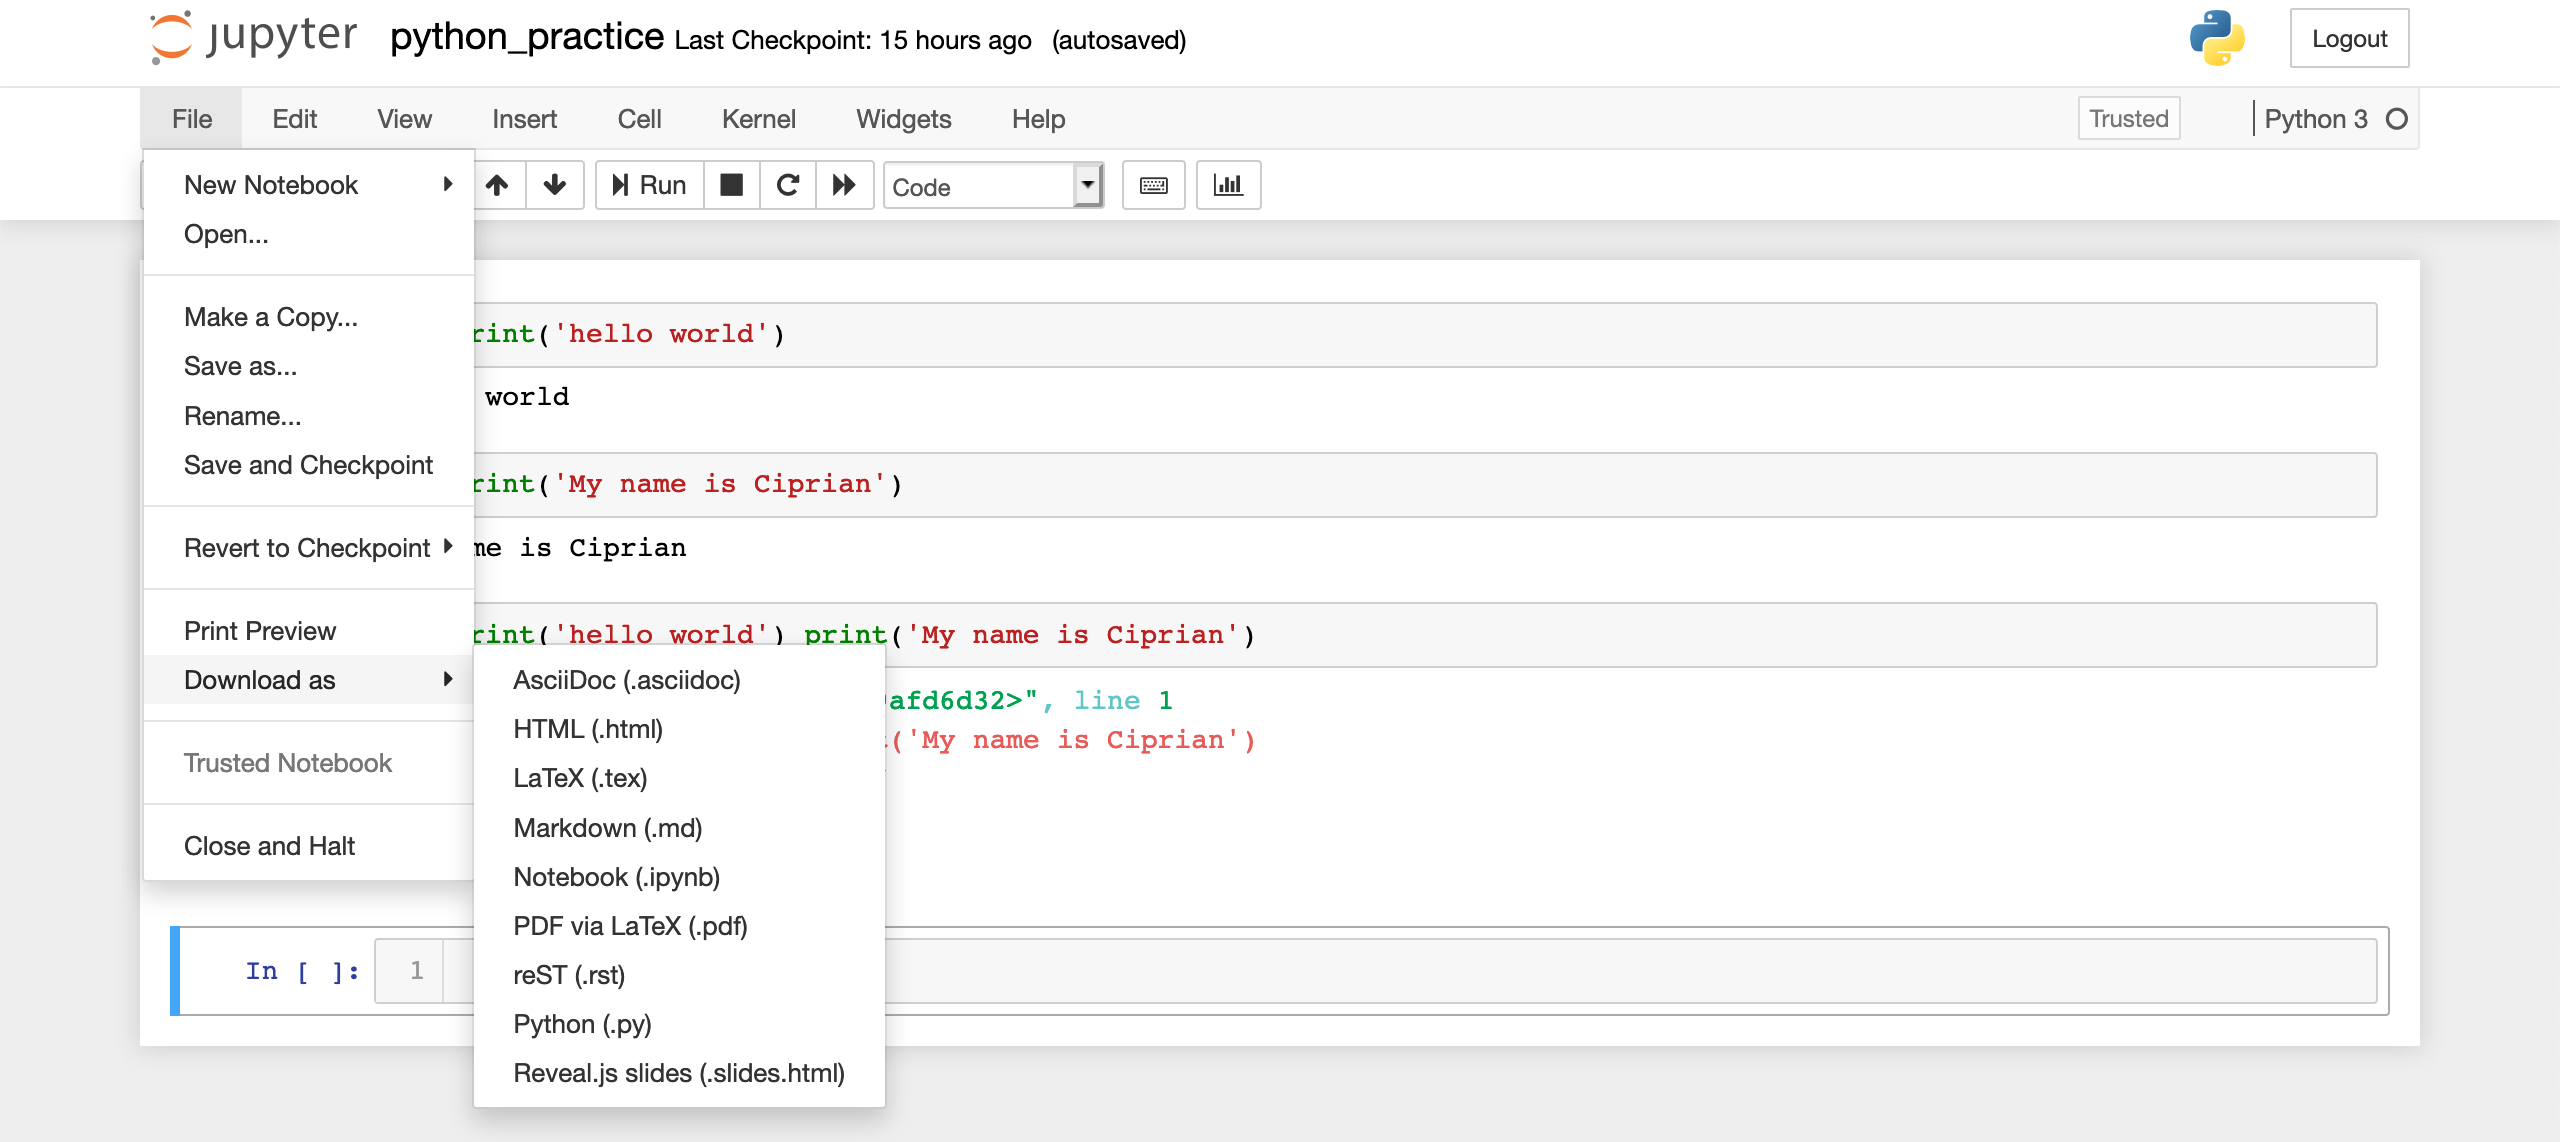
Getting back to the File menu, a very useful feature is the Download as an option. This allows you to export your Jupyter notebook to a variety of formats. If this sounds a bit useless, remember that Jupyter notebooks are often used for data analysis. In addition to running code, they can also display images, graphs, video and other media.
Essentially, you can build a whole report in a Jupyter notebook, then export it to a PDF and share it with your team. That's pretty neat!
Image Source: Screenshot of Jupyter notebook, Edlitera
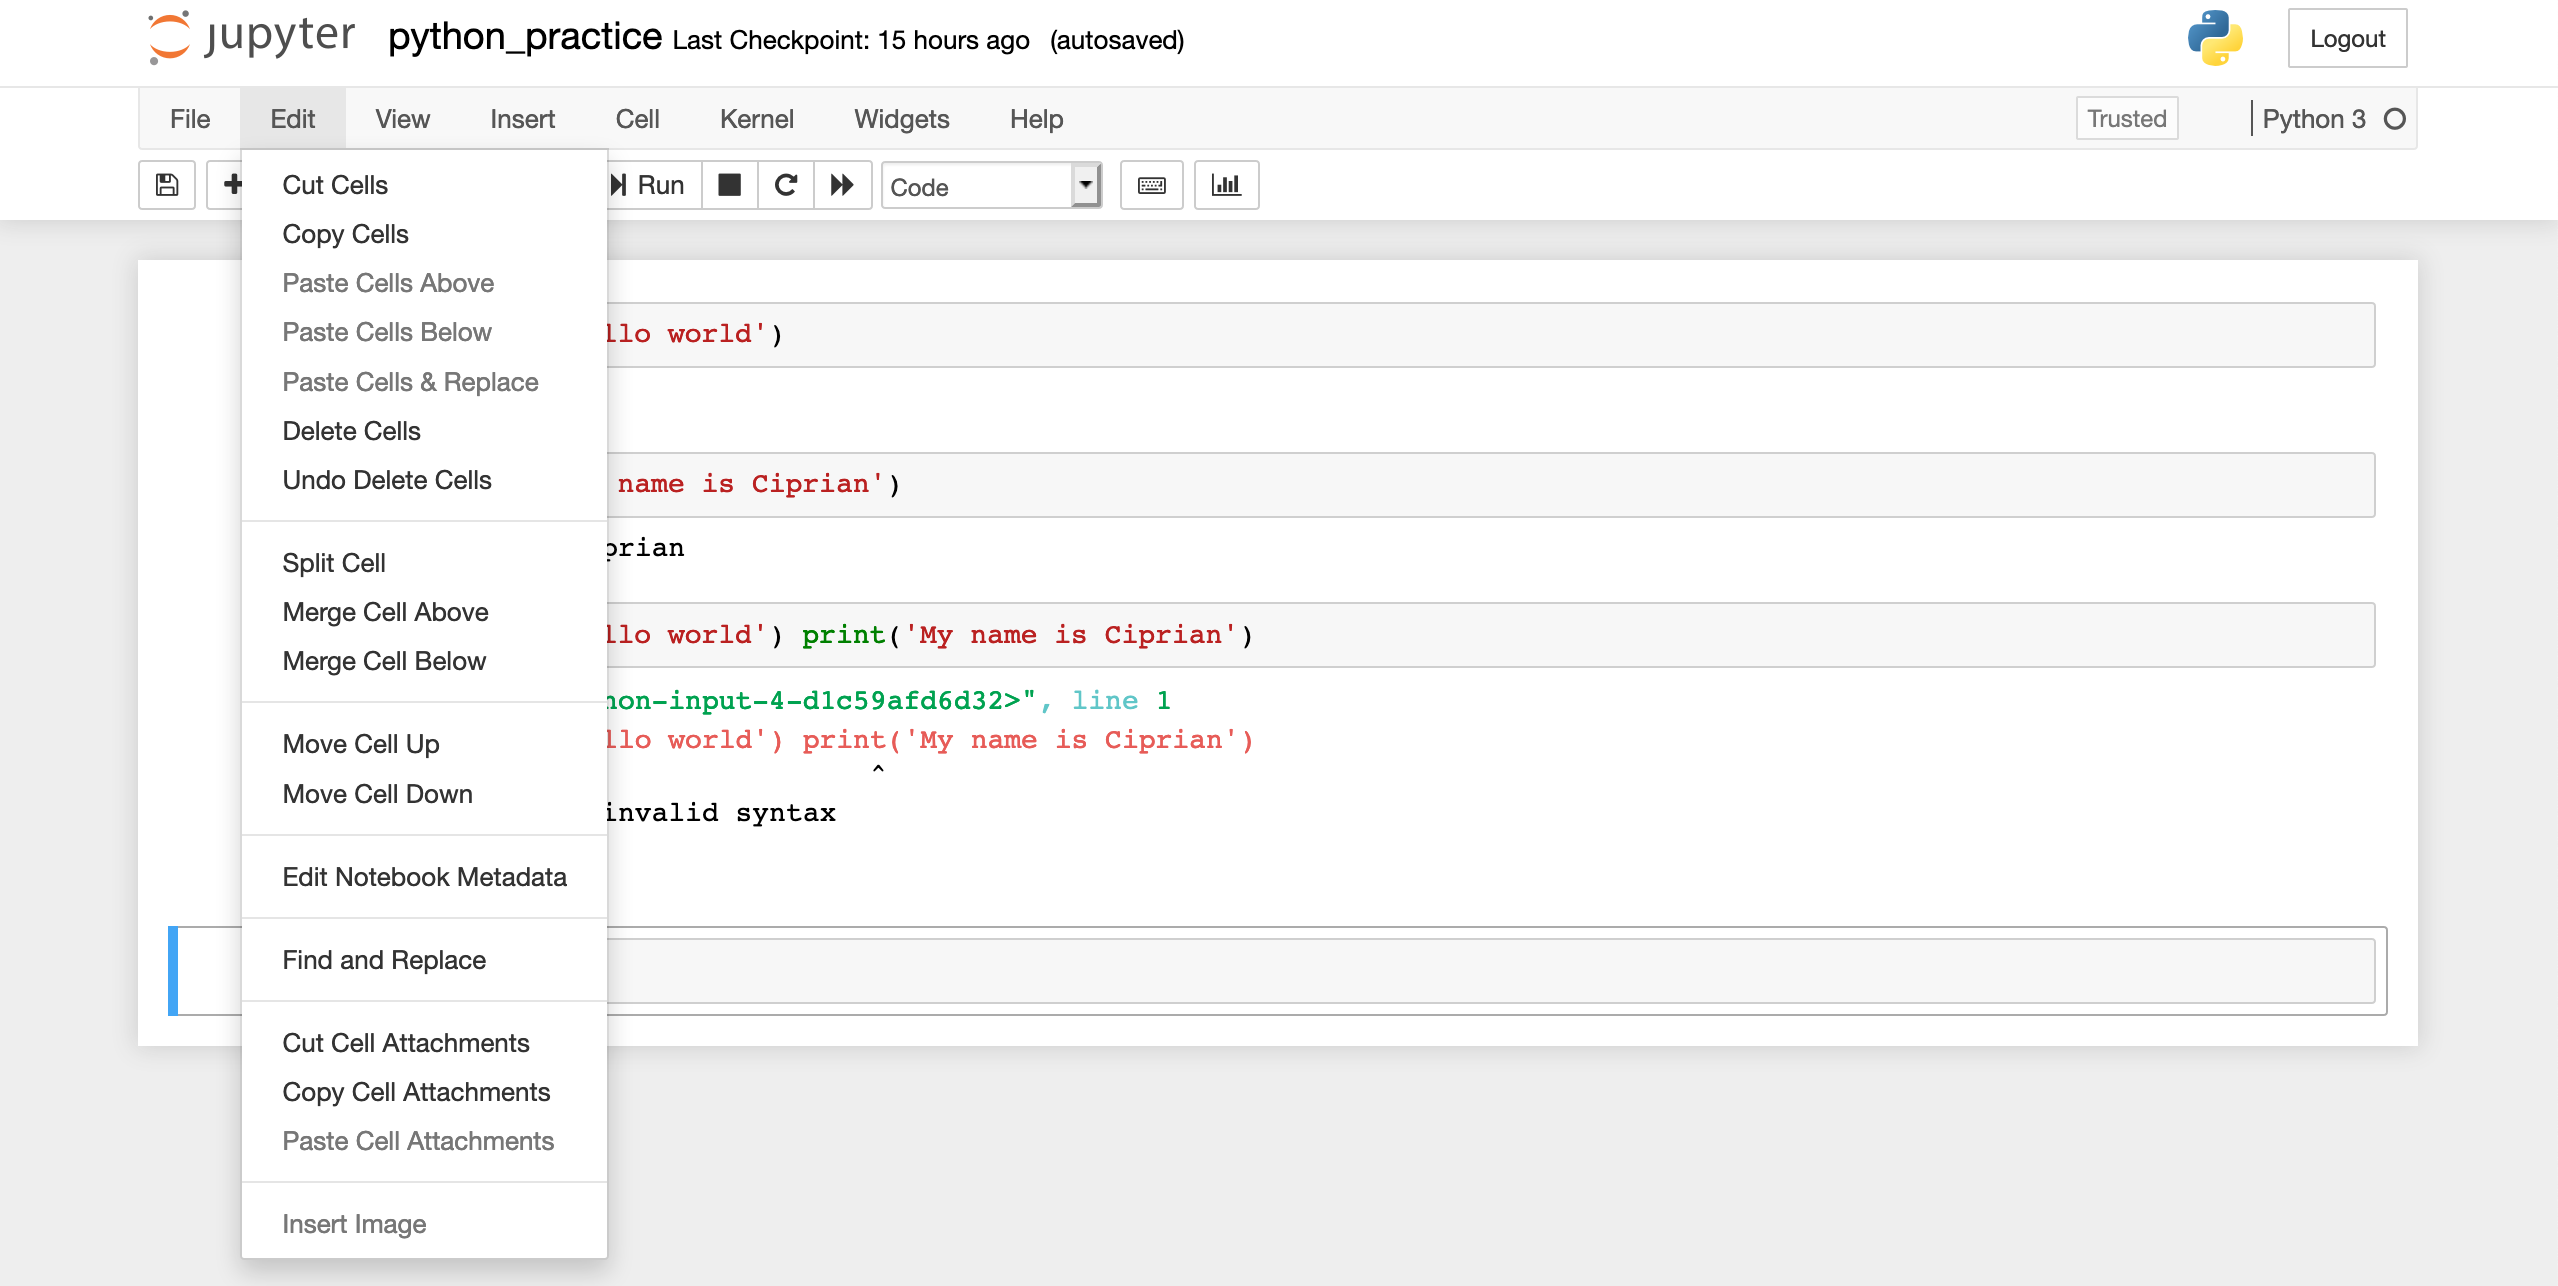
Edit Menu
From the Edit menu, you can edit cells. You can merge them, find text and replace it, and you can move cells up and down.
Image Source: Screenshot of Jupyter notebook, Edlitera
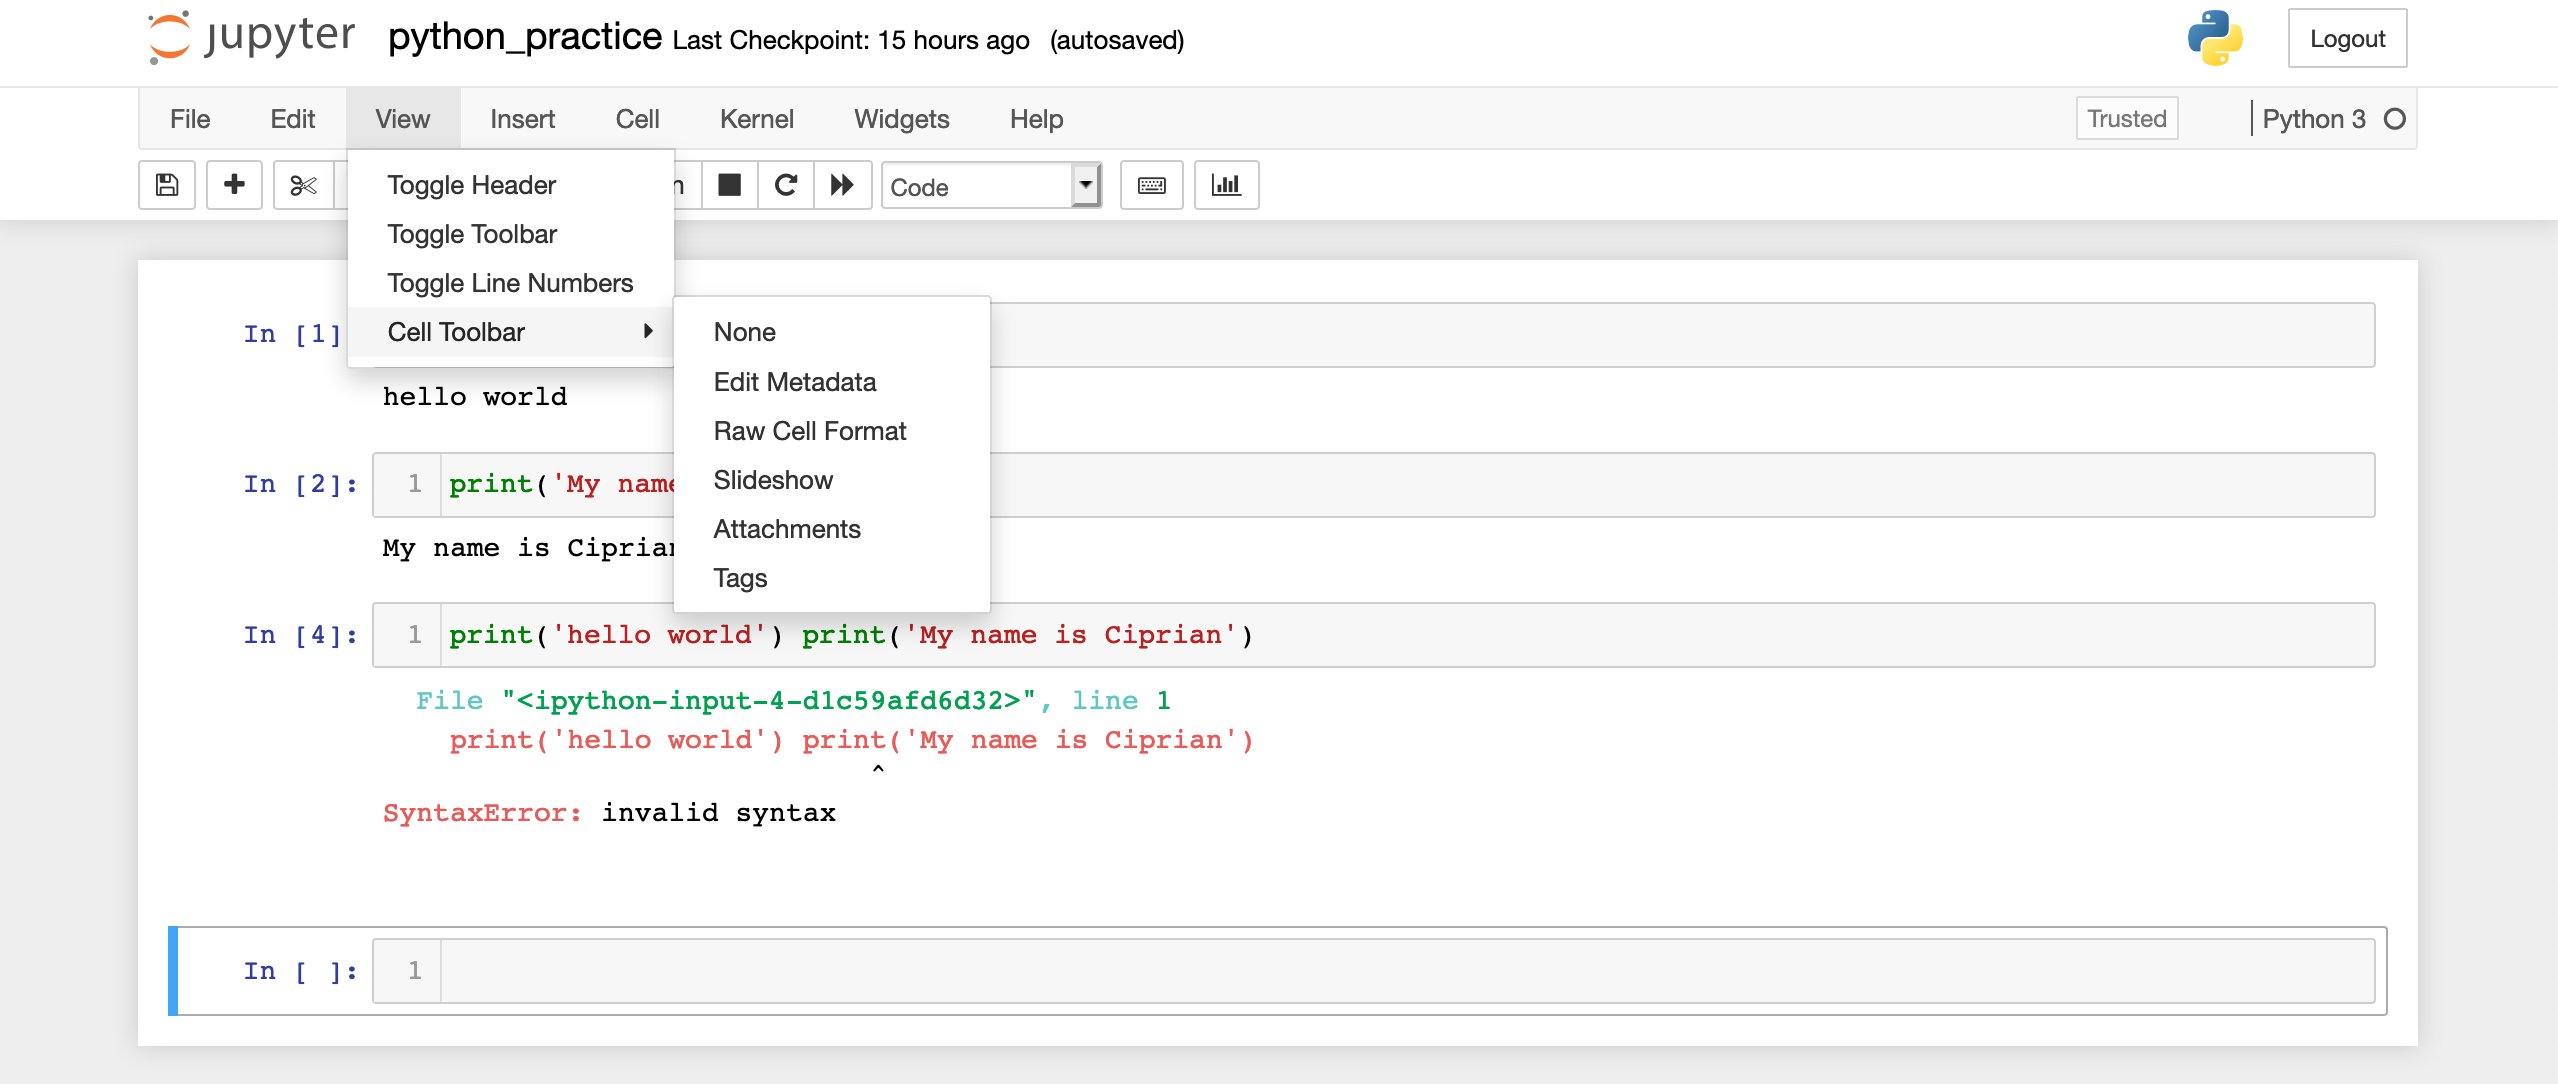
View Menu
The View menu has a bunch of options that control what the notebook looks like. For example, you can hide or show the header if you want to see more of your notebook on one screen. Another one I like is the Toggle Line Numbers feature, which allows you to show or hide line numbers. When you write small programs, line numbers don't matter that much, but in larger programs they're crucial.
That's because, if you have an error in your code, Python will often tell you exactly which line is wrong, and when that happens, you don't want to be counting lines. It's much easier to just see the line numbers.
Image Source: Screenshot of Jupyter notebook, Edlitera
Insert Menu
The Insert menu allows us to insert cells above or below the currently selected cell. You've seen this menu before, when I introduced the keyboard shortcuts for adding cells to a notebook. Generally, I suggest that you learn the keyboard shortcuts because they will make you a lot faster at writing code, but know that you can also just use these menu options right here:
Image Source: Screenshot of Jupyter notebook, Edlitera
Cell Menu
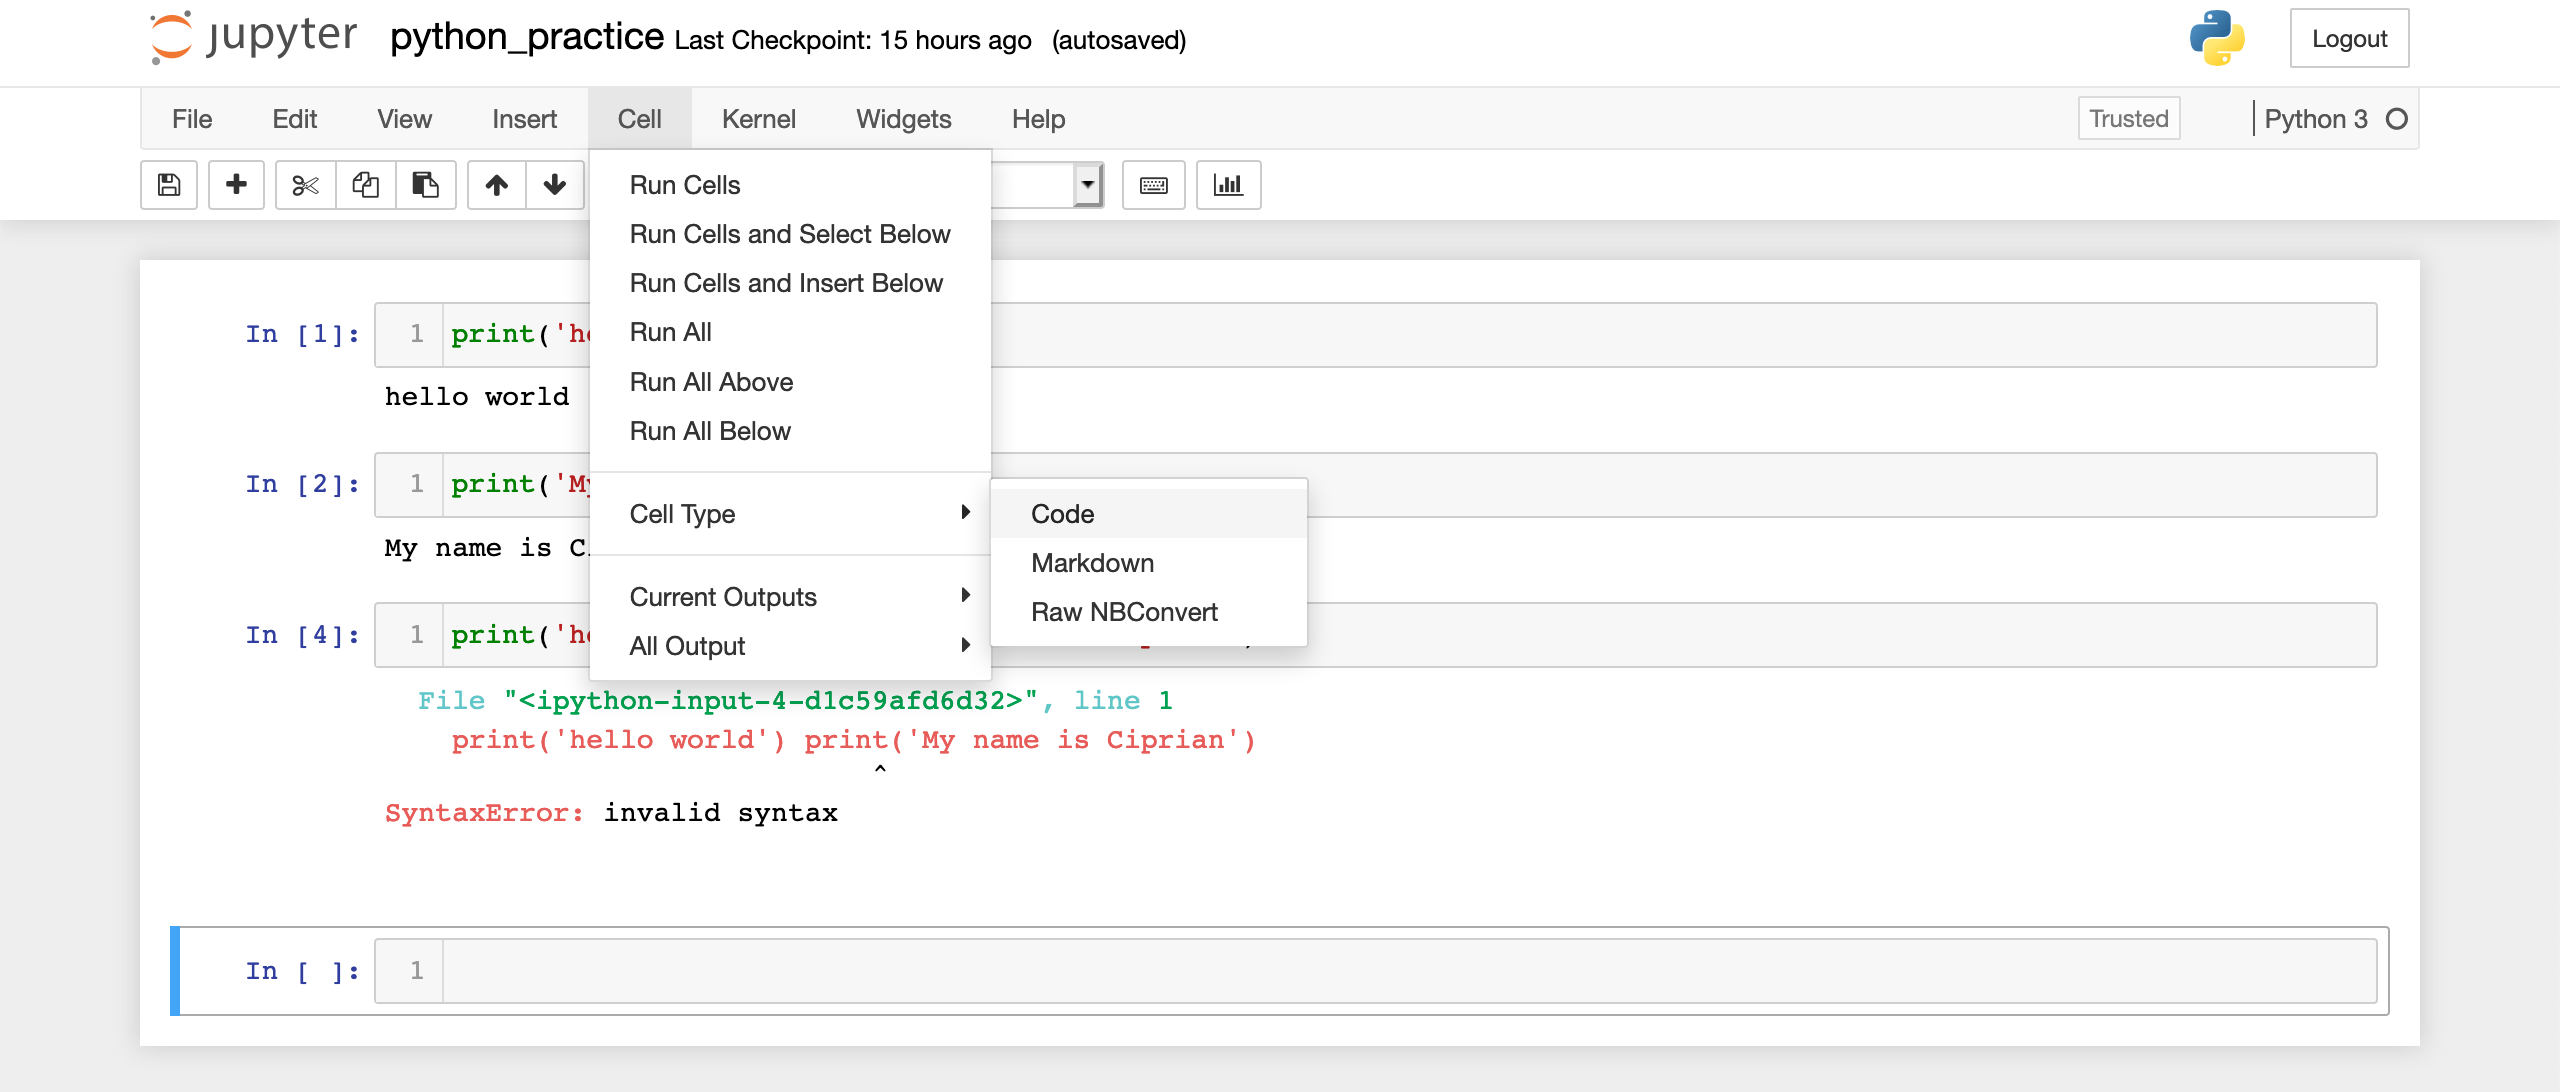
Another useful menu is the Cell menu. Here, a useful option is Run All, which simply executes every cell in your notebook, one-by-one, starting from the top of the notebook. You could do this manually, by selecting which cell you want to run and then clicking Shift + Enter, but if you have a large notebook, that can be very time consuming:
Image Source: Screenshot of Jupyter notebook, Edlitera
In the Cell menu, you can also find the options for Cell Type. Remember, Jupyter supports multiple types of cells, the main ones being Code, which are cells where you can write and execute code, and Markdown, which are cells where you can write text in markdown format. You saw earlier that you can toggle between these modes using the dropdown menu in the header. If the header is hidden, however, you can also use the Cell menu to switch between Cell and Markdown modes.
Kernel Menu
Before I get into details about the available options in the Kernel menu, you need to understand what a kernel is.
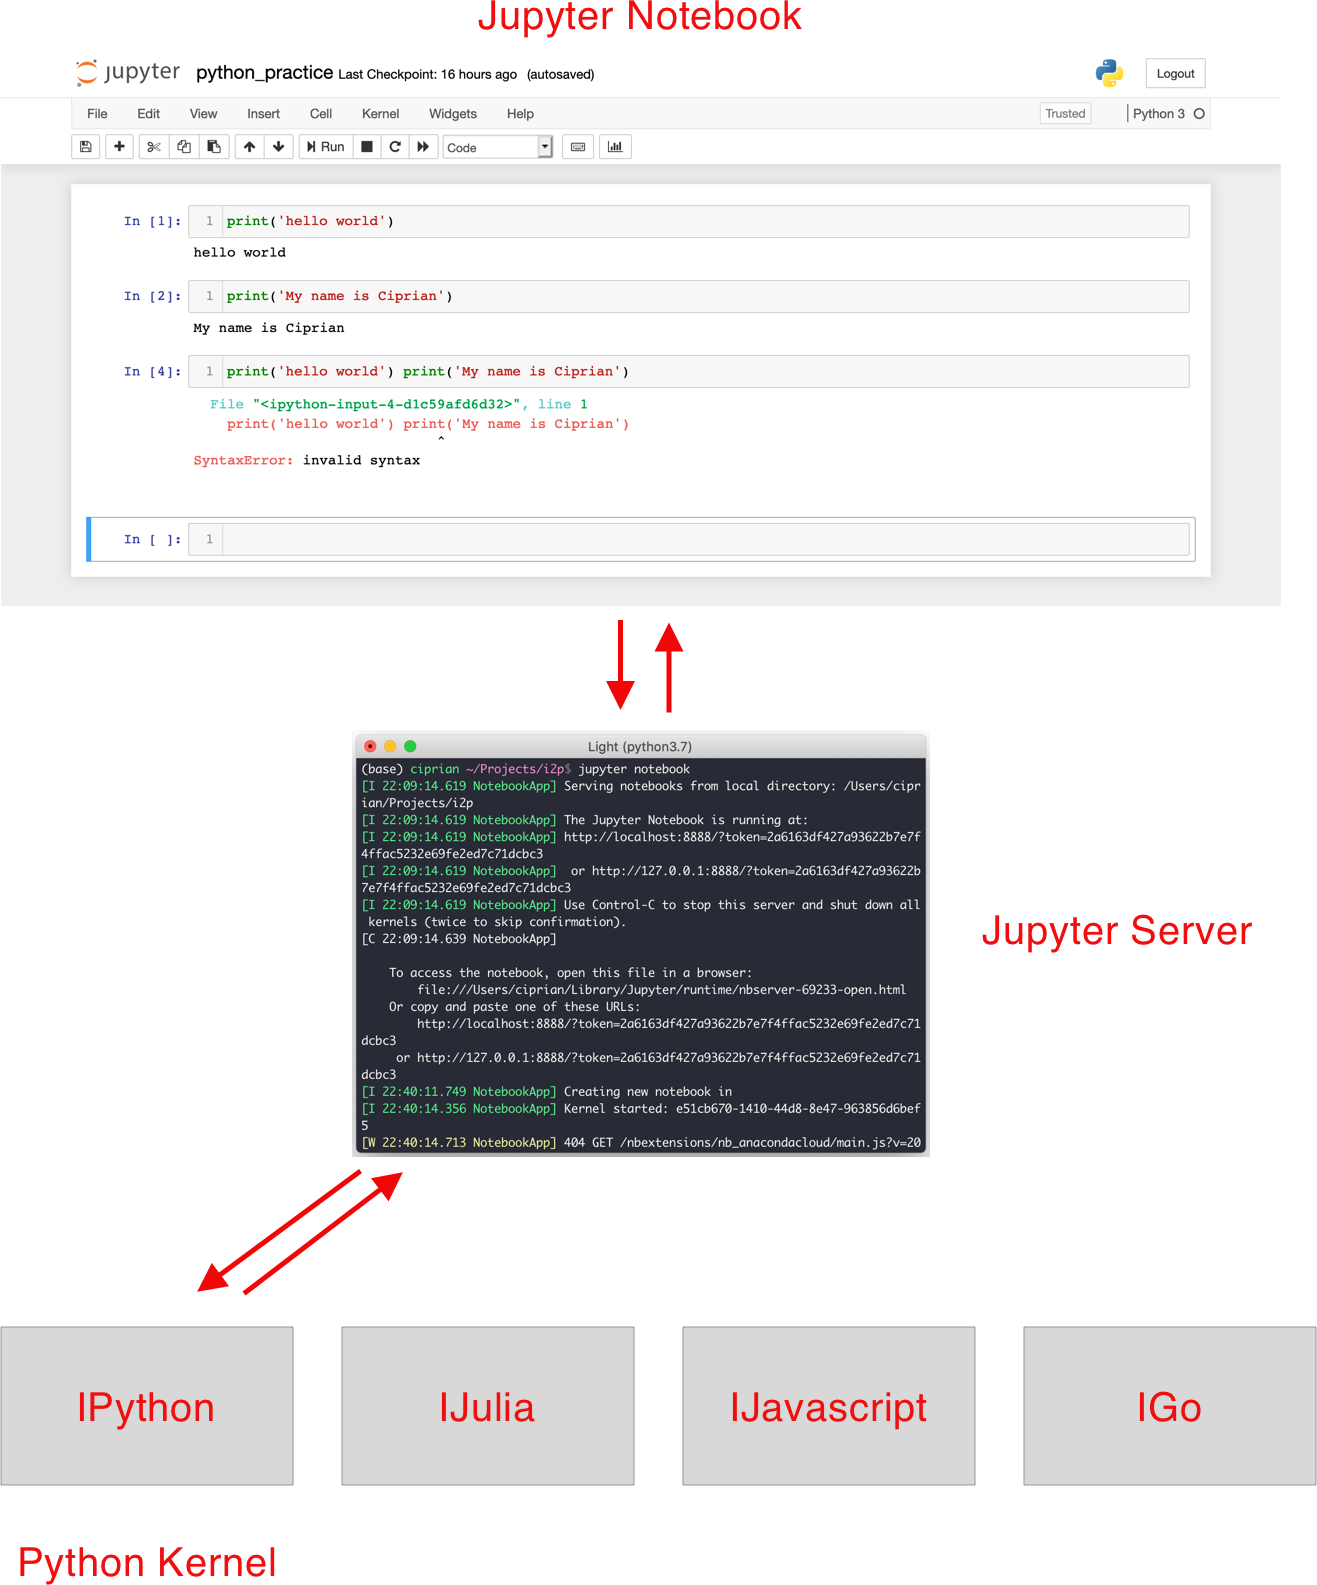
Briefly, a Jupyter kernel is a program that runs the code that the Jupyter server receives from the Jupyter notebook. The diagram below shows a rough mental model you can use to understand the interaction between the Jupyter notebook, the notebook server and the kernel:
Image Source: Screenshot of Jupyter notebook, Edlitera
The red arrows show the data flow. When you run some code in the Jupyter notebook, the code is sent to the server, which then uses a kernel to run that code.
Why do you need kernels? First of all, the Jupyter server itself is not built to understand the code you want to execute. Its main job is to delegate the code execution to the appropriate kernel that understands that particular programming language (in our case Python) and let the kernel execute the code.
In this way, Jupyter is designed to be extensible. This architecture allows programmers to add support for new programming languages by simply writing a new kernel that can understand and run that particular programming language. In the diagram above, I listed only a few of the kernels available in the Jupyter ecosystem. A more complete list of Jupyter kernels can be found here. There are so many of them!
Kernels are what makes Jupyter notebooks so powerful. They are the feature that allows Jupyter to be able to run so many programming languages using a unified interface.
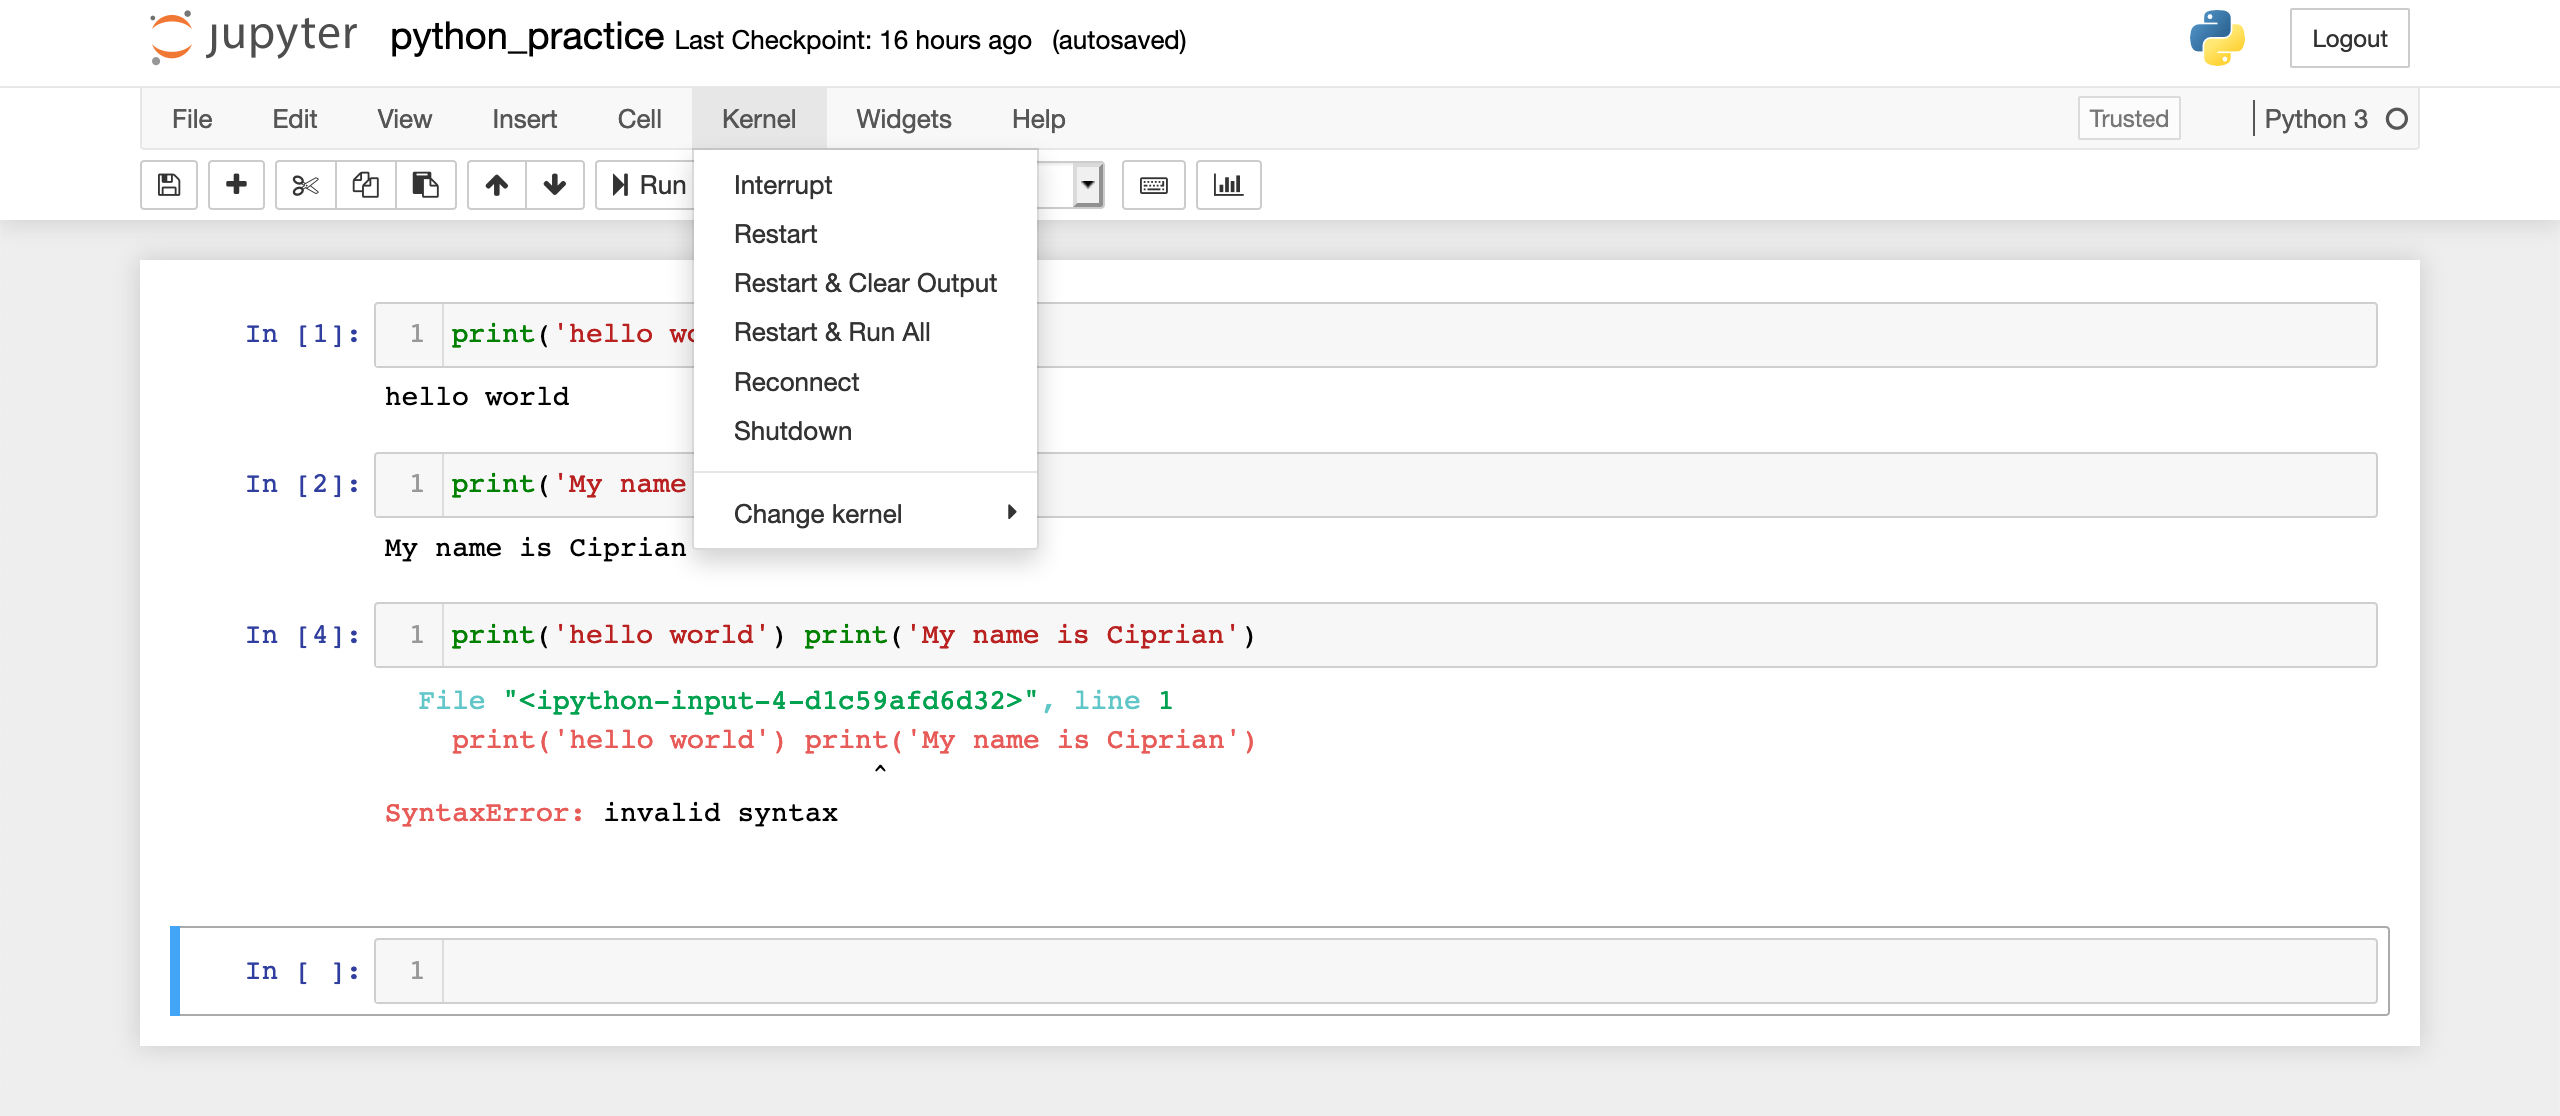
Now that you know what kernels are, let's look at the Kernel menu:
Image Source: Screenshot of Jupyter notebook, Edlitera
As you can guess, all the options in the Kernel menu expose actions you can perform with the kernel that is currently assigned to interpret the code in your Jupyter notebook.
Kernel Menu Options:
- Interrupt - Simply stops the kernel from whatever it's doing at the moment. This is useful if your code is taking too long to run, for example due to some bug you accidentally introduced in your code. Why wait for the kernel to finish executing that (incorrect) code when you can just tell it to stop doing what it's doing, fix your code, and then run the cell again?
- Restart - Restarts the kernel. This will free up some memory, but also wipe out any variables that you have currently stored in your context. You'll learn more about this in future posts in this series.
- Restart & Clear Output - Restarts the kernel and also removes all the output from the notebook. In the screenshot above, the output is 'hello world' and 'My name is Ciprian.' Restarting and clearing the output would restart the kernel and remove those texts.
- Restart & Run All - Restarts the kernel and immediately runs all the cells in the notebook.
- Reconnect - Attempts to reconnect to the kernel. Sometimes, the kernel can become disconnected. When the kernel is disconnected, you won't be able to execute code because there is no kernel ready to execute it. This menu option allows you to reconnect to the kernel.
- Shutdown - Shuts down the kernel.
Finally, Change kernel allows you to connect to a different kernel. But wait, why might you want to do that? A Jupyter notebook can contain code written in multiple programming languages, but it is always connected to one kernel. So, if you want to switch from running a code cell that has Python in it, to a code cell that has, say, Javascript in it, you will have to change the kernel. Without changing the kernel, the Jupyter server will attempt to run that Javascript code using the Python kernel, which will not work because the Python kernel only understands Python.
How to Save and Close a Jupyter Notebook
Jupyter notebooks are autosaved. However, if you want to manually save them, you can use the File > Save > Checkpoint, or the (anachronistic) floppy disk icon in the top left corner. You can also simply type Ctrl + S at the same time.
Closing a Jupyter notebook is a bit more involved. You can just close the web page, but the server will still be running.
To stop the server, you need to go back to the terminal where you launched the Jupyter server and type Ctrl + C at the same time.
Image Source: Screenshot of Jupyter notebook, Edlitera
The server will ask you to confirm that you want to shut it down. Simply type Y and then Enter and the server will be shut down and you will be back in the terminal. At this point, you can also close all the browser tabs that Jupyter opened.
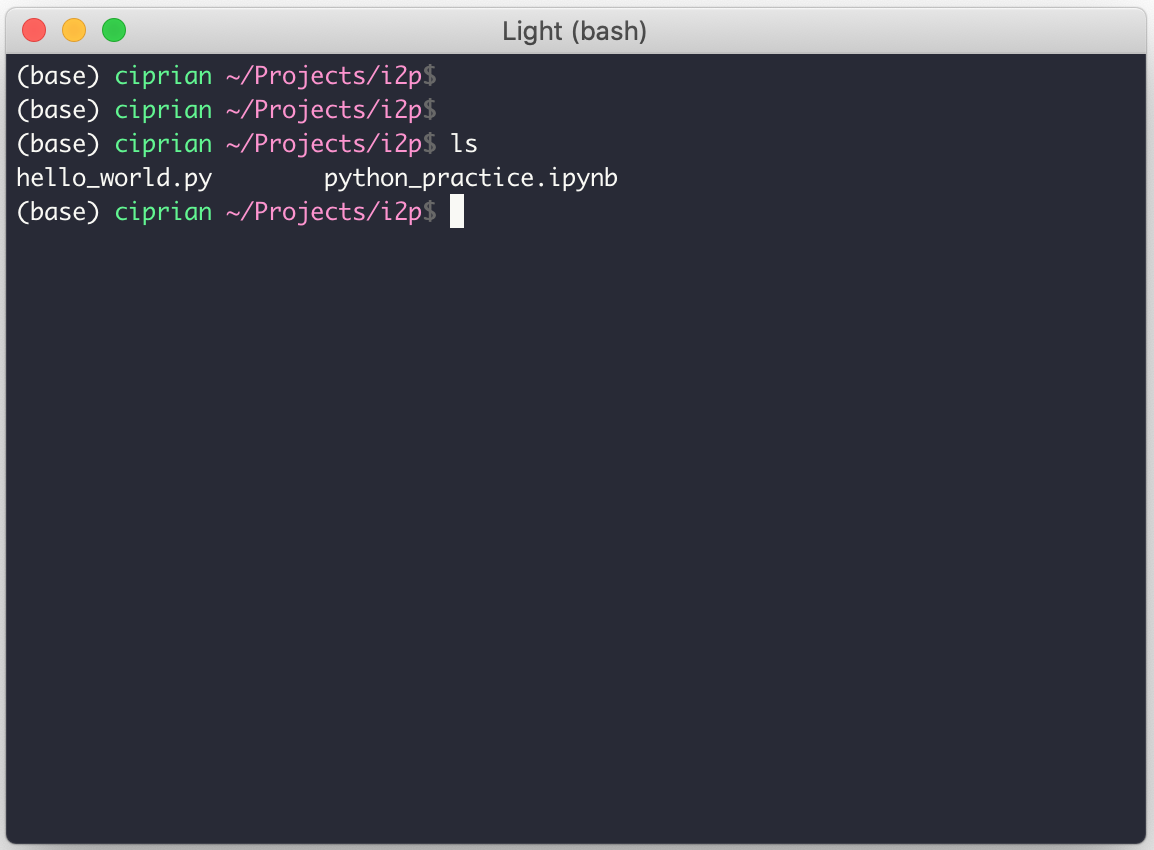
In the terminal you can now see (using the ls command on OS X or dir on Windows) that you have a new file in our folder, called python_practice.ipynb. This is the Jupyter notebook you just created!
Image Source: Screenshot of Jupyter notebook, Edlitera
- IMPORTANT NOTE: If you want to open a saved notebook, one thing to remember is that you can't simply double-click on it.
Instead, what you need to do is open a terminal, type Jupyter notebook and when the Jupyter notebook interface opens up in your browser, you can use the file system interface to navigate to the folder where you saved your notebook and then double click on it. Let me show you how:
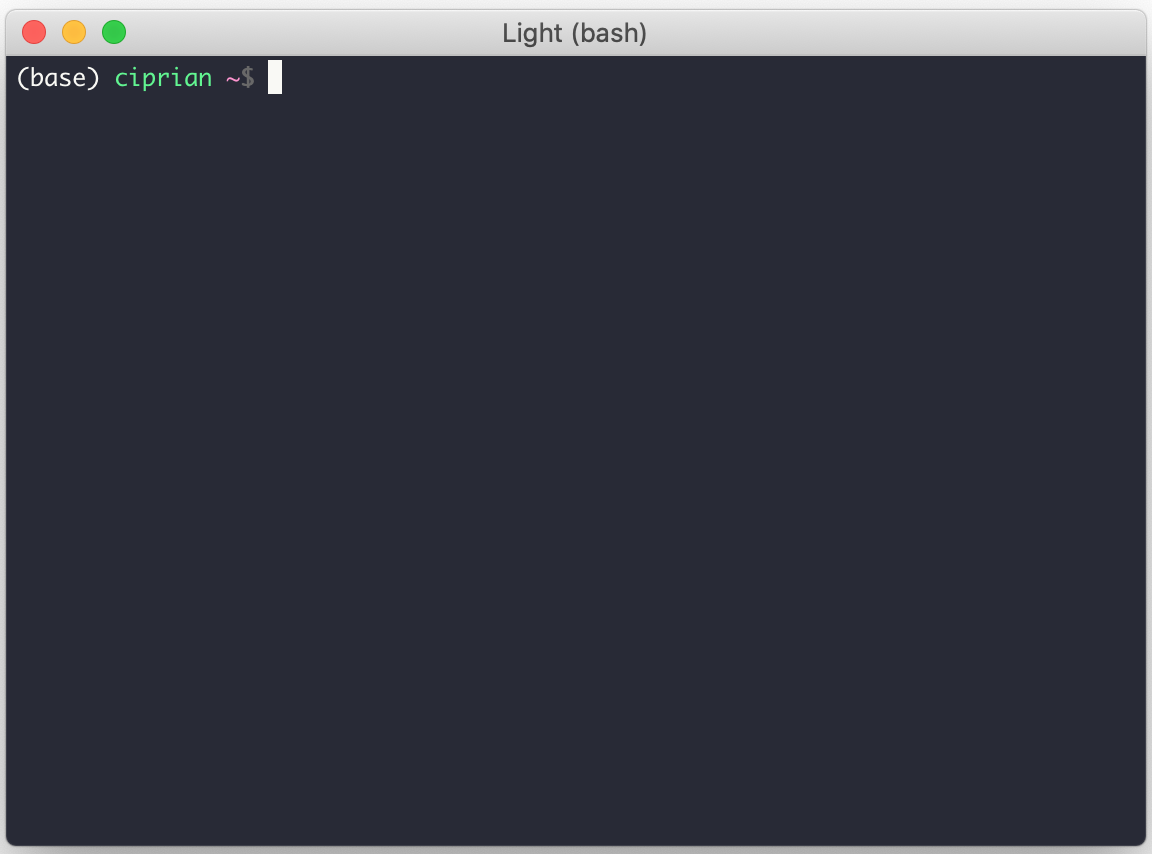
Step 1. Open the Terminal or Command Line Application:
Image Source: Screenshot of Jupyter notebook, Edlitera
Step 2. Navigate to the folder where you have the Jupyter notebook you want to run using the change directory command (cd):
Image Source: Screenshot of Jupyter notebook, Edlitera
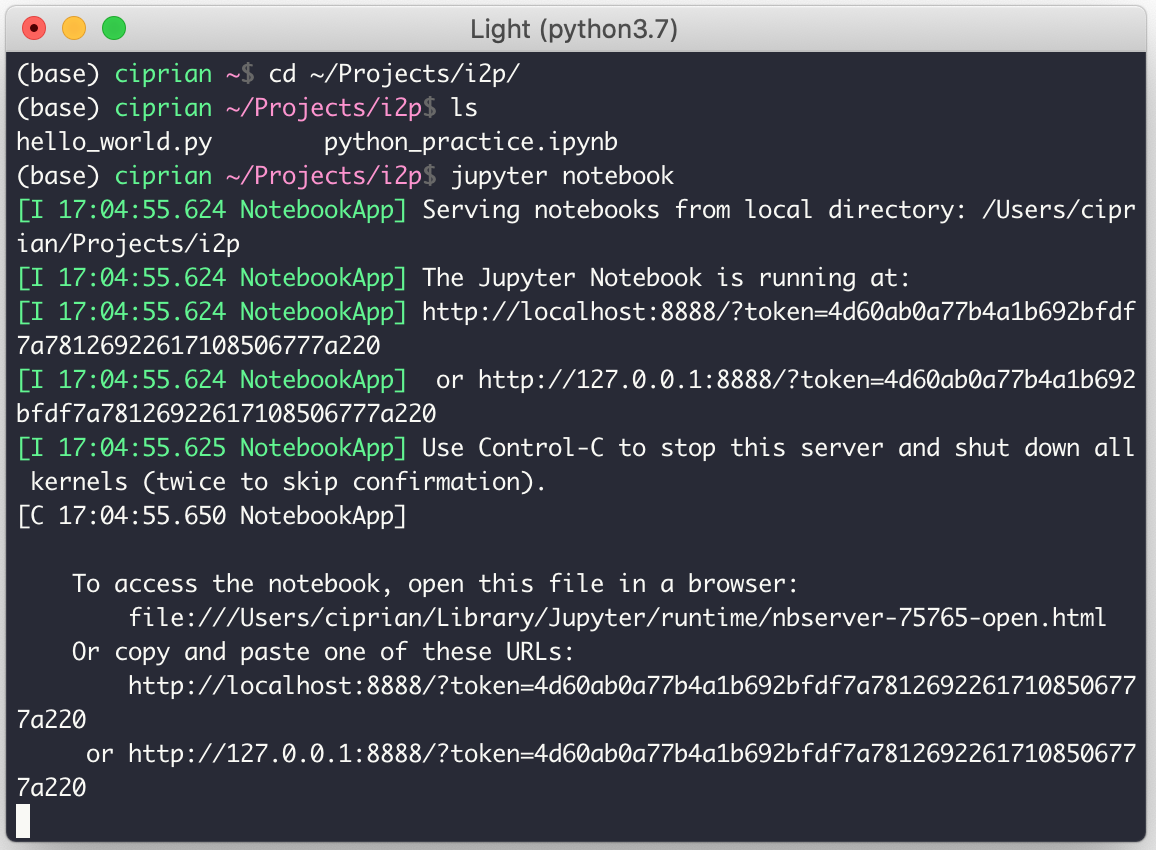
Step 3. Start the Jupyter server by typing Jupyter Notebook:
Image Source: Screenshot of Jupyter notebook, Edlitera
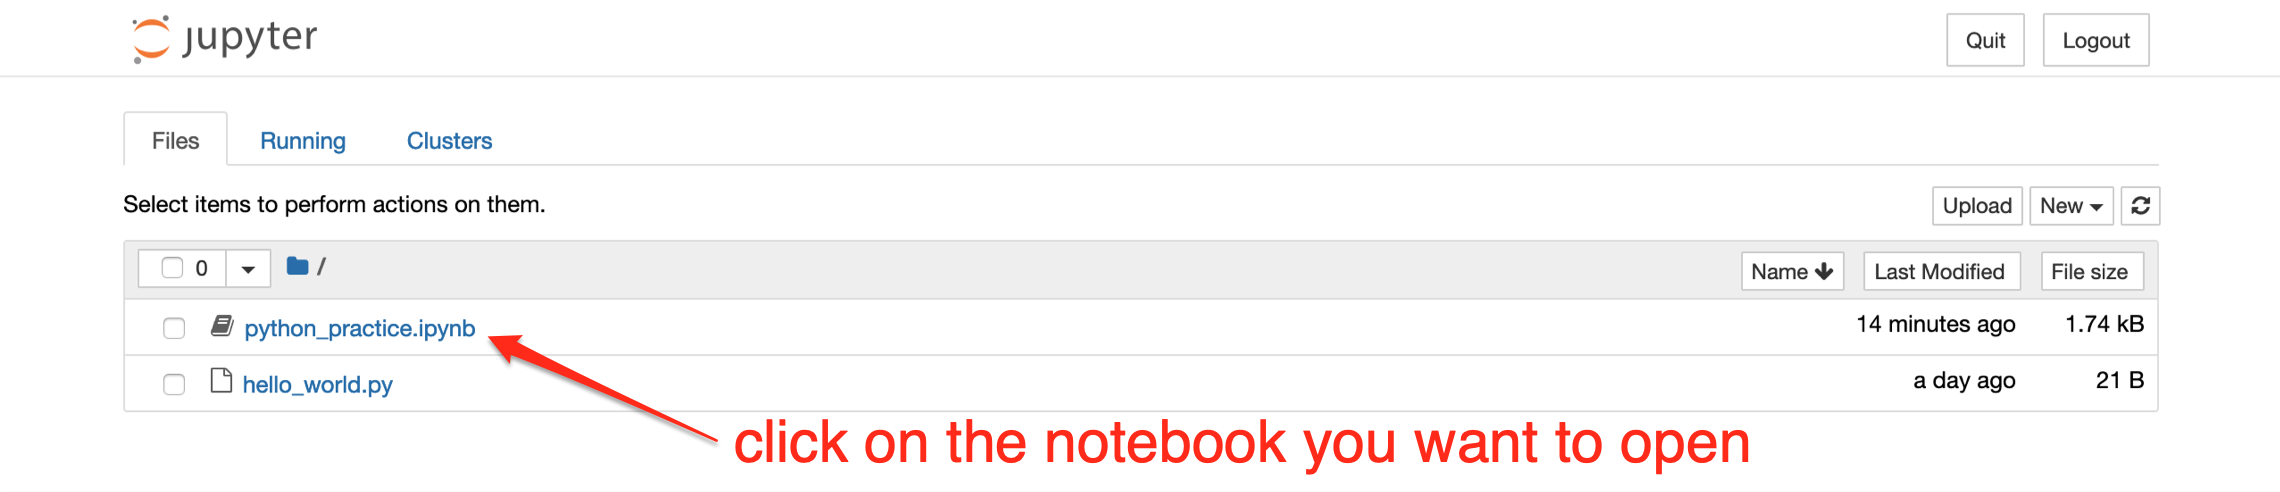
Step 4. When the browser tab opens, click on the notebook you want to open:
Image Source: Screenshot of Jupyter notebook, Edlitera
Step 5. Now finally, the notebook will open in a new tab. Notice how the notebook remembers both the code you wrote and the results of executing that code! If you want to clear that output, don't forget you can use the Kernel > Restart & Clear Output menu option:
Image Source: Screenshot of Jupyter notebook, Edlitera

