


Our video editing app is nearly complete. We started by building a data preprocessing pipeline to extract audio from a video. This audio is then transcribed into text using a Whisper model. Next, we developed helper functions to support editing. Since users edit videos by modifying the audio transcript, we ensured they can only remove words. They cannot add new ones or rearrange them.
We also created functions to align the edited text with the original transcript. Since the original transcript includes timestamps for each word, removing words allows us to determine which video segments to keep or cut seamlessly.
- Roadmap to Building a Video Editing App in Python
- Automatic Dubbing System: How to Create a Text-to-Speech System
To avoid re-editing the video with every change, which would be inefficient, we serve it using Flask and play it with a Video.js player. This player leverages synchronized timestamps to show only the correct parts of the video. It automatically omits the removed words.
Although the app is functional, we still need to build an interface that allows users to make edits easily and preview them in Video.js. Without this interface, the process would be too complicated for a smooth user experience. To achieve this, we will use Streamlit.
What Is Streamlit
Streamlit is an open‑source Python framework designed to simplify web application development. It is made especially for data scientists and machine learning engineers, who often have little web development experience. It allows users to build interactive apps with Streamlit without needing HTML, CSS, or JavaScript knowledge. However, familiarity with these languages can be beneficial for adding custom features. For example, in our project, we will use Flask to serve a video to a Video.js player, overcoming the limitations of Streamlit’s built-in video player.
We chose Streamlit for our app because its API is both easy to use and intuitive. With just a few lines of Python code, we can create a fully functional app with interactive elements like sliders, buttons, and charts.
But Streamlit offers even more. It seamlessly integrates with popular Python libraries such as Pandas, Matplotlib, Plotly, and Altair. This makes it simple to display everything from complex graphs to detailed data tables. Although the framework was originally designed for quickly building machine learning apps to be shared online, it has evolved beyond that purpose. Streamlit is versatile enough to create dashboards, generate reports, and build various other applications.
In addition to its technical features, Streamlit has fostered a vibrant community and a rich ecosystem of add-ons and components. Developers worldwide share their work in the Streamlit Gallery and contribute to its improvement on GitHub. This spirit of collaboration not only improves the framework but also sparks innovation across various industries. Moreover, Streamlit simplifies deployment by supporting its Community Cloud platform and other popular hosting services like Heroku, AWS, and Google Cloud. Therefore, sharing your apps with a larger audience has never been easier.
Before we begin building our app with Streamlit, let’s explore some unique aspects of this framework.
How Does Streamlit Work
Streamlit follows a unique execution model that distinguishes it from many other web frameworks. In a typical Streamlit app, the entire Python script reruns from top to bottom whenever a user interacts with any widget. In a typical Streamlit project, the central file, usually named app.py, serves as the main entry point for your application. This file is responsible for orchestrating the workflow and constructing the user interface by calling functions and importing modules from other scripts.
When your app starts, Streamlit executes the script once to build the initial interface. Every interactive widget, such as a slider, button, or text input, acts as a trigger that causes the entire script to rerun from top to bottom. For example, if a user moves a slider, Streamlit detects this change immediately and reruns the entire script. This behavior ensures that the app’s output is always consistent with the latest widget values.
In simple terms, the code functions as a recipe for constructing the app, which is recreated each time a widget state changes. There are advanced features, such as fragments, that let you limit the scope of reruns. Furthermore, functions like st.rerun() give you explicit control over the execution flow. When st.rerun() is called, Streamlit halts the current execution and immediately restarts the script from the top.
This can be useful when you need to programmatically force an update after performing certain actions. For example, it helps when saving data or updating a file. When building our app, we will avoid using these more advanced functionalities to try and keep things as simple as possible.
While our code reruns each time a widget value changes, Streamlit maintains a session-specific state in the background. This state, accessible via st.session_state, allows variables to persist across reruns. By using sessions state, we enable Streamlit to "remember" values like user inputs or intermediate results. This makes it possible to create a seamless user experience despite the script executing afresh.
This execution model simplifies app creation by specifying actions for each rerun, but it also introduces challenges. Constantly rerunning the entire script can cause inefficiencies, especially with heavy computations or data-loading tasks. To address this, several techniques can be used to optimize performance during repeated code execution:
- caching expensive computations
- employing callbacks
- using session states
- using fragments
Caching is handled using two decorators: @st.cache_data and @st.cache_resource. These allow us to cache the output of functions. When you wrap data loading or expensive computations with these decorators, Streamlit stores the result. It only re-executes the function if its inputs change. In other words, even though the entire script reruns, it is not necessary for the heavy lifting to happen again. This leads to significantly faster interactions. While working with decorators might seem complex at first, they are quite simple. Even those new to them can quickly get accustomed to their use.
On the other hand, callbacks are a concept familiar to most programmers. In Streamlit, widget callbacks are particularly advantageous. They allow us to update specific sections of our app without reloading the entire page. Since most Streamlit applications are interactive, users continuously change widget states. This makes callbacks an essential feature.
At first glance, session states might seem useful only for preserving data across reruns. However, they can also control which parts of the app execute. Besides storing configuration options, intermediate results, and other information, session states can drive conditional logic. This helps manage which parts of the app run during a refresh.
For example, if we want a function to execute only once, we can modify the session state after it runs. This indicates it as already executed. By wrapping the function in an if-statement that checks the session state, we gain precise control over how often and when each segment of code runs.
Finally, we can use fragments. Fragments enable parts of the app to rerun independently from the rest of the script. For example, you might group a set of widgets into a fragment. This way, only that section refreshes when a value changes, rather than the entire page. While this isn’t the default behavior, it’s useful in more complex apps. It helps optimize performance and control which parts of the UI update.
In summary, structuring our code into modular functions helps eliminate unnecessary recomputations in our app. Even though Streamlit reruns the entire script by default, these strategies allow us to fine-tune reruns. This ensures that our code runs as efficiently as possible.
Article continues below
Want to learn more? Check out some of our courses:
How to Construct Our App with Streamlit
The app.py file defines the app’s layout and structure. Within this file, we will configure page settings and arrange elements using Streamlit’s UI components, such as columns, containers, and sidebars.
As with any programming task, it’s vital to first conceptualize how the Streamlit app should function. In this article, we will focus on the app’s conceptual design and leave the code for the next article in this series. However, while explaining the conceptual design, I will mention the Streamlit functions and features used to build different parts of the app. So, let's get started.
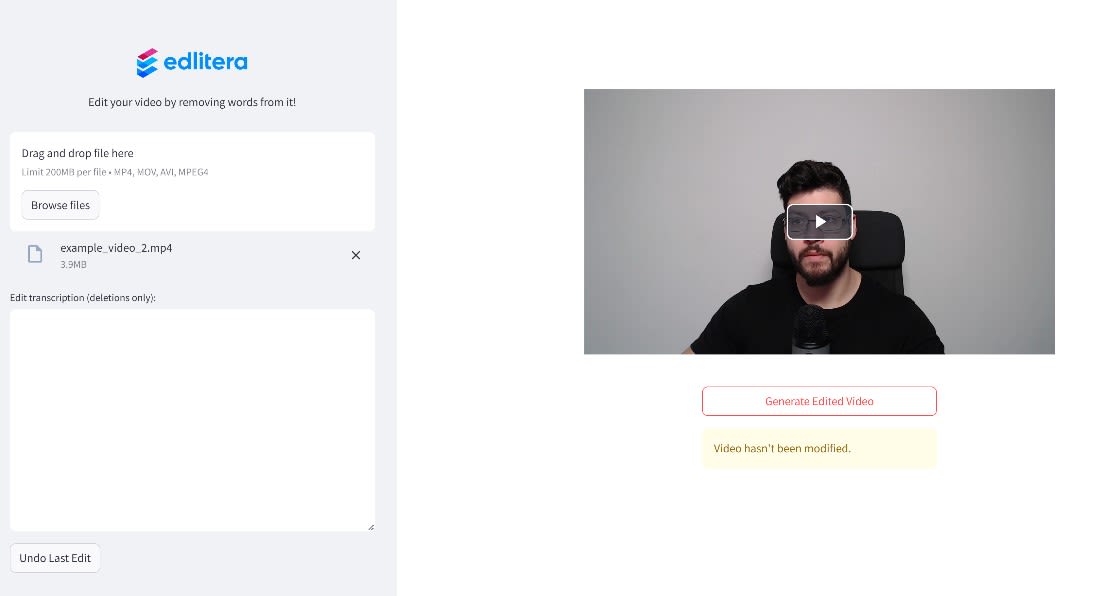
What Should the Home Page Look Like
When the Streamlit app launches, it should display a blank area where a video preview will appear once a video is uploaded. A sidebar will be positioned on the left side. Initially, the sidebar will feature only the company logo, a brief explanation of what the app does, and a simple widget for file uploads. This widget allows users to browse and select a file stored on their computer. In effect, it will look something like this.
To achieve this layout, we will configure the page using the st.set_page_config function. We will define the sidebar's appearance by writing markdown with st.sidebar.markdown. Once the layout and sidebar are set up, we will add the upload widget using st.sidebar.file_uploader. This will create the widget shown in the image above, allowing users to upload files for editing.
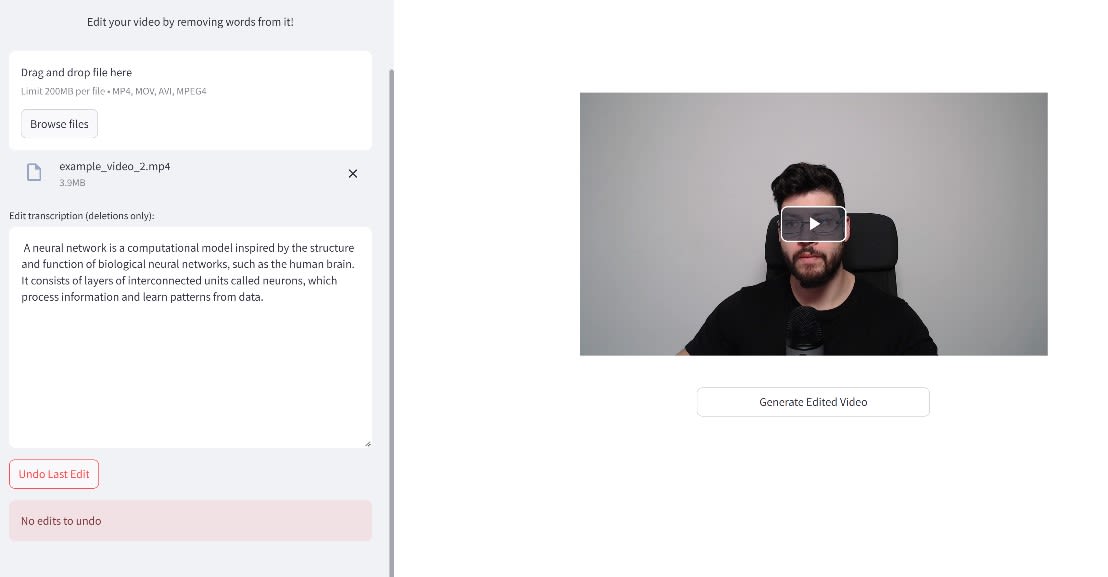
How to Display the Preview of the Uploaded Video and the Original Transcript
Upon uploading a video, its preview should appear in the main section of the app. An editable transcription will be displayed in the sidebar. Two buttons should also appear: the Undo Last Edit button under the transcription and the Generate Edited Video button under the video preview.
The preview will be generated by our Video.js player. This will be achieved by using the video served to it by our Flask application. We will display the transcription using the st.sidebar.text_area function. The undo button will be generated with the st.sidebar.button function. To generate an edited video, we will use the st.columns function.
How to Set Up Warnings
If the user tries to generate a video without making any changes to the original, they will receive an error message.
Likewise, if no edits have been made and the user tries to undo the last edit, they will receive an error message.
If changes have been made to the transcript, the user can generate a new video. Also, the user will be able to undo the last edit. The undo functionality works until the original transcription is restored.
How to Edit the Transcription
Aside from the functions used to generate the buttons, video preview, and transcription preview, we will implement extensive conditional logic in the background. For example, when a user edits the text in the text area, the function created in a previous article will verify whether the change is valid. If valid, another function defined in a previous article of this series will retrieve the timestamps of the omitted words.
These timestamps, which indicate the start and end points of spoken words, will be removed. Based on this, the Video.js player will generate a modified preview where the corresponding video segments are missing. If the edit is invalid, the app will raise a warning. All of the underlying logic will be covered in detail in the following article, where we will discuss the Streamlit app's implementation.
In this article, we laid the groundwork for our video editing app by exploring its core components. We started by explaining how the preprocessing pipeline extracts audio and uses Whisper to generate a transcript. Then, we discussed how helper functions maintain edit validity and keep timestamps in sync. Next, we covered how integrating Flask with Video.js allows video previews without requiring reprocessing after each edit, ensuring efficiency.
Finally, we focused on building a user-friendly interface with Streamlit. By taking advantage of Streamlit’s simple, intuitive API and unique execution model, we set up a clean layout. This layout includes a sidebar for file uploads, an area for the editable transcript, and interactive buttons for actions like undoing edits and generating the final video. In the next article, we’ll dive into the code behind these concepts and show how these elements come together in a working application.

