


Table of Contents
- Advantages
- Flaws
- SageMaker Services
- Amazon SageMaker Ground Truth
- Amazon SageMaker Studio
- Amazon SageMaker Notebooks
- Amazon SageMaker Experiments
- Amazon SageMaker Debugger
- Amazon SageMaker Autopilot
- AWS Marketplace
- Automatic Model Tuning
- Amazon SageMaker Model Monitor
- Amazon SageMaker Neo
- Amazon Augmented AI
- Example
- Conclusion
We already gave a brief introduction to SageMaker in the first article of this series, but to truly understand everything it offers we need to go more in-depth on the topic. SageMaker is the "heart” of every MLOps workflow built on AWS. SageMaker is the most important AWS service for performing machine learning. Other services, such as S3 buckets, CodePipeline and CodeDeploy, all have their place in an MLOps workflow, but they were not designed specifically for machine learning. The only service that was specifically made for machine learning is SageMaker.
Building an MLOps workflow on the AWS platform can be simplified into two parts: building the machine learning part of the workflow and afterward integrating it into the overall workflow. SageMaker covers everything we need to perform various tasks connected to machine learning. We use it for:
- data preparation
- model creation
- model training
- model tuning
- model deployment
- model management
In this article, we will cover all of these functionalities of SageMaker in detail. Knowing as much as possible about it as a service will hopefully allow you to decide which of those functionalities you want to use. While SageMaker services combine perfectly with each other, they can also be used independently of each other. Using only some services it offers and ignoring the others is a completely valid option, and knowing exactly what SageMaker offers can help you make the right choices for you.
Advantages
As a fully managed service that serves as an end-to-end machine learning platform, SageMaker makes all phases in a model's life easier to manage. It perfectly integrates not only with AWS services, providing a lot of already optimized built-in algorithms that can be used, but also supports several different frameworks that can be used, such as Spark, Tensorflow, Pytorch, and many others. It also integrates easily with many other tools. It allows users to use their own algorithms and frameworks. It requires very little setup to get started and enables users to utilize different services that make creating datasets very user-friendly. SageMaker is characterized by how easy it is to start training models. It handles scaling, if scaling is necessary, and provides an easy-to-use distributed training option. Not only that, but we can easily access any service that will further simplify optimizing our model, such as services for automated hyperparameter tuning.
Although we mentioned the service can sometimes be expensive, the way the customer is charged is very reasonable. SageMaker uses a pay-by-the-second payment model. This means that users can choose one of the many available computing instances, and use those instances with no long-term commitments. This makes everything simpler. You don't need to plan everything in advance, or worry about buying and maintaining hardware. With the recent addition of several new features in December of 2020, SageMaker is now the front-runner platform for MLOps.
Flaws
Although SageMaker comes with several different services that make building a workflow easier, it is not without its flaws. While those flaws may be outweighed by all the benefits it brings, this means that SageMaker is not for everyone. Putting aside the fact that it assumes that the user possesses good programming knowledge, which means that beginners might need some time to understand all of its functionalities, SageMaker can potentially be expensive. Of course, whether something is expensive or not is relative. A lot of SageMaker services are not that expensive by themselves, while some others can be. Training and inference, for example, can sometimes be costly depending on your needs. Since you are charged by the second, you will always pay for exactly how much you used a particular service. Depending on your budget, even that can sometimes be expensive. Even so, most of the time that is not going to be the case. You would more than likely spend less with SageMaker than you would on the necessary infrastructure to run things on a similar level. SageMaker is in 90% of cases cost-effective, but there seem to be companies that would be better off avoiding it. However, those companies can usually get away with not using cloud platforms, so whether they should even be taken into consideration as potential SageMaker users is arguable.
SageMaker Services
The SageMaker services that we are going to describe in this article are:
- Amazon SageMaker Ground Truth
- Amazon SageMaker Studio
- Amazon SageMaker Notebooks
- Amazon SageMaker Experiments
- Amazon SageMaker Debugger
- Amazon SageMaker Autopilot
- AWS Marketplace
- Automatic Model Tuning
- Amazon SageMaker Model Monitor
- Amazon SageMaker Neo
- Amazon Augmented AI
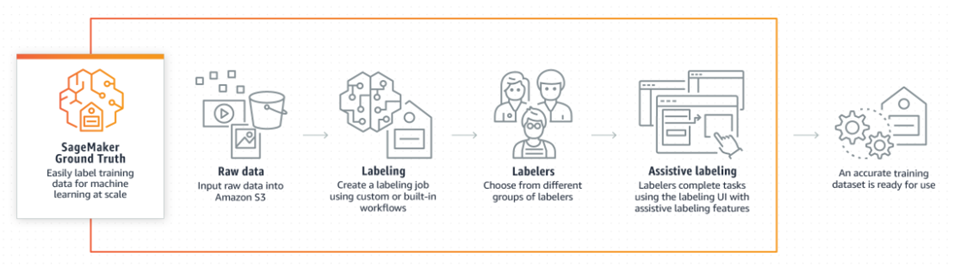
Amazon SageMaker Ground Truth
This feature of SageMaker is designed to make data labeling easier. It is especially useful for labeling images, videos, and text. It contains several built-in data labeling workflows and also supports the use of custom data labeling workflows. No matter what type of workflow the customer decides to use, they can leverage the power of many assistive features. Those features range from using tools that remove distortion in 2D images to tools that perform auto-segmentation and automatic data labeling using machine learning models. If all of those are not enough, users also have the option of employing outside workers to help with the task.
All of this makes data labeling very simple and efficient. Machine learning models label most of the data, while only a certain percentage of data that the machine learning models can't confidently label gets forwarded to be labeled by humans. This has reduced the costs of labeling, especially when large quantities of data need to be labeled, by up to 70%.
Amazon SageMaker Ground Truth workflow
Amazon SageMaker Studio
SageMaker Studio was launched in late 2019 as the first integrated development environment, or IDE, for machine learning. As an IDE, it unifies all the tools necessary for performing machine learning on AWS. Using this feature makes it easy to write code, perform and track experiments, create visualizations to gain some insight into how good our model is, and perform some debugging and monitoring. This all works towards managing the machine learning lifecycle as easily as managing the lifecycle of traditional software. Let's go deeper into the various features that developers use to perform the various tasks necessary to build, train, tune, deploy, and manage models.
Article continues below
Want to learn more? Check out some of our courses:
Amazon SageMaker Notebooks
SageMaker notebooks are basically elastic compute Jupyter notebooks that can be accessed very quickly. They come preloaded with everything needed to run or recreate machine learning workflows.
A user can import their notebook or they can also use pre-built SageMaker Studio notebooks designed for use in different scenarios. Using SageMaker notebooks makes it easy to overcome problems that arise when users try to share their work with other team members. By making controlling compute resources straightforward and making sure that the state of the notebooks is automatically saved, SageMaker notebooks make working collaboratively very trouble-free, and allow the users to efficiently manage a large number of individual lifecycle configurations. This means that we can combine all of the benefits of using a Jupyter notebook without actually needing to deal with the downsides.
For example, you don't need to worry about environments, because when you copy a notebook it will open in the same environment as the original notebook. This happens because the original notebook dependencies get saved into the notebook's metadata. Also, because they provide persistent storage, you can view notebooks and share them even if the instances that the notebooks run on are currently not running.
People collaborating with you don't even need to copy them to take a look at them. You can provide them with a secure URL that leads to a read-only copy of the notebook you are working on. This is a perfect way of giving someone temporary access so that they can give you their thoughts on how a particular problem should be handled.
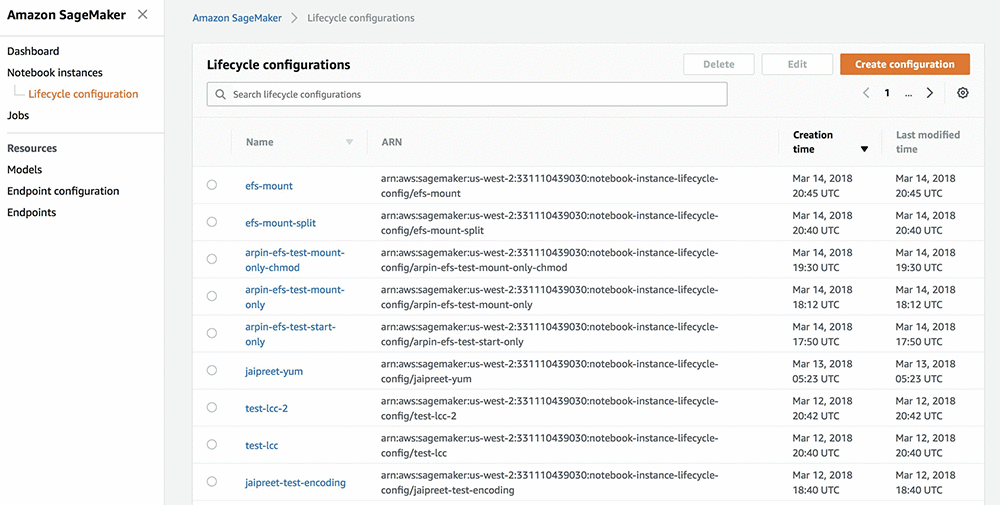
Lifecycle configurations offer you even more flexibility, by allowing you to create shell scripts that run whenever you create a notebook instance or run one. AWS offers a lot of already created scripts that you can find on their Github page. These range from exporting notebooks to pdf, installing packages, stoping idle SageMaker notebooks to controlling other AWS resources.
Lifecycle configuration management for Amazon SageMaker notebooks
Amazon SageMaker Experiments
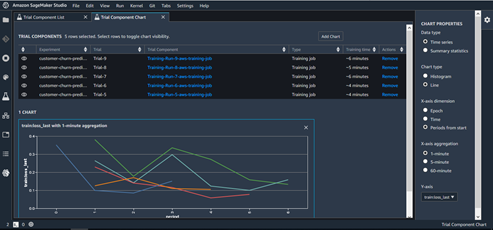
Using SageMaker Experiments, we can track different iterations of machine learning models. It creates an efficient way of organizing the different artifacts that are created when we try out a certain machine learning model. For each run, we need to store which data we used, which algorithm we used, and the parameters of that particular algorithm. Tracking all of that can quickly lead to problems in tracking the results of different combinations. Using SageMaker Experiments is most practical when used as a component of SageMaker studio, where we can search certain experiments by their characteristics and compare the results of different experiments. SageMaker experiments are built upon three basic components:
- Experiments
- Trials
- Trial components
Experiments are the basis of everything. We create an experiment, which is defined by some characteristics, e.g. the model we used and the input data. Once we have an experiment, we can create trials. Each trial consists of running a notebook. This means that by doing trials, we can do more than just track model training. By creating different trials, we make it easy to track and compare different runs.
Tracking experiments with SageMaker Experiments
Amazon SageMaker Debugger
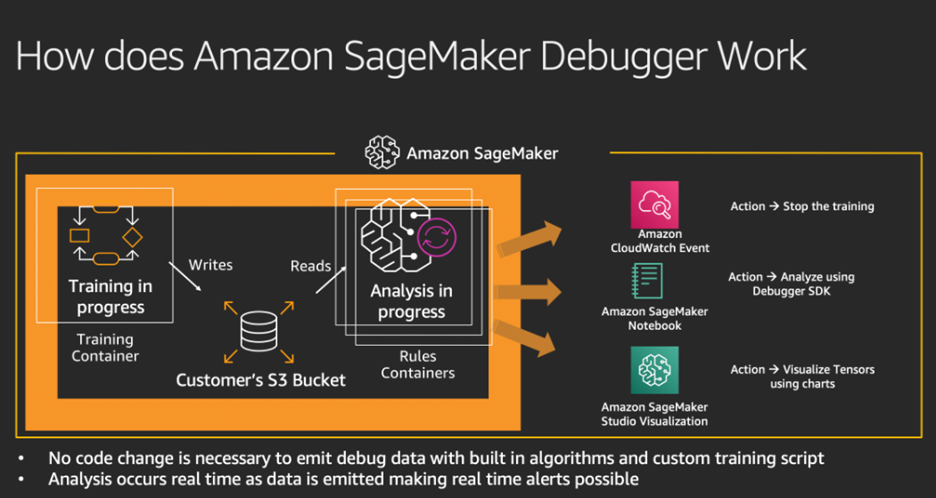
SageMaker Debugger works by capturing the training tensors during the training process. The information we gain by monitoring, recording, and analyzing tensors can later be used to create visualizations that depict the tensor data of a process. This information is accessible even during training. To put it simply, it captures a collection of different metrics during different stages of training a model. This in turn makes it possible to create Python objects that can interact with those metrics. The most useful part of SageMaker Debugger is the ability to provide real-time alerts. By noticing the problem as soon as it first occurs, the developer won't need to spend a lot of time searching for that problem later on.
SageMaker Debugger is highly advised for companies. It saves a company money by sending an alert as soon as we run into a problem. A quick investigation of the new problem usually leads to less time spent later on. Since AWS uses a pay-by-second payment model, it is very beneficial to spend as little time using its services as possible.
Amazon SageMaker Debugger
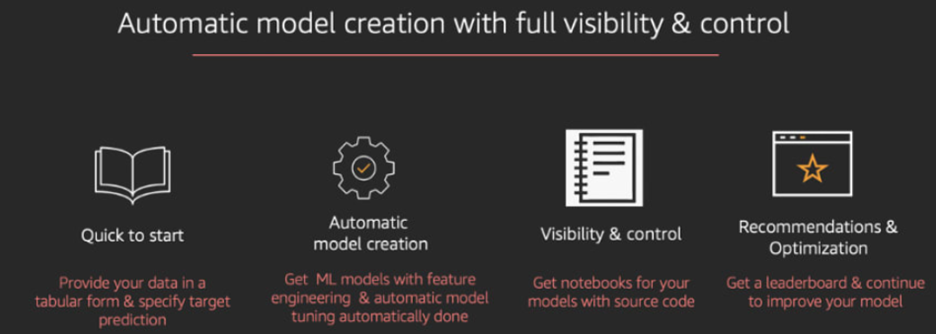
Amazon SageMaker Autopilot
SageMaker Autopilot was created to further simplify using AWS for machine learning by creating an automatic service that does everything on its own. Autopilot will first look at the available dataset and will then decide on a few different potentially optimal machine learning workflows. These workflows don't include just picking a model automatically and tuning it but also include automatic data preprocessing. It will also generate code that is used for that preprocessing so users can later use that code for manual tuning. After going through all of these steps, Autopilot will create an inference pipeline, which can be used to deploy models.
To sum up, SageMaker Autopilot covers these functionalities:
- Loading and preprocessing data
- Can work on regression and classification problems
- Automatic model tuning
- Distributed training
- Automatic instance selection
- Automatic cluster size selection
Amazon SageMaker Autopilot
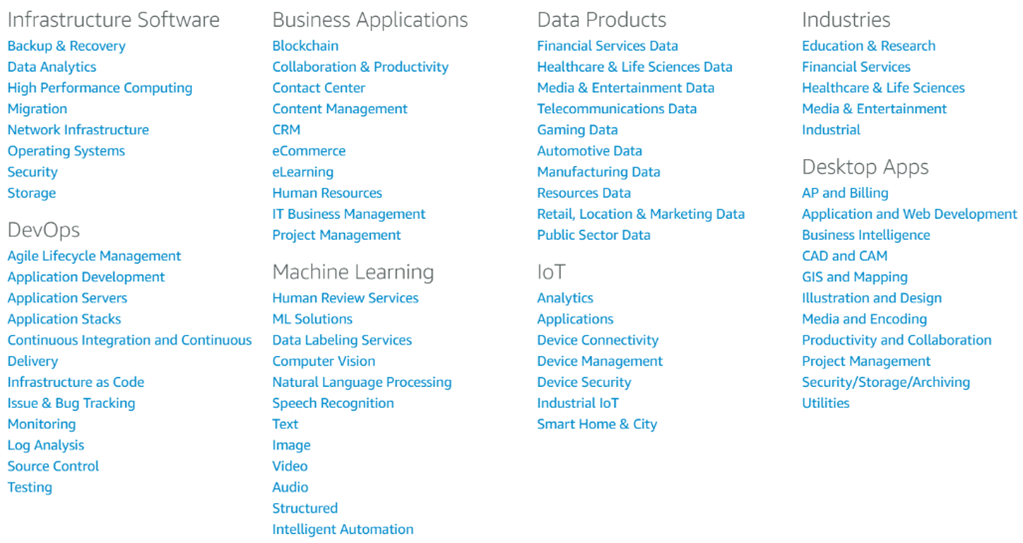
AWS Marketplace
AWS Marketplace is a special case. It is not connected to other components directly. It is a marketplace where independent vendors can sell their solutions to whoever wants to buy them. Those solutions are broadly separated into eight categories.
AWS Marketplace categories
Each buyer can look through a catalog and search for a product that suits their needs. AWS Marketplace also helps a company with software licensing and procurement, while at the same time making sure that the customers can find, buy, deploy, and manage software solutions with little to no effort.
Automatic Model Tuning
Automatic Model Tuning, also called hyperparameter tuning, allows the user the specify the model they want to use, the dataset they want to use, and the range of hyperparameters they want to try out. The model then gets automatically tuned, using either a random search or a bayesian search. The user ends up with the best possible version of their chosen model. The user just needs to take into account the training resources that are going to get used. Each run still requires time, and for bigger models, this might lead to spending too much money.
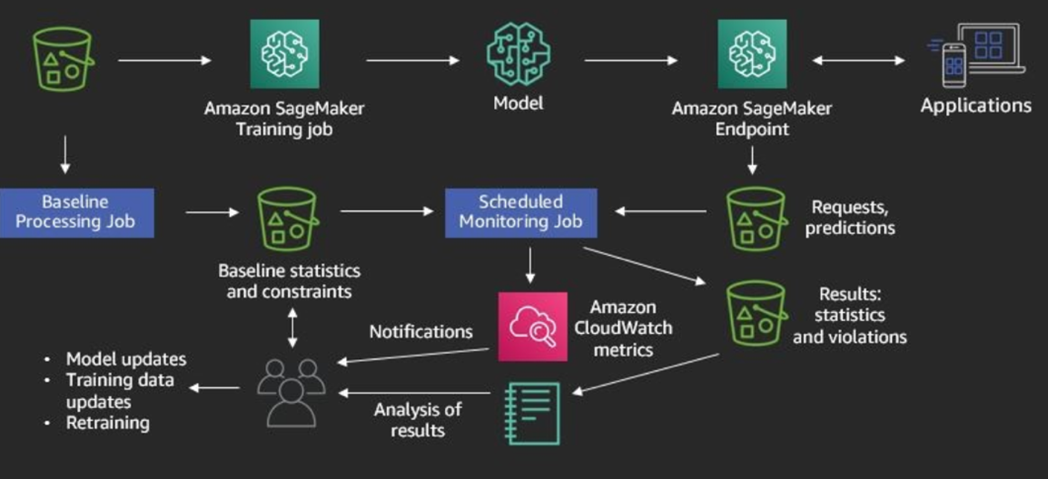
Amazon SageMaker Model Monitor
SageMaker Model Monitor is a tool made to battle concept drift. In machine learning, concept drift refers to the change that happens in the relationship between input and output data through time. It is also called covariate shift or dataset shift. Because data evolves, models also must evolve, or else they become obsolete. Using Model Monitor, the user can detect deviations in quality that can happen for deployed models and can receive alerts based on those deviations. Noticing deviations is very straightforward. SageMaker collects many metrics from models that have been trained in it. Comparing those metrics makes deviations very clear. Using SageMaker Model Monitor is especially easy from inside SageMaker Studio. To enable model monitoring, several steps need to be taken:
- Capture data - the endpoint must be able to capture data from requests and model predictions
- Create a baseline - baseline schema constraints and statistics need to be computed for features so we can build a baseline from the dataset that we used to train our model
- Schedule monitoring jobs - schedule data collection, data analysis, and reports
- Interpret results – compare the latest data with the baseline to try and find potential violations (also includes looking at metrics and notifications from Amazon CloudWatch)
Amazon SageMaker Model Monitoring
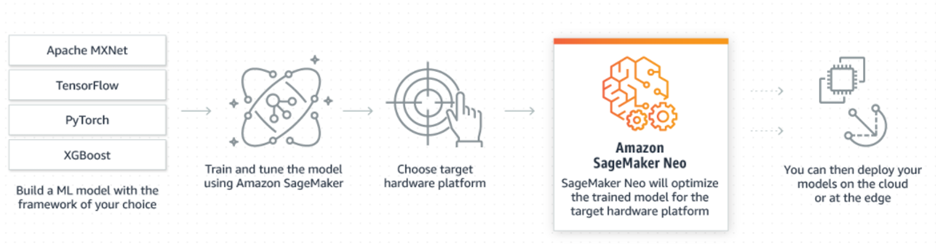
Amazon SageMaker Neo
Neo serves as a model optimizer, focused on tuning models so they work better at the edge. Edge devices are characterized by memory and processing power constraints, but the developers still want their models to give accurate low-latency predictions. Usually, developers spend a lot of time optimizing models, but they don't need to worry about that with SageMaker Neo because Neo automatically optimizes models. Models optimized with Neo tend to run two times faster without losing accuracy.
Using Neo is as simple as picking the target hardware platform. Taking into account the model that you want to optimize, it will compile the model into an executable using a neural network to make sure that the model is optimized for that specific platform. Another benefit to Neo is that it is available as open-source code under the Apache Software License as the Neo-AI project. Models that are compiled can easily be deployed to the cloud or at the edge. To make edge deployments swift, it is recommended to use AWS IoT Greengrass. It supports Neo-optimized models, so it will allow the user to deploy models with over-the-air updates directly to the edge.
Role of Amazon SageMaker Neo
Amazon Augmented AI
Amazon Augmented AI (Amazon A2I) is a supportive service, designed to complement other services. From time to time, a machine learning model will give low-confidence predictions. To ensure that the results are correct, humans must review those predictions. Building a workflow that makes human revision manageable can sometimes be very complicated. This is where Amazon A2I comes into play. It is a tool used for creating workflows that make human reviews of low-confidence predictions quick and easy. It does that by supplying the user with prebuilt workflows. Those workflows are especially useful when an individual uses another Amazon service such as Amazon Rekognition (used for image and video analysis) and Amazon Textract (used for extracting data from documents, e.g. extracting handwriting), but are also very easy to adapt to custom machine learning models.
To sum up, Amazon A2I allows users to easily integrate a human review workflow inside their main workflow. This makes reviewing machine learning model predictions easy and allows the user to easily integrate human reviewers into their machine learning workflow. You can choose your reviewers, which makes it possible to use both private vendors and even services such as Amazon Mechanical Turk. Using Amazon A2I has proven to be of great use in content moderation, model accuracy monitoring, loan application processing, reviewing explicit adult content, sentiment analysis, video and audio files transcription, reviewing translations, and much more.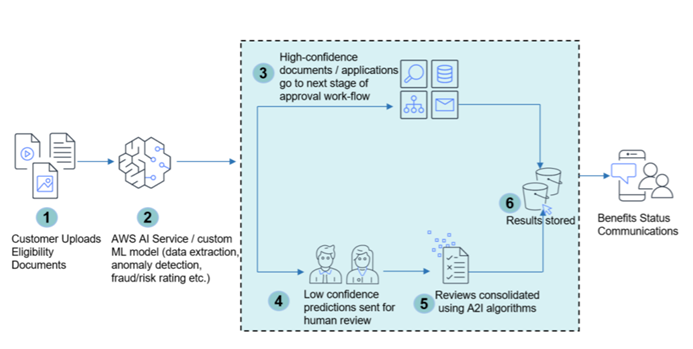
Example
After covering how different Amazon SageMaker tools work, we will demonstrate many of its functions in an example. We won’t be able to squeeze in every feature in this single article, and we are going to focus on using the free options that every free AWS account has at its disposal.
Trend followers and recent conference attendees will also notice that this tutorial doesn't include the newest features that were added to SageMaker in December of 2020. These features will be explored in the third and final article of this series. They are exciting additions that have the potential to further simplify building a complete MLOps workflow.
In this example, we are going to:
- Create an S3 bucket
- Open a new Amazon SageMaker Studio instance
- Create a new Amazon SageMaker Studio user
- Upload our dataset
- Separate data into test, training, and validation datasets
- Upload data to our bucket
- Define an experiment
- Define a trial for our experiment
- Train a model and connect it to our trial so the parameters get tracked
- Deploy our model
- Test our model by feeding it test data
We won't focus too much on demonstrating how we prepare datasets since that is not the main goal of this article, nor will we focus on feature selection, feature engineering, etc. We are going to use a dataset that already contains relatively clean data. The dataset we are going to use is the Heart Disease UCI dataset. We are going to work on a simple classification task. The dependent feature of the dataset is defined by the "target" column. We want to use the other features to predict the values inside the "target" column.
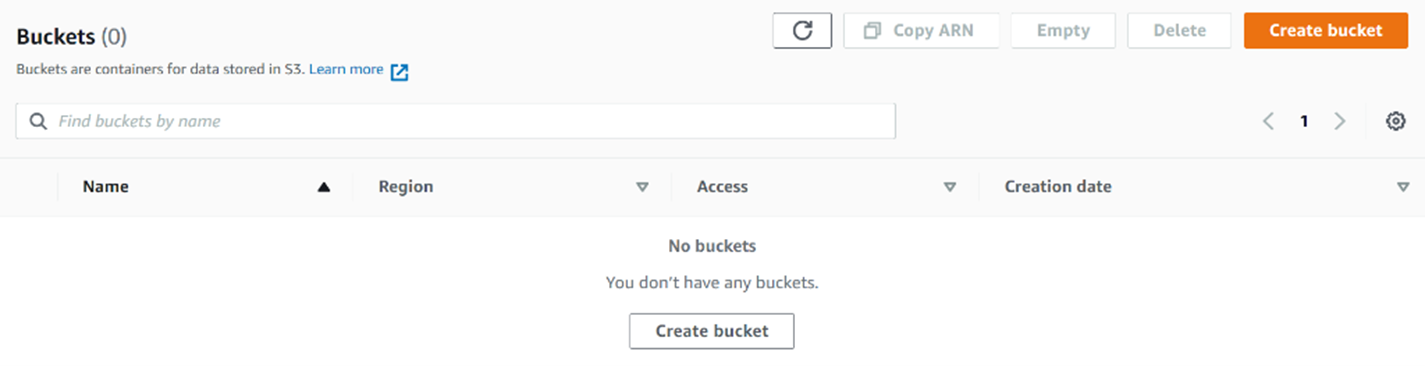
We will start by creating an S3 bucket. You could also use previously created buckets, but for the purpose of demonstration, we are going to create a new one. If you wish to know more about S3 buckets, you can consult the Introduction to MLOps on AWS article from this series. We need to create the bucket so we have a place where we can store our data. To create a bucket, we just need to go to the S3 services screen on AWS and click on either of the "Create bucket" buttons.
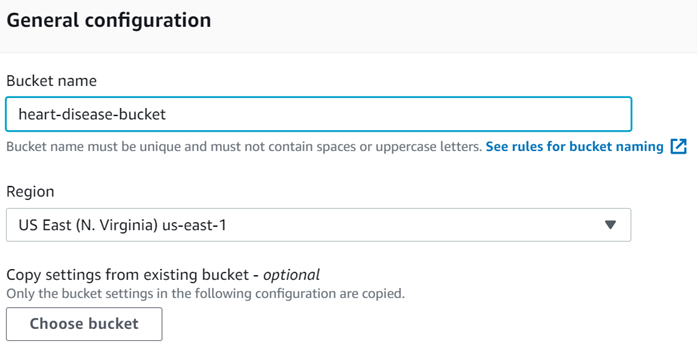
This will lead us to a screen to configure the bucket we are creating. Be sure to give the bucket a name that is unique if you already have S3 buckets, and choose your region. We are going to name our bucket "heart-disease-bucket".
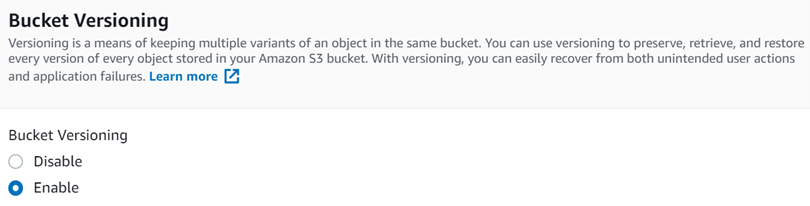
For the rest, we are going to go with the default options. The only thing that needs to be changed is the "Bucket versioning option", which needs to be enabled. Versioning is a very important part of MLOps, so it is good practice to create workflows that allow for easy versioning. If you wish to know more about which tools we use for versioning, you can consult the An Introduction to MLOps article. To select that we want to use versioning, we just need to click on "Enable" when creating the bucket.
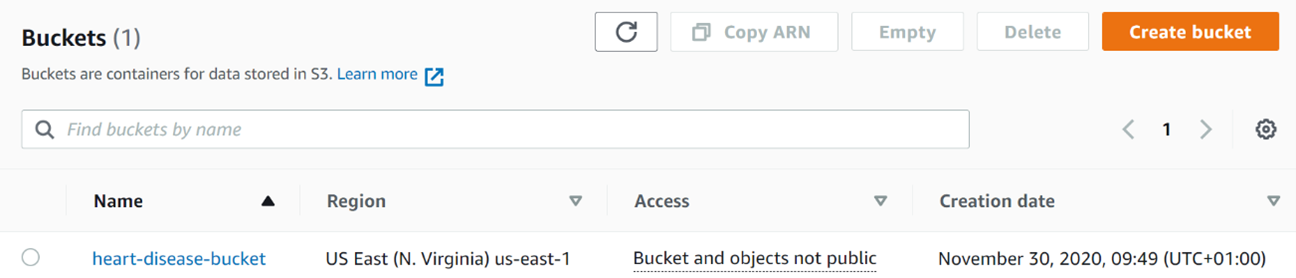
The newly created bucket will be displayed on the Amazon S3 screen, inside our bucket list. With this, our storage space is ready.
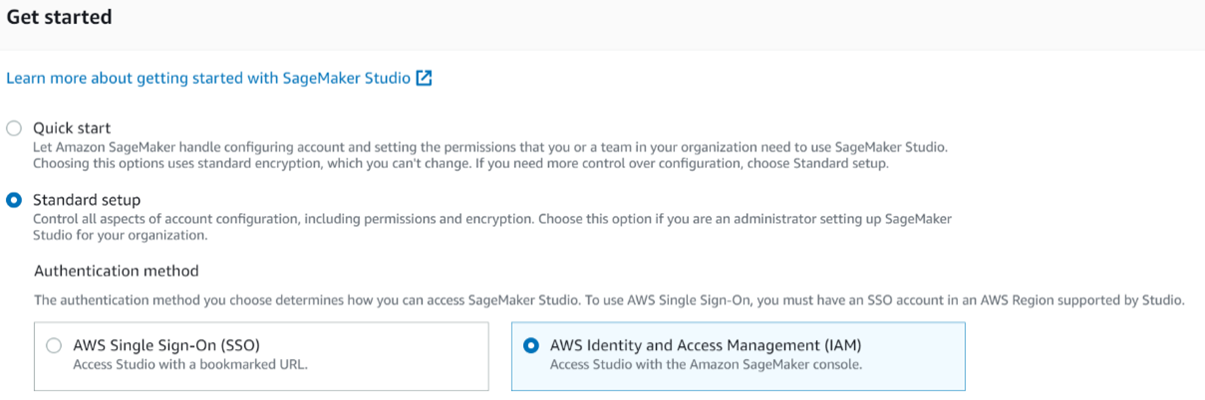
We can transition to working with SageMaker Studio. The free account used for this demonstration doesn't have a Studio created, so let's do that first. To create a SageMaker Studio, we need to go to the Amazon SageMaker page on AWS and select "Amazon SageMaker Studio". This will prompt us to create an Amazon SageMaker Studio instance.
When setting up SageMaker Studio, we are not going to use the quick start option. The quick start option doesn't let us control all aspects of our account when we create it. Configuration, permissions, and encryption can only be configured when we use the "Standard setup" option. To start, we are going to select AWS IAM as our authentication method because we want to access Studio with the SageMaker console.
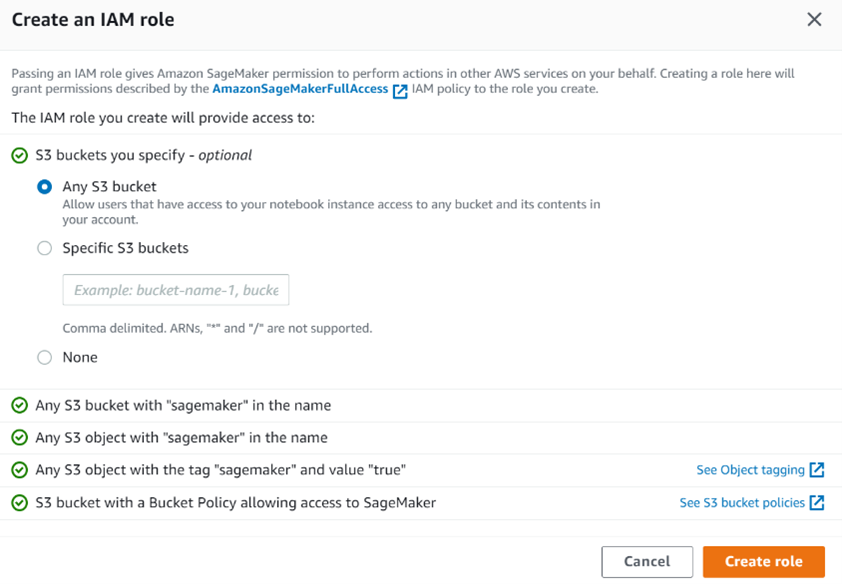
Now that the authentication method is configured, we need to specify the role we are going to use. We can use a premade role or we can create a new one. Since this account doesn't already have roles we can use as a template, we are going to create a new role by selecting "Create a new role" under "Permission". When creating a new role, we can specify which buckets can be accessed using it. We are going to set it to "Any S3 bucket". We can do this because we have only one bucket, but sometimes roles have access only to specific buckets.
The other options we need to specify are:
- Notebook sharing configuration - optional
- Network and storage - not optional
- Tags - optional
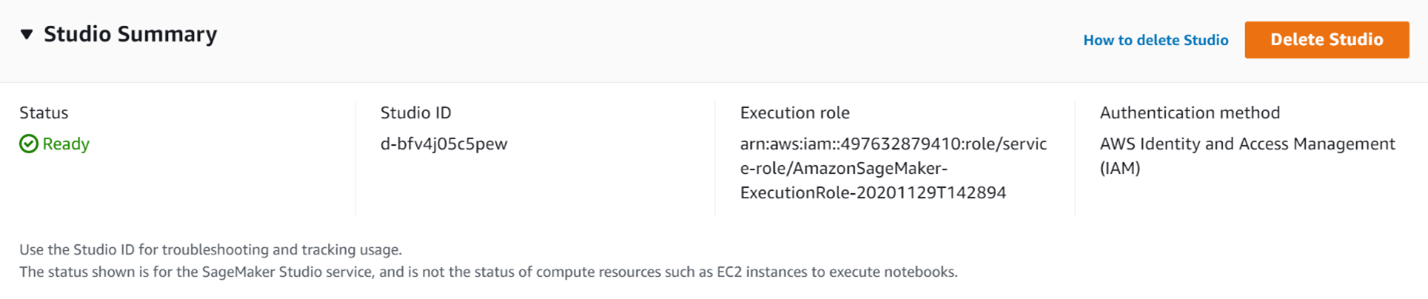
We can leave these three options on default. They are not relevant for this demonstration. Our preparations are now complete. Now we just have to wait for a little, because AWS needs a few minutes to prepare everything. The Studio status will be "Pending" while everything is getting prepared. Once our instance transitions into "Ready", we can start using it.
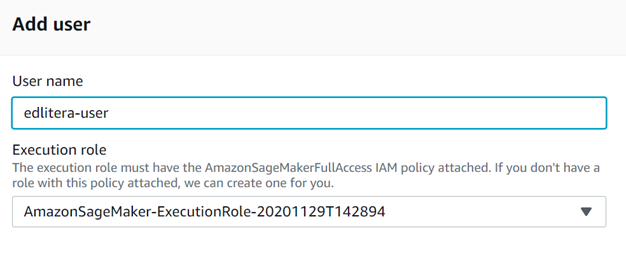
To start coding, we first need to specify a user. Studio is designed with the idea that it will be created by an administrator that will then help data scientists and other team members use Studio by creating users for them. This will make things easier for those users. It will minimize how much they need to use the AWS console in their work compared to when they were using notebook instances. To add a new user, we just need to click on "Add user".
When adding users, we need to specify a user name and we need to specify the IAM role attached to them. We are going to name our user "edlitera-user" and we are going to connect it to the role we specified earlier.
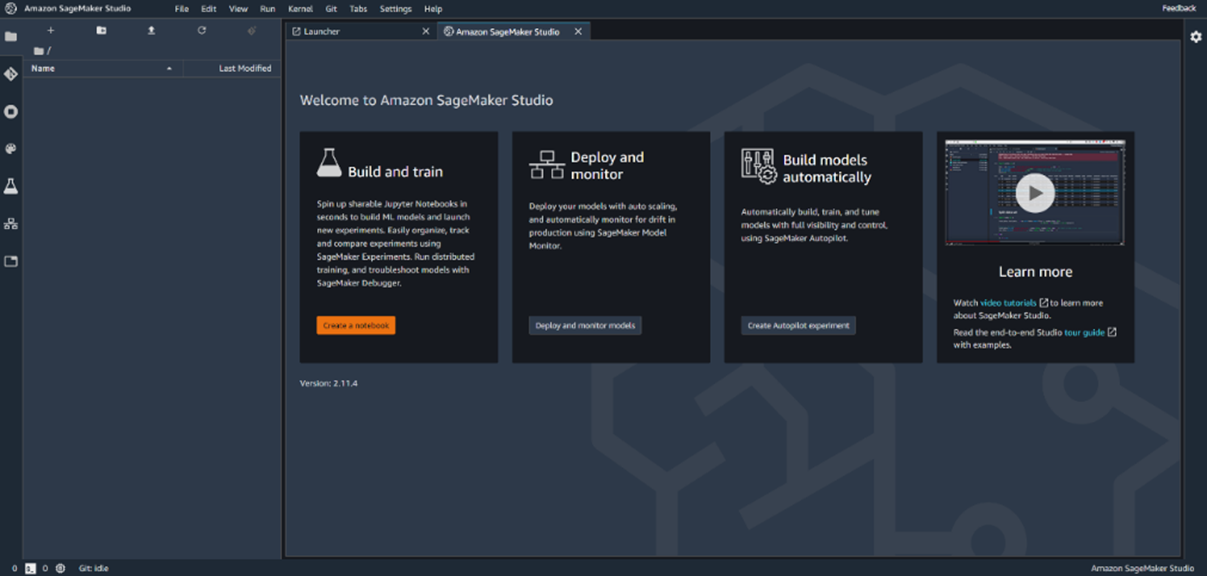
Once our user is ready, we can enter Studio and start working with our data by clicking on "Open Studio" next to our user. Upon entering Studio, we are brought to a screen that looks like this:
As can be seen, SageMaker Studio works by extending the JupyterLab interface. There are a few options available from the start:
- Build and train - create Jupyter notebooks to build models and do experiments
- Deploy and monitor - deploy with autoscaling and monitor for drift
- Build models automatically - leverage the power of SageMaker Autopilot to automatically build, train, and tune models
- Learn more - video tutorials that teach beginners how to use SageMaker Studio
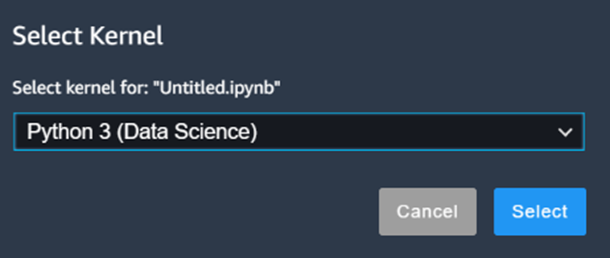
To start, we are going to create a Jupyter notebook. Starting a Jupyter notebook from SageMaker Studio is five to ten times faster than starting a separate Jupyter notebook instance without using SageMaker Studio. When creating a notebook by clicking on "Create a notebook" in the "Build and train" window, Studio will ask us what kernel we want to use for our notebook. The recommended kernel for data science has already been premade by AWS, so we can just use that one.
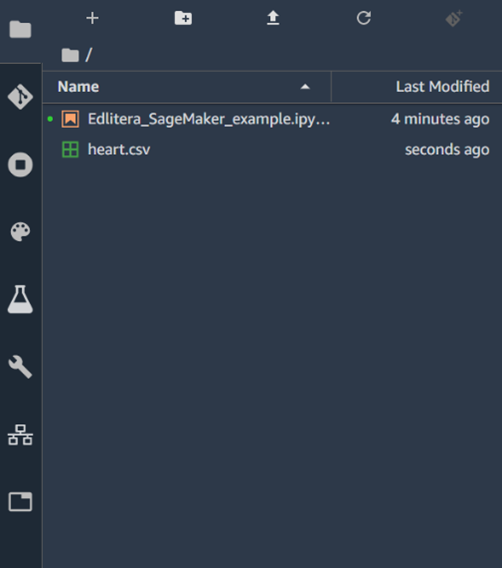
Kernels might take some time to start up, so we need to wait until everything is up and running before starting to code. The notebook is automatically assigned the name "Untitled". Let's rename it to "Edlitera_SageMaker_example". The next thing we will do is upload our dataset to SageMaker Studio. To do that, we just need to go to the file browser that is at the top of the window and upload our file.
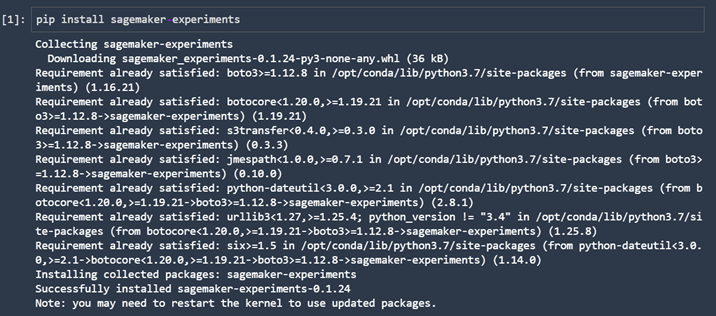
Once we upload our dataset, we can go to the next step, which is separating the data into train, validation, and test datasets. When coding, we usually import the necessary libraries first. However, since this example will also demonstrate SageMaker Studio Experiments (which is a library that is not included by default), we need to pip install everything we need for it.
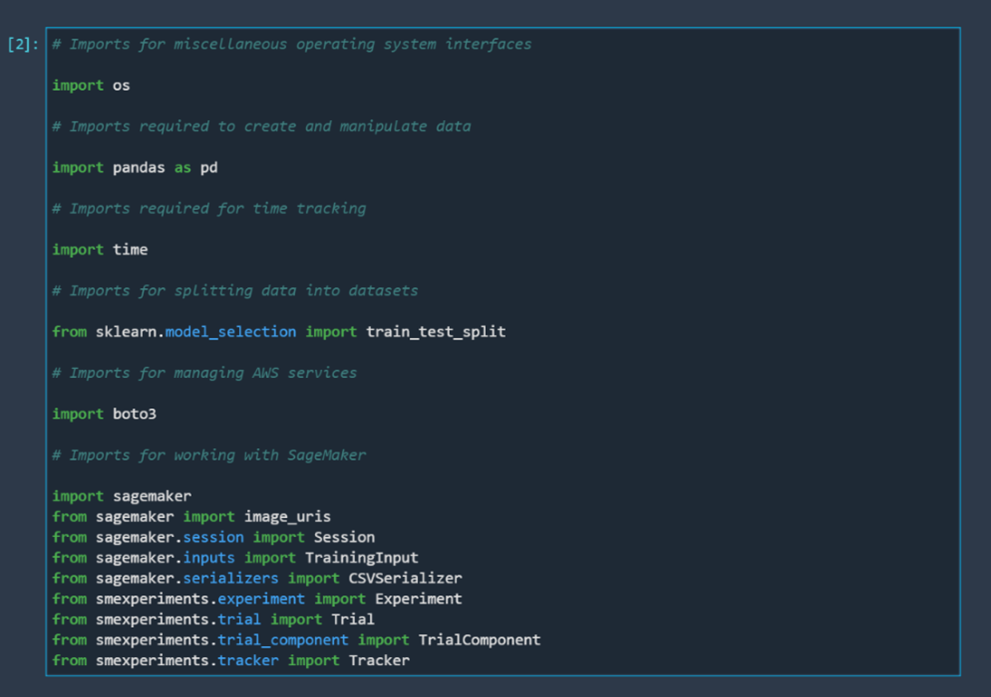
The next step is to import the libraries we are going to use. We are going to use several different libraries, both standard libraries and libraries connected to AWS services and working with SageMaker.
After importing what we need, we are going to load in our data and create a dataframe. We already said that we are not going to analyze our data, however, there is one thing we need to check. By default, SageMaker treats the first column of a dataframe as the column that holds the values that we want to predict. If "target" isn't the first column in our dataframe, we have to rearrange the columns.
It seems that the "target" column isn't the first column in our dataset. It is the last column. Let's change the order of the columns so that the "target" column becomes the first column, and check our results.
Now that we have dealt with that problem, we can focus on separating our data into three datasets: one for training, one for validation, and one for testing.
After separating our data into datasets, we need to create CSV files from them so we can store them in our S3 bucket. Although we could simply load the data from this notebook for the purposes of training our model, it's good practice to get used to saving datasets into our S3 buckets. This allows us to track different dataset versions. This is very important so that we can try out training the same model using different datasets.
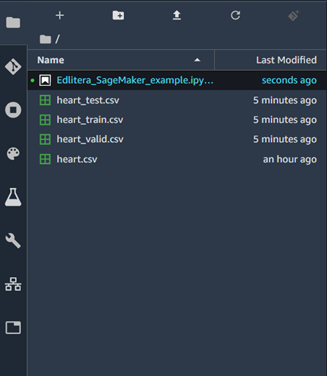
The result will be immediately visible in the file browser of SageMaker studio.
After creating the CSV files, we need to upload those files into our S3 bucket. To do that, we must first specify a few variables, such as our boto3 session, our bucket name, the prefix which we will use when uploading into our bucket, and the output path for our model.
Now that we have defined those variables, we can go ahead and upload our CSV files to our bucket.
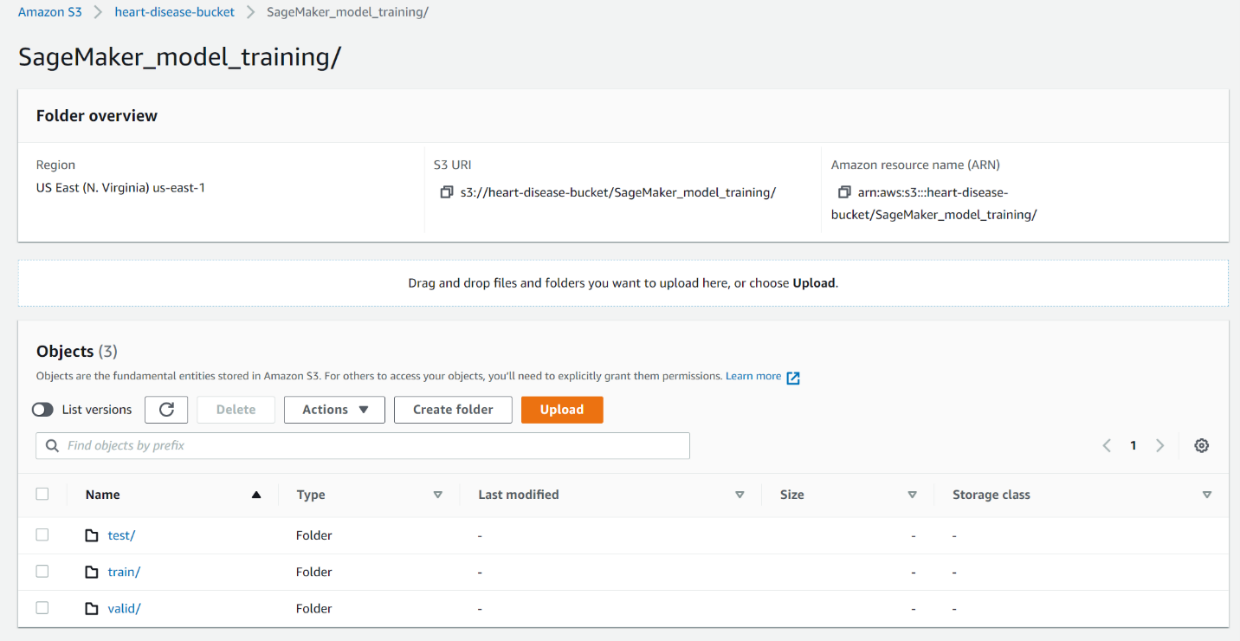
This will immediately be visible in our bucket. We can see that the three directories are created. Inside each of those three is the corresponding CSV file.
Once our data is prepared inside our S3 bucket, we can point SageMaker towards it. We will define where SageMaker needs to look for training and validation data when training the model.
Now we have everything we need to create a model and train it. However, before we do that, let's configure an experiment and a trial. This way we can track our model. We can connect it to the parameters that were used and the different metrics that were measured. This is a very useful feature of SageMaker that becomes increasingly important as the number of different versions of our models grows.
First, we will create an experiment. In this example, we are going to go through creating just one experiment. However, you can create multiple experiments by following the same steps.
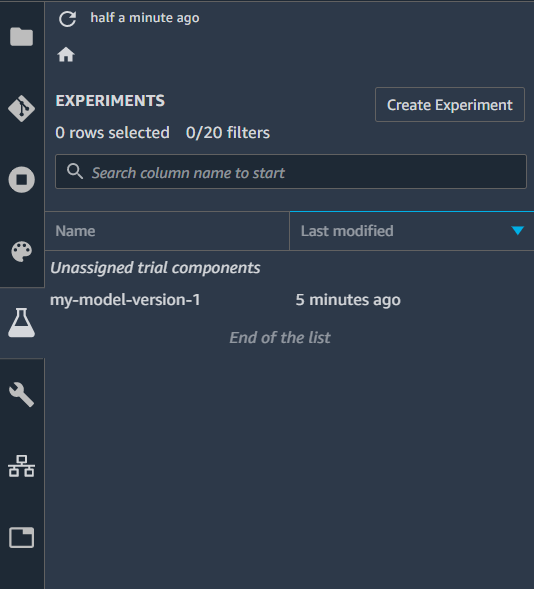
After we create the experiment, it will show up in our experiments window.
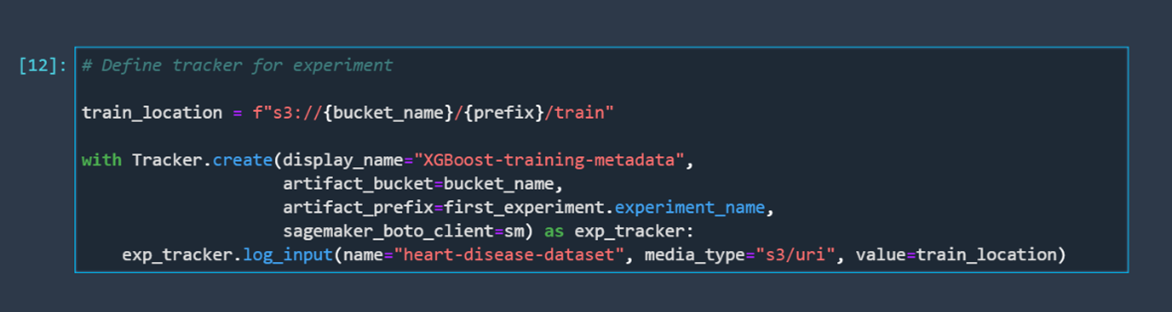
Now that we have an experiment, we must create a tracker for it. Trackers are important because they define what we want to track about our experiment. For this example, we will only track the training data that we use for training our model, just to keep things simple.
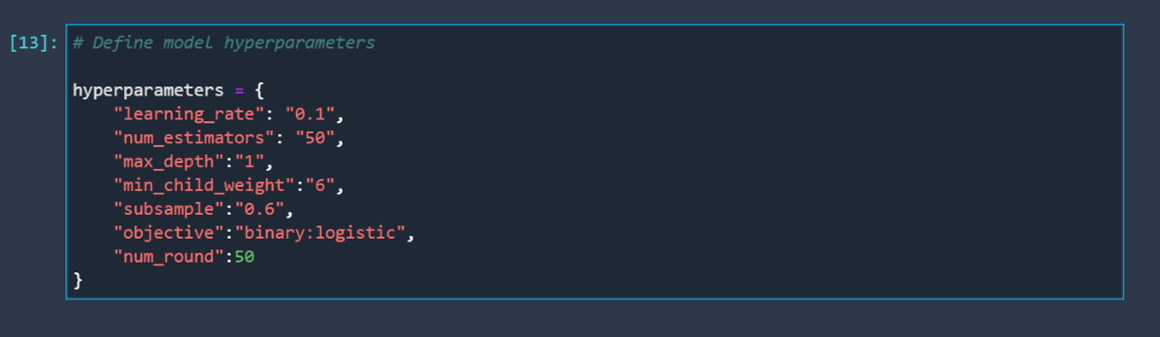
After creating an experiment, we should create a trial. Before creating a trial, we need to specify a tracker for that trial. Let's define the model hyperparameters we are going to track and log.
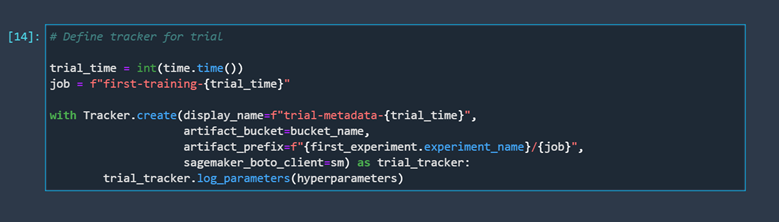
To make tracking our trial easier, we are going to track the time it was performed using the time library. Now we have everything we need to create a tracker for our trial.
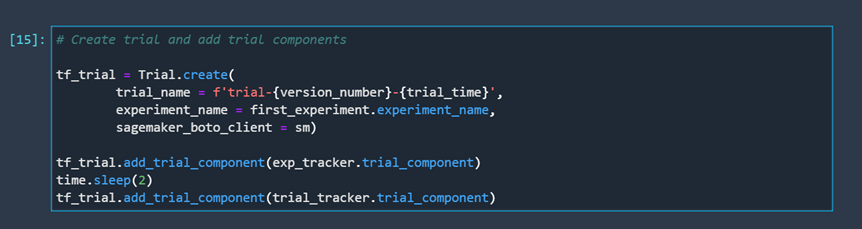
After finishing the preparations, we can create the trial and connect it to the trackers we created earlier.
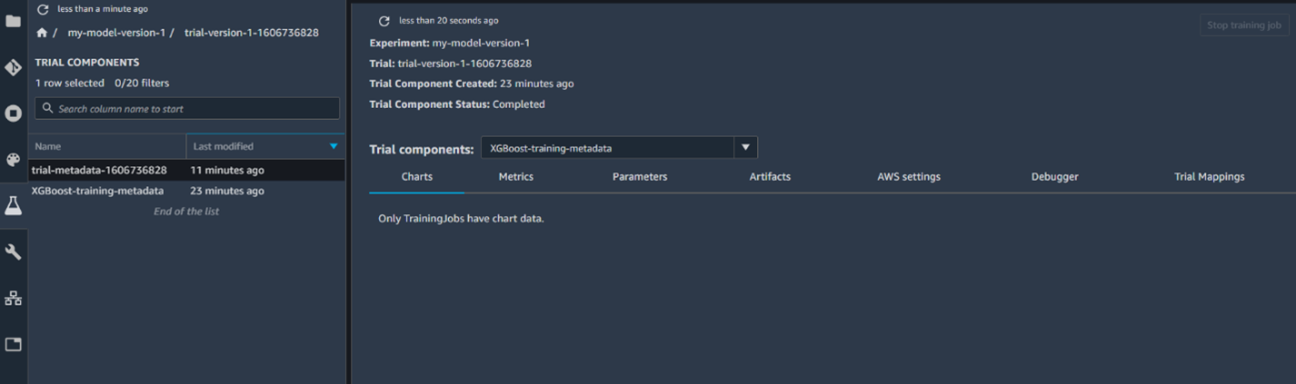
The trial will instantly get created. It is important to note that, at this moment, we can see that certain fields are still empty. The trial doesn't have any model training results at its disposal right now because we didn't train a model yet.
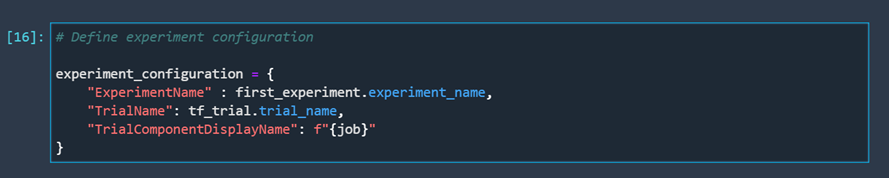
To make sure that we can later connect the process of training our model with our trial, we need to define our experiment configuration. This means we need to tell the model which experiment and trial it needs to send data to.
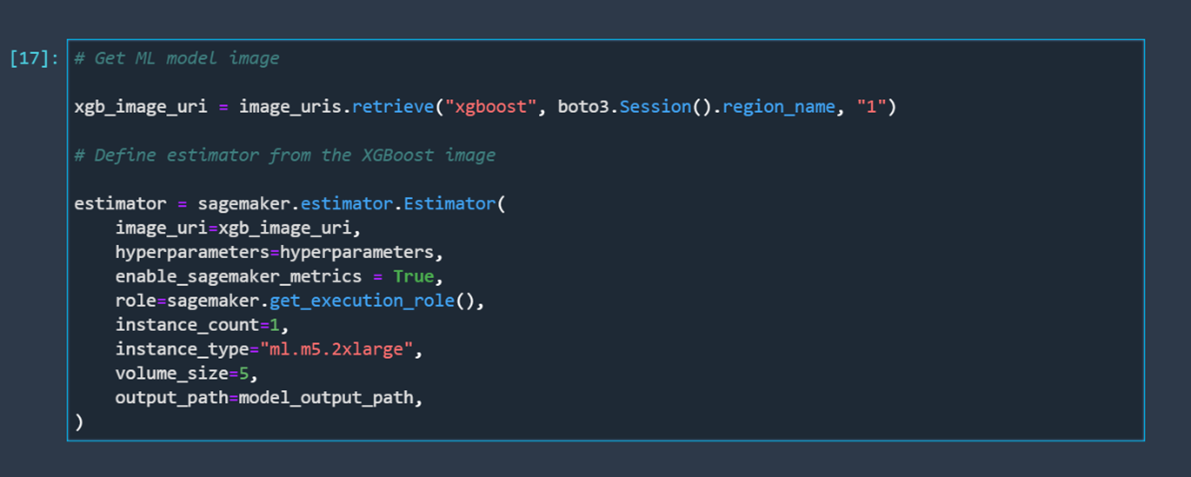
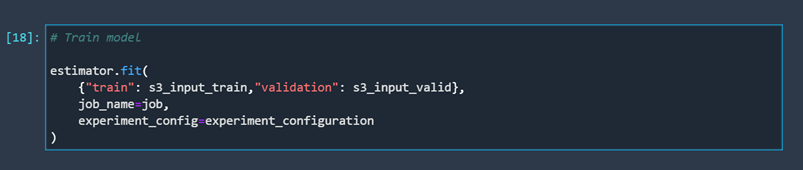
Now that everything is prepared, we just need to define our model, train it, and deploy it. Let's start by defining our model. We are going to create an XGBoost model using an XGBoost model image with the hyperparameters we defined earlier. We will create only one large instance since that is all we need for this example.
Once we define our model, we can train it.
When the training finishes, we can see how many billable seconds are connected to that particular training job. There is a way to make training cheaper by using managed spot training, but the model used in this example trains too fast for that to be relevant.
Let's take a look at our trial information. Let's first check whether our input for the experiment was properly tracked.
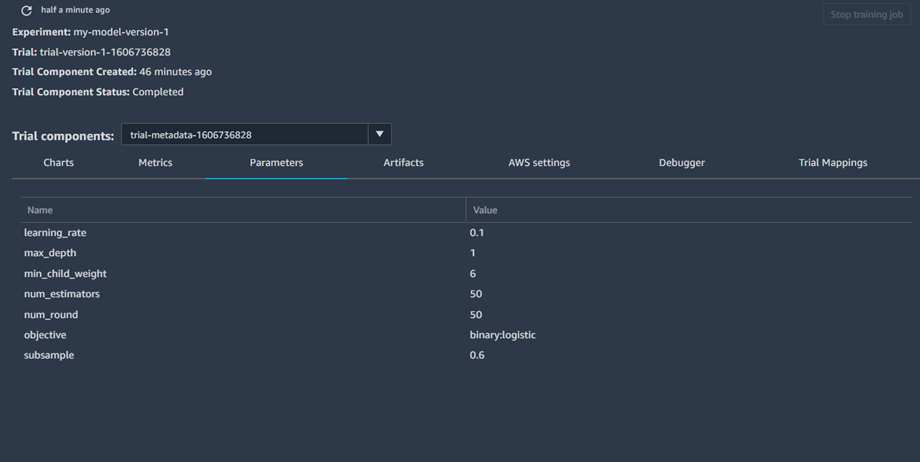
The training data we used, from the bucket we created, has been tracked successfully. Let's take a look at the tracker that was tracking the hyperparameters we used.
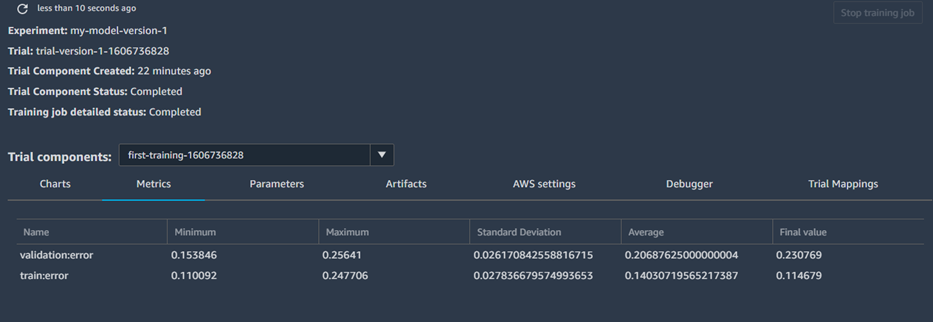
The hyperparameters we used were also tracked successfully. If we did multiple trials, we could compare the parameters used for this run with the parameters from other runs to see which hyperparameters will lead to the best possible results. Let's check to see the results of tracking our training.
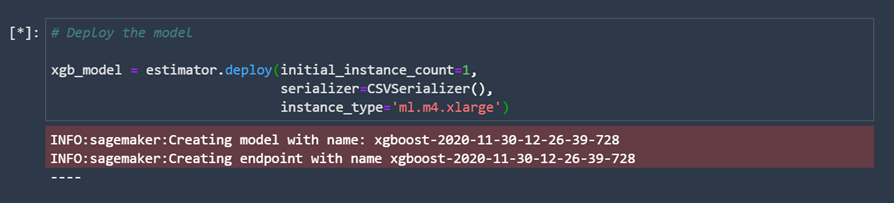
We didn't analyze our data and we didn't tune our model, which is reflected in the results. The validation error, in the end, is still relatively high, but that is not important since it is not what we are focusing on in this example. Now it's time to deploy our model. Deploying a model is done in just a few lines of code. Running this code can take a while.
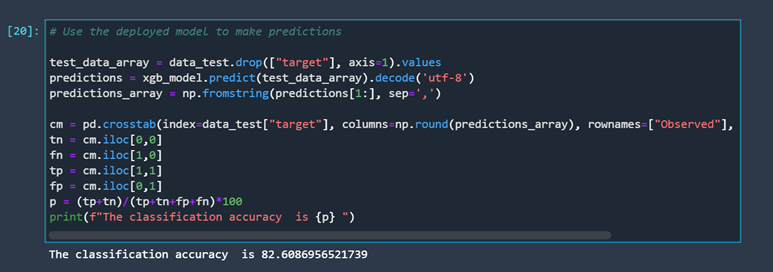
Once our model is deployed, we can use it to make predictions. Let’s use the test dataset we prepared earlier.
This finishes up the whole example. The last thing that we need to do is clean up everything we created. AWS is a cloud platform, so it is very important to track everything that you have running because you are getting billed for it. To make sure you don't need to pay any additional money, you need to:
- Clean up experiments and trials
- Stop the deployed model
- Delete the user we created inside SageMaker Studio, along with everything connected to that user
- Delete the SageMaker Studio that we created
- Delete the bucket we created
The easiest way to check if everything has been properly cleaned is to go to the "Billing & Cost Management Dashboard" on AWS, where you can see what you are getting billed for.
Conclusion
With cloud platforms becoming more and more popular, most machine learning and deep learning practitioners will sooner or later need to adapt and learn how to work on machine learning projects in the cloud. Although there are a number of cloud platforms available as possible candidates, it is always useful to focus on learning how to use the most popular one. The most popular platform for machine learning and MLOps as of this article is AWS. Containing a plethora of different tools designed to make practicing machine learning as easy as possible, AWS is a great platform to learn for those that are not familiar with working in the cloud.
Accordingly, the first service you should consider exploring is AWS SageMaker. As a service, SageMaker is constantly evolving. With the addition of SageMaker Studio relatively recently, learning how to use SageMaker has never been easier. SageMaker Studio unifies the tools necessary for ML development. As an IDE, it allows us to use an integrated visual interface to write code, create experiments, track them, visualize data, do some debugging, deploy our models, and monitor them. While SageMaker offers a relatively user-friendly interface, for someone who doesn't have experience working with cloud platforms, the sheer number of different tasks that can be performed using SageMaker Studio can be overwhelming and confusing.
The best way to understand how SageMaker functions is by using it. Starting with simpler projects and ending with implementing it as an integral part of an MLOps workflow leads not only to achieving higher proficiency in SageMaker, but also higher proficiency with the AWS platform itself. Becoming highly proficient in SageMaker is a big step towards achieving a high level of expertise in the field of MLOps. The companies that find the idea of working in the cloud interesting are also often the companies that find the idea of transitioning to a fully automated machine learning life cycle very tempting.
Throughout this article, the reader is first introduced to the various important topics connected to SageMaker. Later, they are led through a working example of preparing datasets (which also covers some basics of using S3 buckets), training a machine learning model, and deploying it. As a bonus, the process of creating an experiment alongside creating a trial is included in the example. This is also an integral part of doing machine learning with SageMaker because it allows us to track and compare our models. To make sure you don’t incur additional costs, some functionalities of SageMaker are not covered in the example. Also, functionalities such as SageMaker Model Monitoring can't be efficiently displayed through an example contained in an article. There is no point in monitoring a model that we created, deployed, and deleted in a matter of minutes. After going through this example, you should have the basic tools to get started with using SageMaker, and begin your journey towards becoming a machine learning specialist on AWS.
In the next article in this series, we will delve deep into the recently released SageMaker features, explaining each one of them in detail. A special focus will be given to SageMaker Pipelines. As the first purpose-built CI/CD service for machine learning, they are a step in the right direction for AWS, further cementing its position as the leading cloud platform for machine learning.

