


Table of Contents
- What Are AWS SageMaker's New Features and How to Use Them
- How to Create a Workflow Using SageMaker Pipelines
- How to Create a Studio Instance and User
- How to Define Pipeline Parameters
- How to Code the Processing Step
- How to Train Your Model
- How to Code the Processing Step to Evaluate Your Models
- How to Set Registration of Your Models
- How to Define a Condition for Your Model
- How to Define the Pipeline
- How to Run the Pipeline
- How to Deploy Your Model
- How to Manually Approve a Model
- How to Clean Up to Avoid Overcharge on What You Don't Use in This Demonstration
The previous articles in this series focused on familiarizing you with AWS services, specifically SageMaker, since it's the service created for machine learning on AWS. If you've read the previous articles of this series, you should already be familiar with how we can use AWS for MLOps and should also have some basic proficiency in SageMaker:
This will be considered prerequisite knowledge for this article since it won't go over those once again. The topics covered in this article instead go over the newest additions to SageMaker using one of those additions to demonstrate how easy it is to build a CI/CD workflow.
AWS SageMaker's new features were unveiled at the December 2020 re:Invent conference and show how dedicated AWS is to staying the best choice for MLOps in the cloud. All of these new features are designed to augment the already-existing features on SageMaker or to introduce new functionality requested by current AWS users.
In the following sections, we are going to go over each of the new SageMaker services and will, later on, create a CI/CD workflow to show how you can optimize your workflow orchestration and automation with SageMaker's newest features.
What Are AWS SageMaker's New Features and How to Use Them
There is something for everyone in the newly released features for AWS SageMaker. Some of them were introduced to augment the data preparation process, allowing you to aggregate and prepare data for machine learning, store data, update data, retrieve data, share features, and even detect bias and understand model predictions.
There is also a new feature added that contains pre-built solutions for common use cases. This feature is ideal for beginners because it helps you learn SageMaker quickly but also presents itself as a sort of benchmark anyone can use to see how good their custom solutions are. Big quality of life improvements were introduced for the training and tuning phase of the MLOps workflow, allowing for distributed training and for automatically debugging training runs. Monitoring and managing models on edge devices have also become much easier. But the biggest change was the introduction of a service designed for workflow orchestration and automation.
The features I will cover in this article are:
- SageMaker Data Wrangler
- SageMaker Feature Store
- SageMaker Clarify
- SageMaker JumpStart
- Distributed Training
- SageMaker Debugger
- SageMaker Edge Manager
- SageMaker Pipelines
SageMaker Data Wrangler
SageMaker Data Wrangler is a great new feature. It allows you to shorten the time you usually spend on data preparation. It makes aggregating and preparing data much easier, which in turn lets you focus on other things instead of losing time on tedious tasks. Data Wrangler allows you to work with data from a simple visual interface and performs:
- Data selection – data can be selected from multiple sources and imported from different formats.
- Data cleansing – covers operations such as imputing missing data, encoding data, using prebuilt transformations, or making custom ones.
- Data exploration and visualization – creating histograms, scatter plots, box plots, etc. to better understand data and identify potential errors.
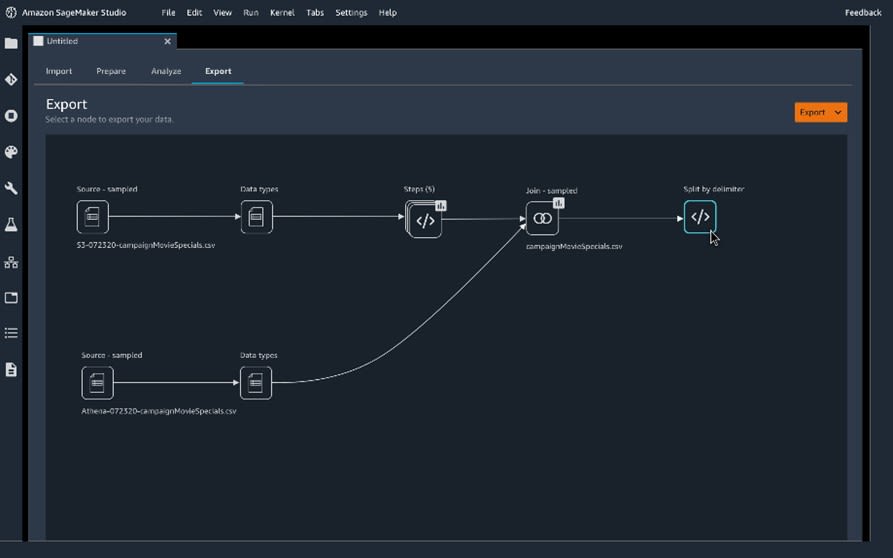
Data Wrangler's simplicity stems from the many built-in transformations that are accessed from the visual interface without coding, which significantly shortens the time needed to try out different transformations on the same data. Because it supports a wide range of visualization templates, Data Wrangler makes previewing and analyzing the results of different transformations very straightforward.
Image Source: SageMaker Data Wrangler, https://aws.amazon.com/sagemaker/data-wrangler/
One function that deserves its own paragraph is the ability to export the whole data preparation workflow into a notebook or code script with a single click, as shown in the image above. This is extremely useful and works well in tandem with SageMaker Pipelines, helping you to easily create a complete MLOps workflow. Data Wrangler also automatically publishes features to the SageMaker Feature store, which leads to effortless sharing between teams and allows features to be reused.
SageMaker Feature Store
One of the most important steps of preparing data for models is doing feature engineering. Just cleaning data (removing missing values, getting rid of outliers, etc.) isn't enough to truly optimize machine learning models. Creating features of high quality is of the utmost importance, but even if we manage to do that, it's still very important to create some type of feature store. Having a place to store features avoids the loss of productivity that arises from different teams running identical jobs or even writing a duplicate feature engineering store. Feature stores are usually built by machine learning teams, but SageMaker now offers a fully managed centralized repository for storing features in the SageMaker Feature Store.
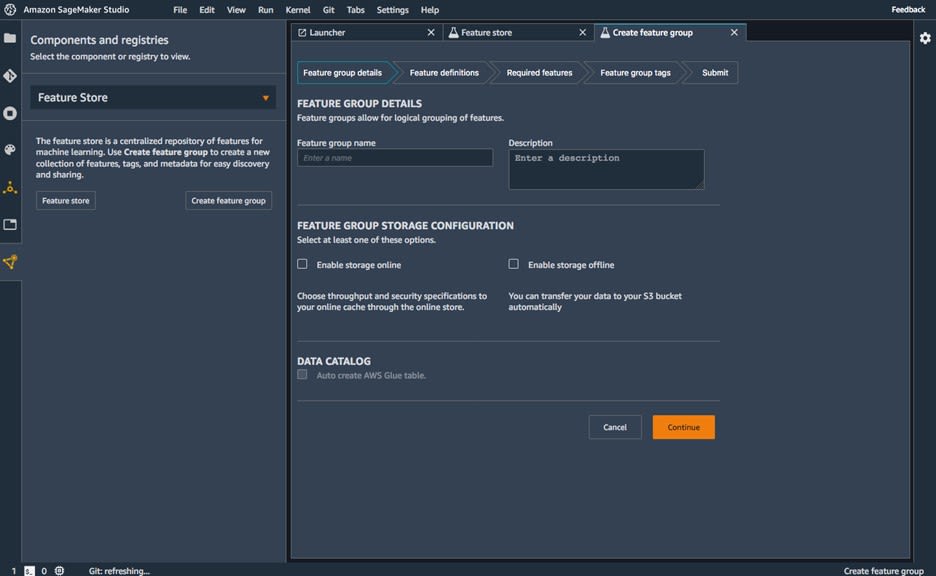
Feature Store is also integrated with SageMaker Studio, making it easy to work with from the same place where data preparation is done with SageMaker Data Wrangler. After running some code that creates features, it is easy to store those features using Feature Store in an organized way. You can create groups of features tagged with metadata.
For example, each feature is tagged with a timestamp which lets you retrieve the state of a feature at a particular point in time. Those features can easily be retrieved for use in SageMaker workflows at great speed.
Image Source: SageMaker Feature Store, https://aws.amazon.com/sagemaker/feature-store/
SageMaker Clarify
As a feature, SageMaker Clarify is integrated into several different features. It serves a few very specific purposes, which it achieves by integrating into other features:
- Imbalance detection – integrating with SageMaker Data Wrangler to find imbalances in the dataset.
- Bias detection – integrating into SageMaker Experiments and SageMaker Model Monitor to check for bias in trained models and in models that are deployed and monitored.
These functionalities might seem less important at first, but they lead to a greater understanding of the data you'll use for training models and of the models themselves.
Imbalances in the dataset can have an extreme influence on the results of training a model, creating imbalances that will make models unusable.
Checking for bias is also very important because it is a sign that the model is not valid anymore. Changes in the world can cause a shift in the model inputs, which then causes the model to start giving out biased predictions.
Another functionality that often gets overlooked is how SageMaker Clarify can help connect those who design models with customers and others that want to know the basis upon which a model makes its decisions. Using SageMaker Clarify to explain the behavior of a model can foster trust between groups.
Image Source: Amazon SageMaker Clarify, https://aws.amazon.com/sagemaker/clarify/
SageMaker JumpStart
This newly introduced feature is mostly designed to help those that don't have a lot of experience with SageMaker tools to get started as quickly as possible, whether it be to learn how to work with the different features SageMaker offers or to avoid as many complications as possible. JumpStart can also help you start using MLOps for problems you've already solved several times, where a lot of templates exist.
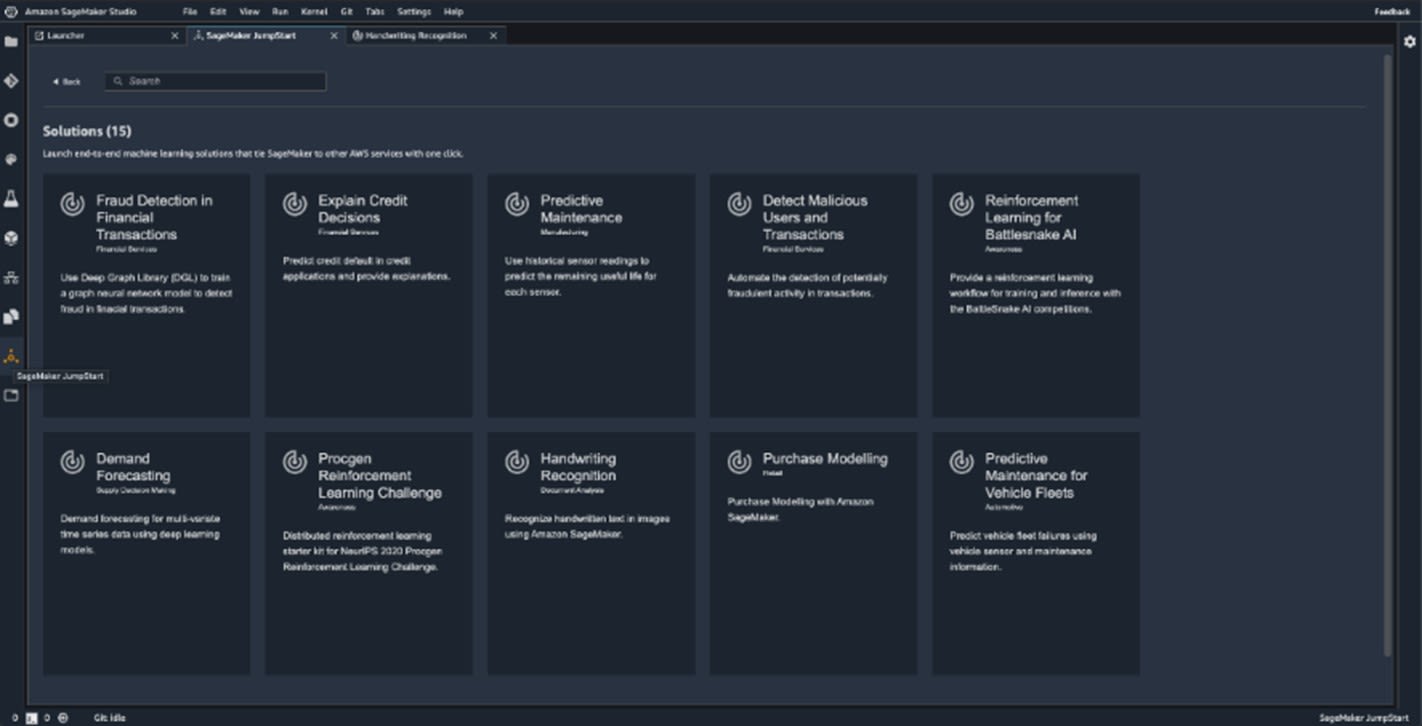
JumpStart makes it incredibly easy to start with MLOps. Without much knowledge, you can do some relatively complex operations using pre-built solutions. Those pre-built solutions are easily accessible from SageMaker Studio and come in the form of the following:
- End-to-end solutions
- Models
- Sample notebooks
End-to-end solutions can be deployed with a single click and cover everything that is needed for a complete workflow. AWS CloudFormation will use a template to prepare all the necessary resources and let you take a look at notebooks of the solution that is deployed, which is a great resource for learning more about creating end-to-end solutions on AWS.
You can also deploy a specific pre-trained model from a large collection. These models are trained on some stock datasets but can be fine-tuned on custom datasets to achieve greater accuracy (transfer learning).
Image source: SageMaker JumpStart, https://aws.amazon.com/blogs/aws/amazon-sagemaker-jumpstart-simplifies-access-to-prebuilt-models-and-machine-learning-models/
Article continues below
Want to learn more? Check out some of our courses:
Distributed Training
Working with machine learning and deep learning models automatically involves working with large amounts of data. This is especially true for deep learning models. Due to the nature of how deep learning models are trained, they require large datasets. Training on GPUs makes everything faster, but not fast enough. Training a model on a single GPU, no matter how strong, usually leads to training times measured in days, which is just not acceptable. The market changes very fast, so models need to adapt fast.
The solutions to that problem are found in the form of the following:
- Model parallelism
- Data parallelism
Model parallelism involves splitting models that are too large to fit on a single GPU across multiple GPUs. It is usually a very demanding procedure that involves teams of data scientists spending weeks to find the most efficient way to partition a model across multiple GPUs. Using only a few lines of code, you can use SageMaker to invoke an analysis of your model on SageMaker Debugger. This analysis tells you what is the most efficient way of partitioning a deep learning model in a matter of seconds. Further optimization of resources is achieved by splitting batches of data into micro-batches, ensuring that all GPUs are simultaneously active.
Data parallelism is what we call splitting large datasets to enable concurrent training of models. There are many benefits to using AWS for model parallelism, but most of them make models run faster than on other platforms. The main difference originates from a high level of synchronization between GPUs. This is achieved because SageMaker manages the GPUs that train models in parallel. Many will also find the ability to use already existing frameworks beneficial. Data parallelism is achieved through APIs that are already commonly used, such as DDP for PyTorch and Horovod for TensorFlow.
Distributed Training is very useful in many cases, but mainly for computer vision and NLP tasks. These two areas usually require data scientists to pick suboptimal training parameters due to hardware limitations.
SageMaker Debugger
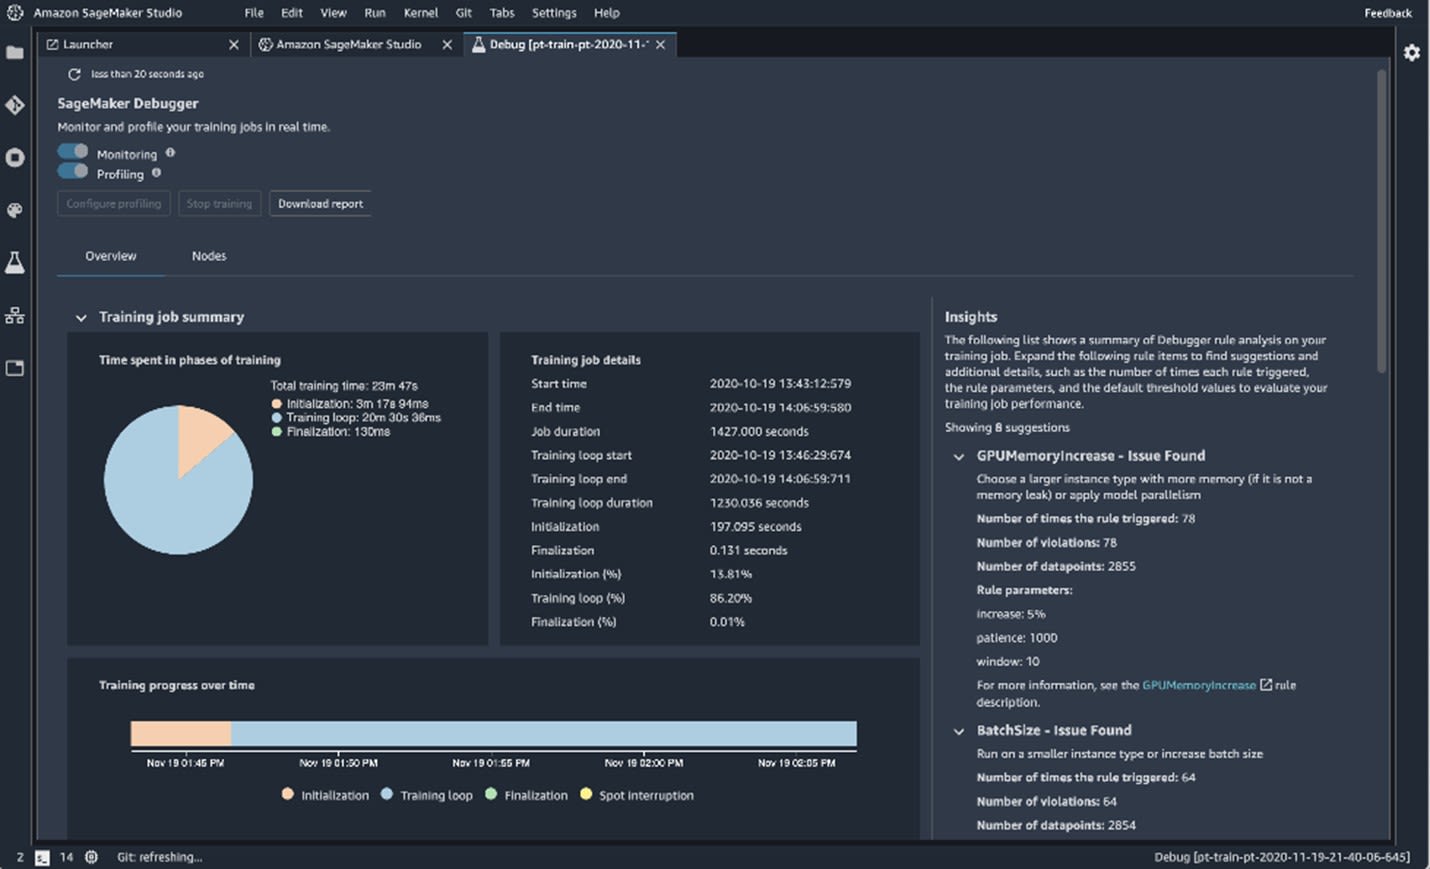
SageMaker Debugger is a great optimization tool for machine learning models. It works by tracking different metrics, which gives you insight into how your model functions.
Using Debugger you can do the following:
- Automatically detect common training errors and send alerts.
- Monitor resource utilization to find resource-intensive operations and identify system bottlenecks.
- Analyze different metrics during training, such as inputs, outputs, transformations, gradients, and other similar statistics.
- Set up early stopping based on conditions.
Debugger supports all of the most popular machine learning frameworks, e.g, XGBoost, TensorFlow, Keras, PyTorch, and Apache MXNet. By default, Debugger is included in the containers of these frameworks.
Debugger fulfills a very specific but very important role. Aside from giving useful information in terms of different training metrics, its role in determining resource usage is priceless. Finding bottlenecks allows companies to get rid of them, which in turn saves a lot of money.
Image source: SageMaker Debugger, https://aws.amazon.com/sagemaker/debugger/
SageMaker Edge Manager
Nowadays, there are a lot of devices that require real-time predictions made when new data is available. These different devices serve as boundaries between networks and are called edge devices. Often, edge devices run machine learning models and are especially easy to achieve with SageMaker Neo, which specifically optimizes machine learning models for edge devices. As a new service, SageMaker Edge Manager enables you to optimize, monitor, and maintain machine learning models on many edge devices simultaneously.
SageMaker Edge Manager works in tandem with Neo. To be more specific, Edge Manager provides a software agent that already includes a machine learning model optimized by Neo. When predictions using the machine learning model are made, a sample of the data is taken and sent to the cloud for monitoring, labeling, and retraining. This keeps models updated and removes the need for service disruptions leading to costly downtime. Edge Manager also makes sure to cryptographically sign models, making tampering with them impossible.
Using a provided dashboard, you can visually represent data returned from edge devices to easily identify problematic models. All the features, such as automatic optimization of machine learning models, continuous monitoring of machine learning models, easy integration with device applications, etc., are only what are currently available.
Edge Manager includes extremely useful features, such as serving multiple models on one edge device which is very important in certain scenarios. Sometimes, it is not enough to use just one model on an edge device.
For example, self-driving transport robots are becoming more popular in warehouses. Such a robot needs to use different machine learning models. An object recognition model allows the robot to find out the position of obstacles in its way, but the robot needs to also use machine learning models that will decide how to avoid every specific obstacle. This means that aside from detecting obstacles, robots must recognize what a particular obstacle is and how to avoid it using other machine learning models.
SageMaker Pipelines
SageMaker Pipelines is a phenomenal addition to SageMaker. There were ways before using AWS for orchestration, but they presumed knowledge of services other than SageMaker. While Pipelines still require you to understand the basic concepts or workflows, orchestrating workflows, and CI/CD principles, the ease with which the service is created, automated, and manages workflows at scale makes it irreplaceable.
As the first CI/CD service for machine learning, SageMaker Pipelines makes creating and managing new workflows so straightforward that even those with minimal knowledge of CI/CD can do it. Each pipeline built by the service is just a series of steps defined by a JSON file. These are encoded as DAGs (directed acyclic graphs), which allows for many scientific and computational applications. Using Pipelines makes it easy to track different relationships between steps in your pipeline. The output of each step serves as the input of the following step.
Image source: SageMaker Pipelines DAG, https://aws.amazon.com/sagemaker/pipelines/
The SageMaker Pipelines service supports the following step types:
- Processing – creating a processing job for data
- Training – creating a training job to train a model
- Condition – evaluates the result of a step, and based on a condition, executes a certain step
- Transform – used for batch transformations, ie., running inference on an entire dataset
- RegisterModel – used to register models to a model group
- CreateModel – used to create models
Building a pipeline comes down to selecting which steps you want to use and in what order. By creating a sequence of those steps, you can easily create the pipeline and automate different steps of the machine learning workflow.
Using Pipelines, we can automate all parts of the machine learning workflow:
- Data Loading
- Data Transformation
- Training and Tuning
- Deployment
Even if you're inexperienced, you can quickly start working with Pipelines because there are a lot of built-in templates. The built-in templates make implementing CI/CD in a machine learning environment very straightforward.
Everything gets logged and you can access logs that describe every step of the workflow. Models themselves are stored in the Pipelines model registry, which is a central repository that is accessed from both SageMaker Studio and the SageMaker Python SDK.
Using SageMaker Pipelines has an added hidden benefit. Because it has so many built-in templates and tutorials included, it serves as a fast introduction to the world of DevOps for total beginners. Of course, you are hardly going to become DevOps engineer just by working with Pipelines, but you will at the very least get introduced to some very important CI/CD practices. Version control, parity between different environments, on-demand testing, etc. are all concepts that most data scientists are not that familiar with, which is a problem. Since good communication between different teams inside a company is paramount, it is beneficial for all teams to know the basics of what other teams do.
Data scientists can make the job of DevOps engineers a lot easier if they are familiar with the concepts, but unfortunately, that is often not the case. Investing time into learning something that is outside of their field but is closely connected to it would benefit many data scientists and prepare them for the future. Sooner than later, most data scientists will be expected to be MLOps engineers and be familiar with DevOps concepts.
How to Create a Workflow Using SageMaker Pipelines
Here's a demonstration of the newly introduced service, SageMaker Pipelines. The prerequisite for the following example is some basic knowledge of AWS SageMaker. It's recommended that you read the previous article of this series. The previous article includes an introduction to SageMaker through Studio and explains how to access different SageMaker services from inside SageMaker Studio.
As a side note, this tutorial will also include spending some money. Although the cost is under $1.00, it's an unavoidable expense, since I'll be demonstrating a full end-to-end SageMaker workflow and you'll need to create an endpoint.
To demonstrate Pipelines, I'm going to use a SageMaker project template. Even though Pipelines makes creating a whole workflow very easy, coding everything from the beginning would still take up too much time and is not recommended even by the creators. The general idea is that, because creating everything from scratch is a waste of time, you should just take the offered templates and adapt them to your needs.
The SageMaker project template covers the process of creating a workflow for a regression problem. That problem is based upon the data from the Abalone dataset offered by UCL.
So, let's get started.
How to Create a Studio Instance and User
To start, you'll need to create a SageMake Studio instance. How to do that was already covered in the previous article. However, there are some changes that you should implement now that the new features have been added.
To be more specific, the creator of the Studio must allow users to use so-called project templates. Those are the templates I mentioned earlier when talking about SageMaker Pipelines.
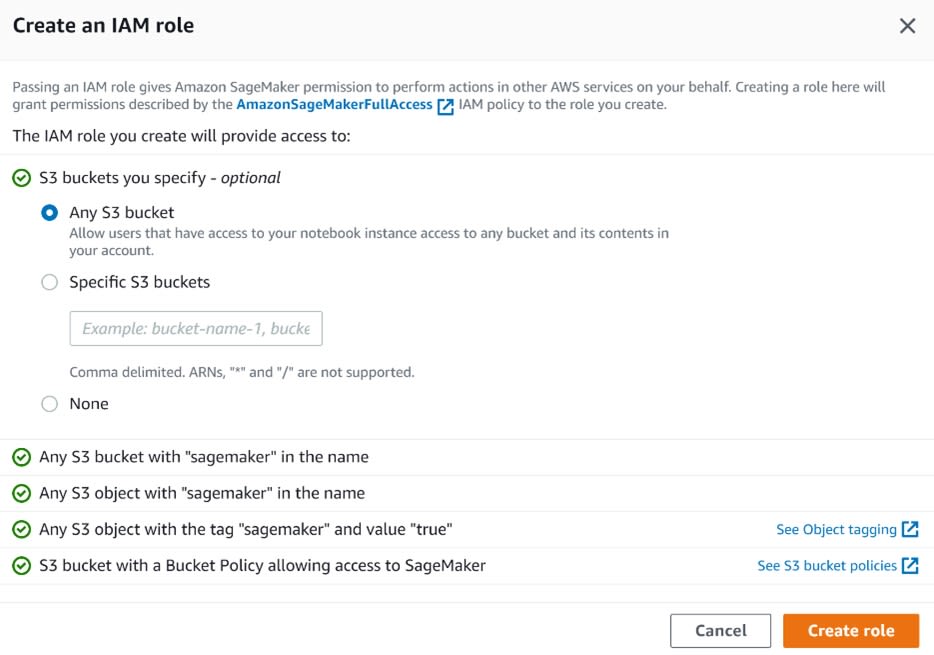
Let's create a new studio and name it Edlitera-Studio. For an IAM role, just select create a new role. When you create the role, make sure that you specify that you want to use data from any S3 bucket.
Image source: SageMaker Studio, https://aws.amazon.com/sagemaker/getting-started/
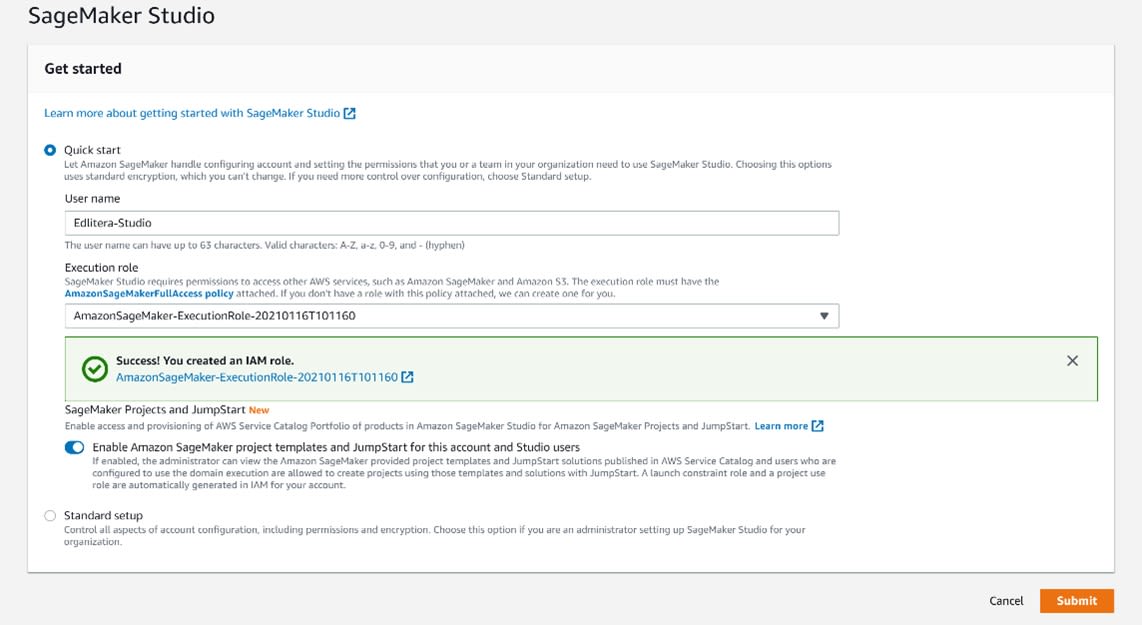
Afterward, select that you want to enable SageMaker project templates and JumpStart for this account and any Studio users you wish to include. Your Studio creation panel should now resemble the following image:
Image source: SageMaker Studio, https://aws.amazon.com/sagemaker/getting-started/
When you click Submit, you will be redirected to a screen that looks like this:
Image source: SageMaker Studio, https://aws.amazon.com/sagemaker/getting-started/
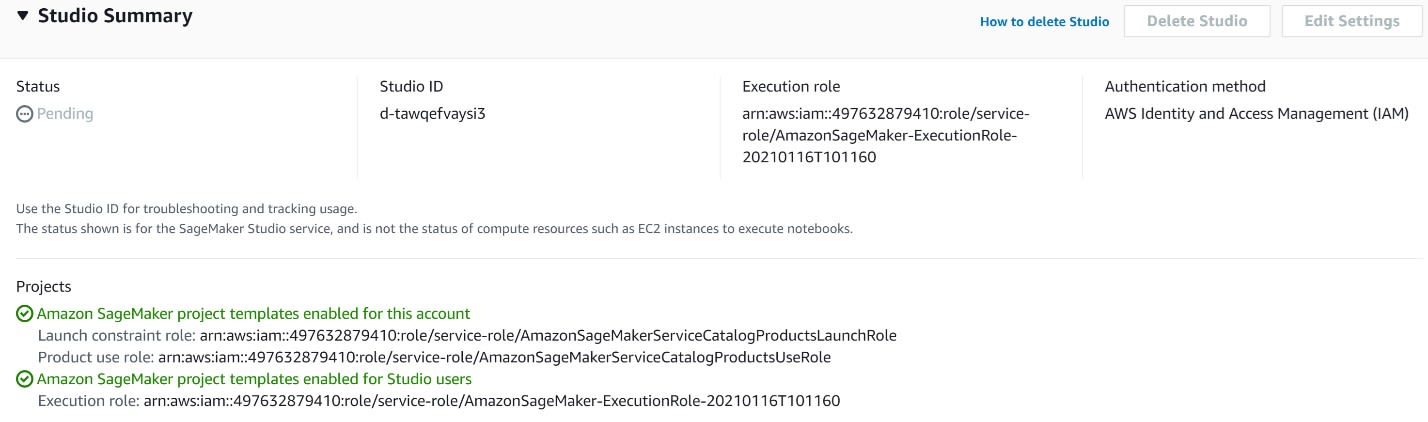
While the Studio is being created, it can take a little bit of time.
Once the Studio instance is created, the status will switch from Pending to Ready.
Note that Studio itself displays that you enabled project templates for the account and for any Studio users. Then, you need to create a new user that uses the same role as the Studio instance. Let's also give it the same name, only in lowercase.
When everything is ready, your screen will look like this:
Image source: SageMaker Studio, https://aws.amazon.com/sagemaker/getting-started/
Once you are ready to start using Studio, click Open Studio. This will redirect you to the SageMaker Studio instance for that particular user.
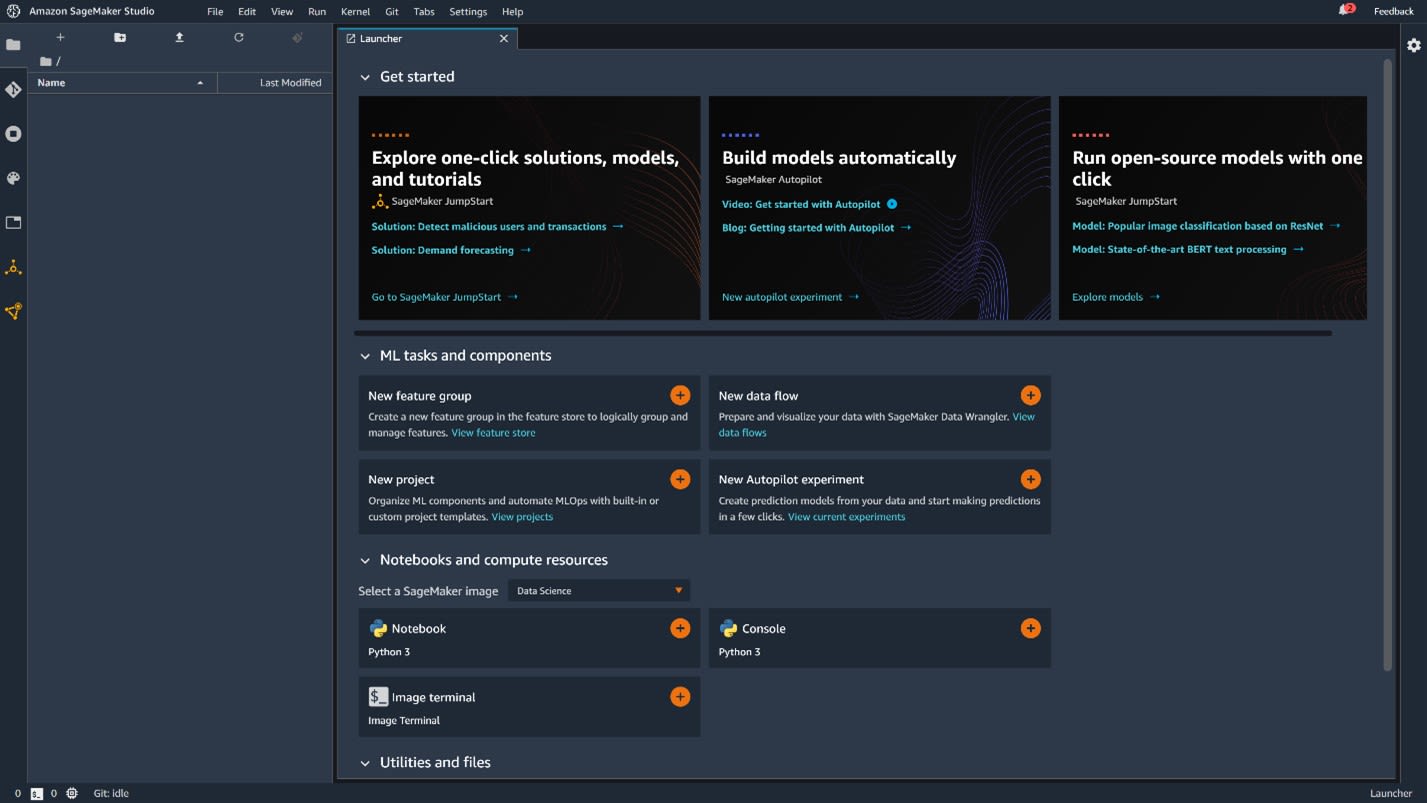
As you enter Studio, you will be greeted with a launcher screen that looks like this:
Image source: SageMaker Studio, https://aws.amazon.com/sagemaker/getting-started/
In the launcher screen, click the New Project tab.
An important thing to note is that if you didn't set up your Studio to allow project templates in the beginning, you won't be able to use these templates.
If you already have a Studio and don't want to create a new one, just follow this example by clicking Edit, and you can allow the usage of projects and project templates.
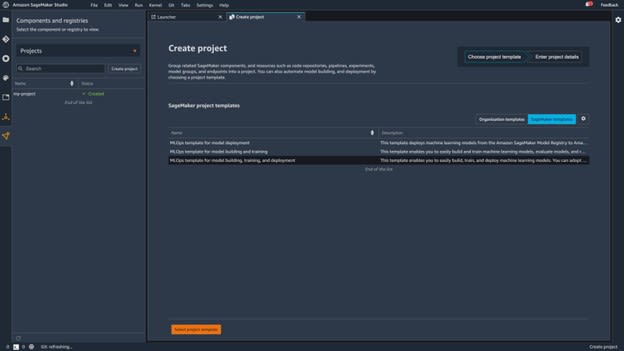
It will lead you to another screen where you can select three different templates:
- MLOps template for model deployment
- MLOps template for model building and training
- MLOps template for model building, training, and deployment
Here, select the template that includes model building, model training, and model deployment. This template allows you to look at and analyze an example of a complete end-to-end workflow.
Image source: SageMaker Studio, https://aws.amazon.com/sagemaker/getting-started/
If you look at the left part of the screen, you'll notice that there is already a project created named my-project. This does not mean that a project gets created by default. I created a project in advance to demonstrate how it looks when you already have a project created.
Once you click the template and then click Select Project Template, you'll be prompted to give a name to your project and to give it a description. You can put whatever you want in there, but for this example, I am going to call the project edlitera-example, and I am going to describe it with the same text.
Afterward, just click Create Project to finish the creation process.
Image source: SageMaker Studio, https://aws.amazon.com/sagemaker/getting-started/
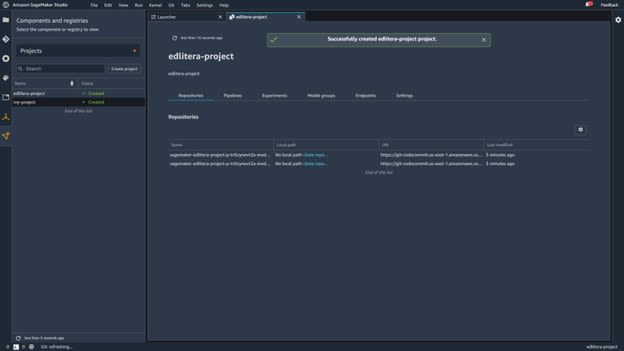
The creation process is automatic, so the only thing you need to do at this point is to wait for a few minutes until SageMaker creates the new project. When the process finishes, the screen will look like this:
Image source: SageMaker Studio, https://aws.amazon.com/sagemaker/getting-started/
As you can see in the screenshot, you have two repositories available to you. One of the repositories is for model building and the other is for model deployment. Those are actually CodeCommit repositories.
For this example, you need to use both of them, so clone both repositories by clicking Clone Repository situated near the repository names.
After you clone the repositories, you can access them and take a look at what is inside. The repositories contain all the artifacts you need to create a full end-to-end workflow.
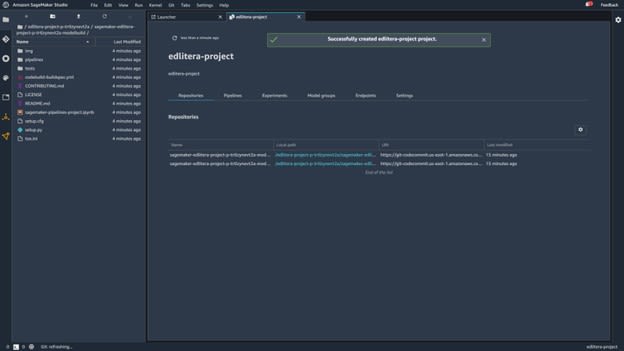
When you open the Model Build repository, the left side of your screen will change and look like this:
Image source: SageMaker Studio, https://aws.amazon.com/sagemaker/getting-started/
Here you see all the artifacts needed to build a machine learning pipeline, run that pipeline, and register models that have been trained. That whole process executes automatically.
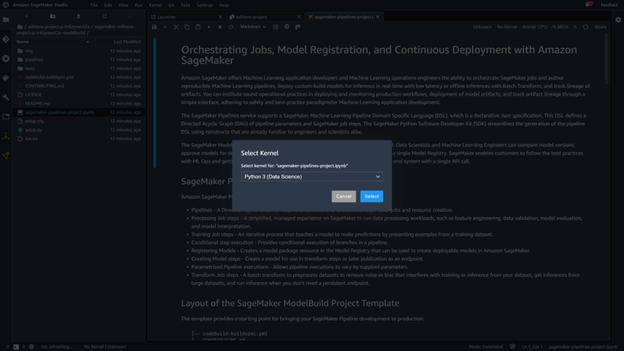
There are several files inside the repository, but the most interesting and useful one for right now is sagemaker-pipelines-project.ipynb. It is a sample notebook that demonstrates how to build a pipeline. When clicking on it, you first need to select the kernel you are going to use.
In this case, you want to use the Python 3 (Data Science) kernel.
Image source: SageMaker Studio, https://aws.amazon.com/sagemaker/getting-started/
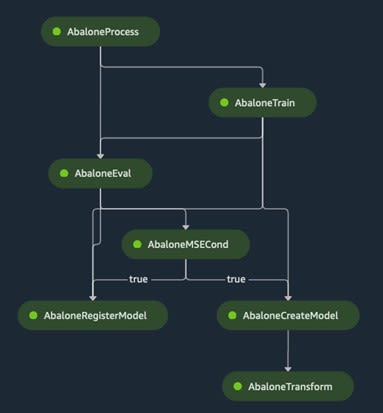
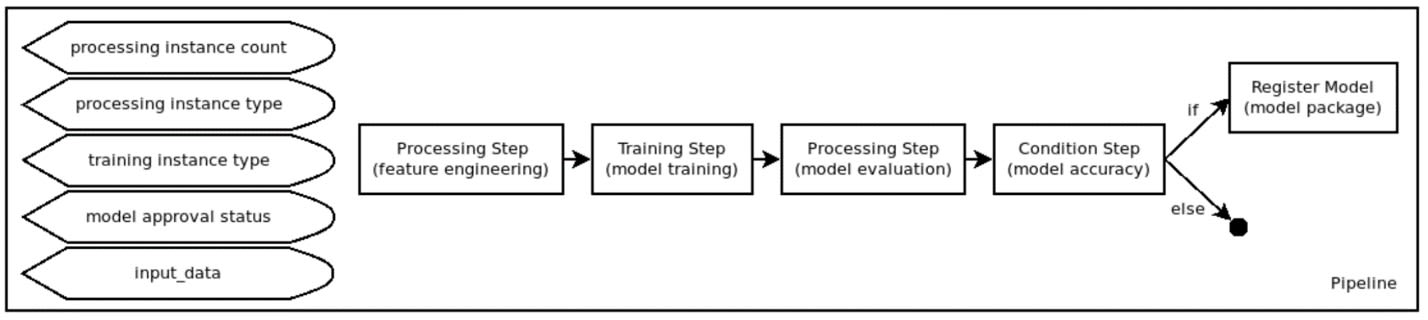
This sample notebook lets beginners get some great insight into how SageMaker Pipelines function. It explains the different kinds of steps you will use in a pipeline and how to string those steps together.
Image source: SageMaker Pipeline graph, Edlitera
However, this is only the visual representation of the pipeline. To get a better idea of how pipelines made with the SageMaker Pipelines service look like in terms of code, we need to find and take a look at the pipeline.py file. This file can be found by clicking first on the pipeline folder and afterward on the Abalone folder.
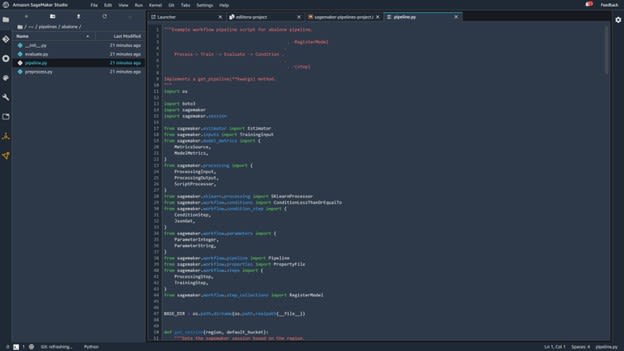
Opening the pipeline.py code will lead to a screen that looks like this:
Image source: SageMaker Studio, https://aws.amazon.com/sagemaker/getting-started/
How to Define Pipeline Parameters
The principle of writing pipelines is fairly simple. You write individual steps, define those steps with parameters, and afterward connect the steps in a specified order to create a pipeline.
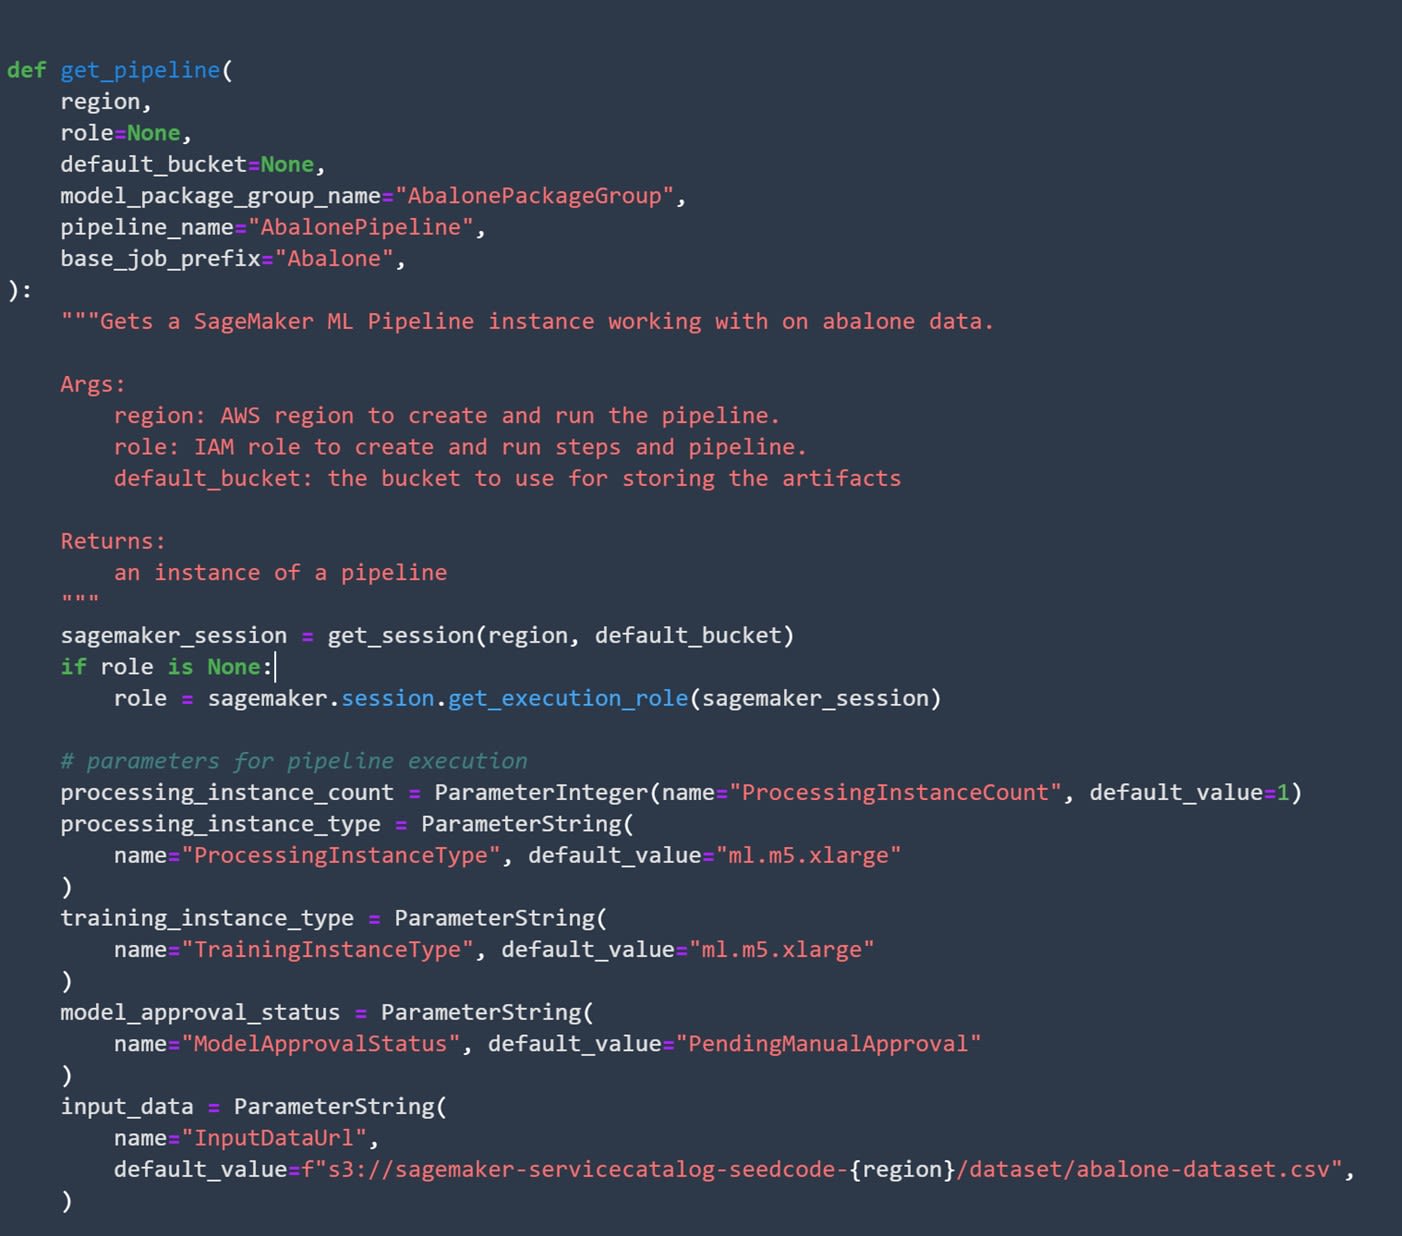
First off, you need to define a few parameters for the pipeline itself:
Image source: SageMaker Studio, https://aws.amazon.com/sagemaker/getting-started/
This will define the processing instance and training instance that you are going to use and, most importantly, whether you want to automatically deploy models after pipeline execution or not.
Usually, it's preferred to not automatically deploy models. Even though it might look practical to have everything done automatically, it's safer if you keep at least a certain degree of control over the workflow.
To achieve that, you need to set the default value of the model_approval_status parameter to PendingManualApproval. After defining some initial parameters, you can take a look at how the code looks for each of the different steps in our pipeline.
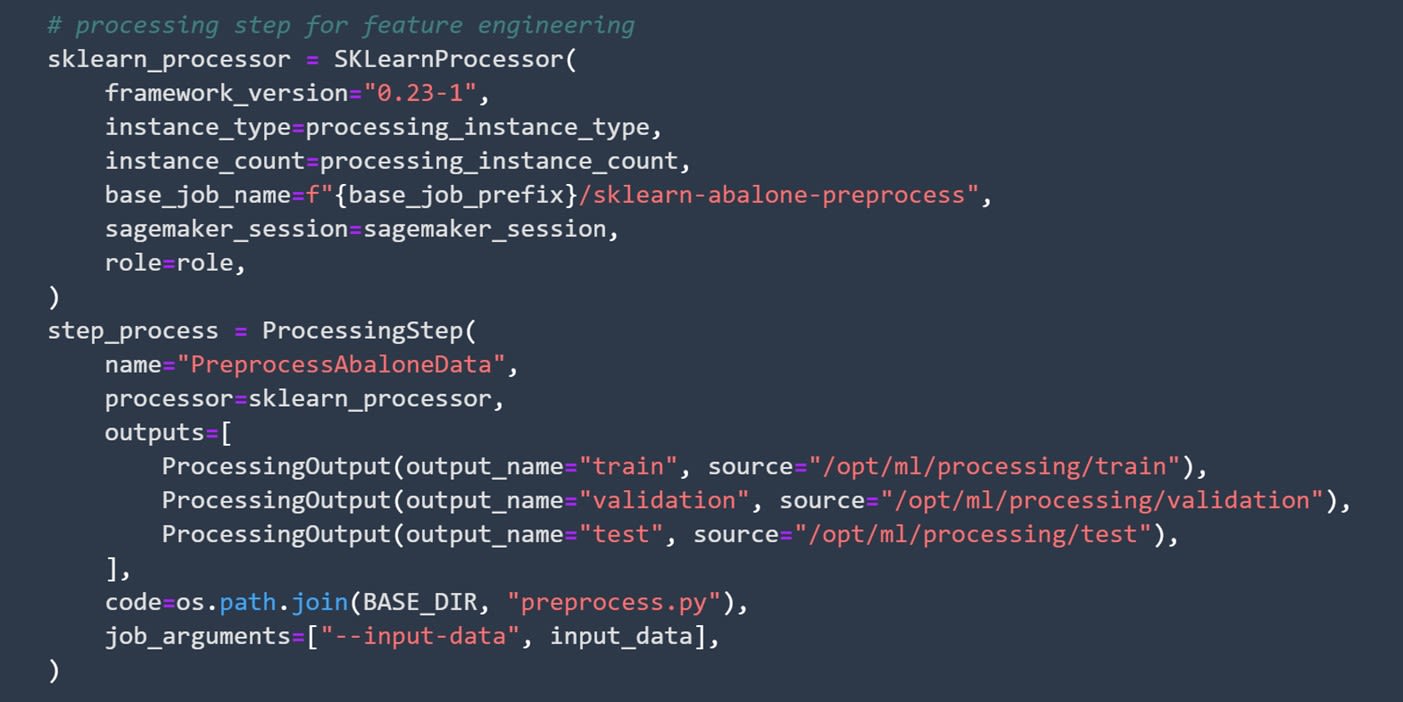
How to Code the Processing Step
Coding the processing step is relatively simple and can be separated into two parts. First, you need to define the processor and afterward the processing step itself. In this case, you are going to use the SKLearnProcessor object to process your data.
After you set up the parameters for it, you can define the processing step itself.
Image source: SageMaker Studio, https://aws.amazon.com/sagemaker/getting-started/
After the processing step, you can continue to the training step.
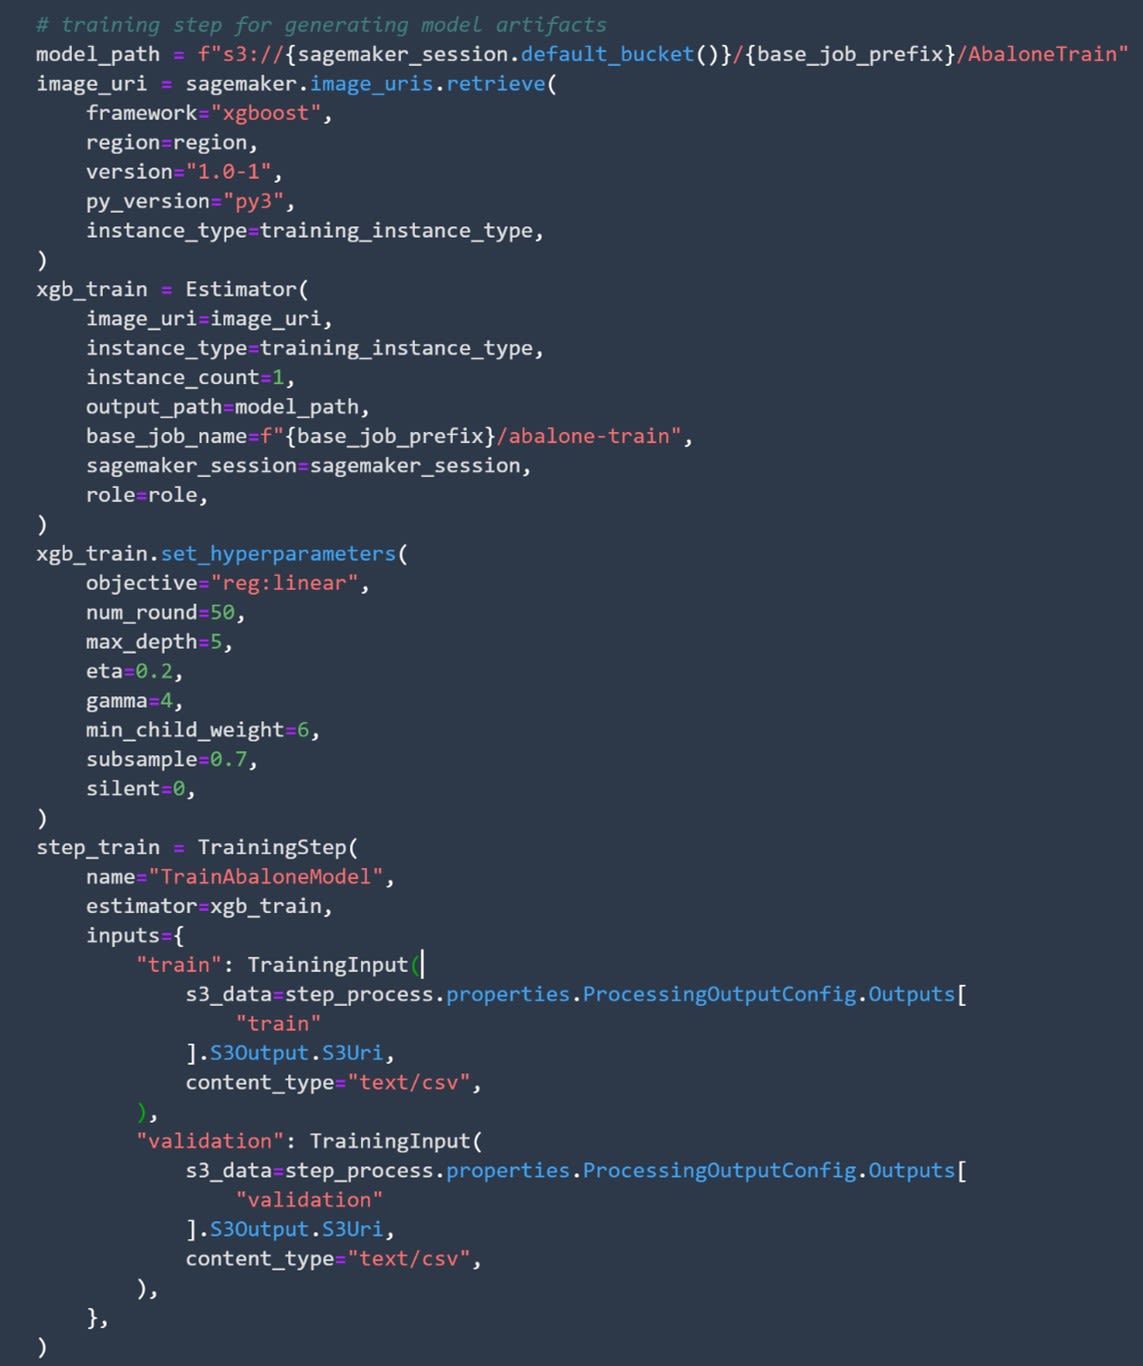
How to Train Your Model
Similar to how you defined the processing step, you can separate this training step into two parts.
First, you need to define the model you are going to use alongside the parameters of that model. Afterward, you need to define the step itself.
Image source: SageMaker Studio, https://aws.amazon.com/sagemaker/getting-started/
After defining the training step, you can define how you want to evaluate the model.
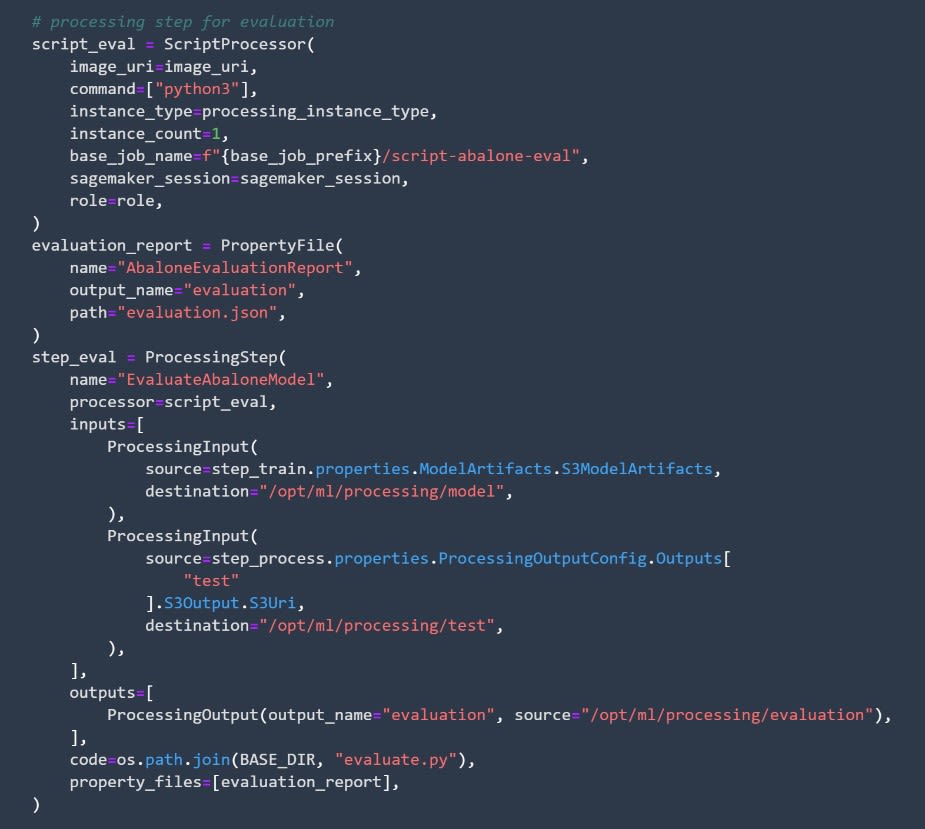
How to Code the Processing Step to Evaluate Your Models
In this step, you need to create code that will allow you to evaluate the models. Again, the code can be separated into two parts.
First, define a ScriptProcessor object to use for processing, and afterward, create the processing step itself.
Image source: SageMaker Studio, https://aws.amazon.com/sagemaker/getting-started/
After this step, it is important to define how and when the pipeline is going to register models.
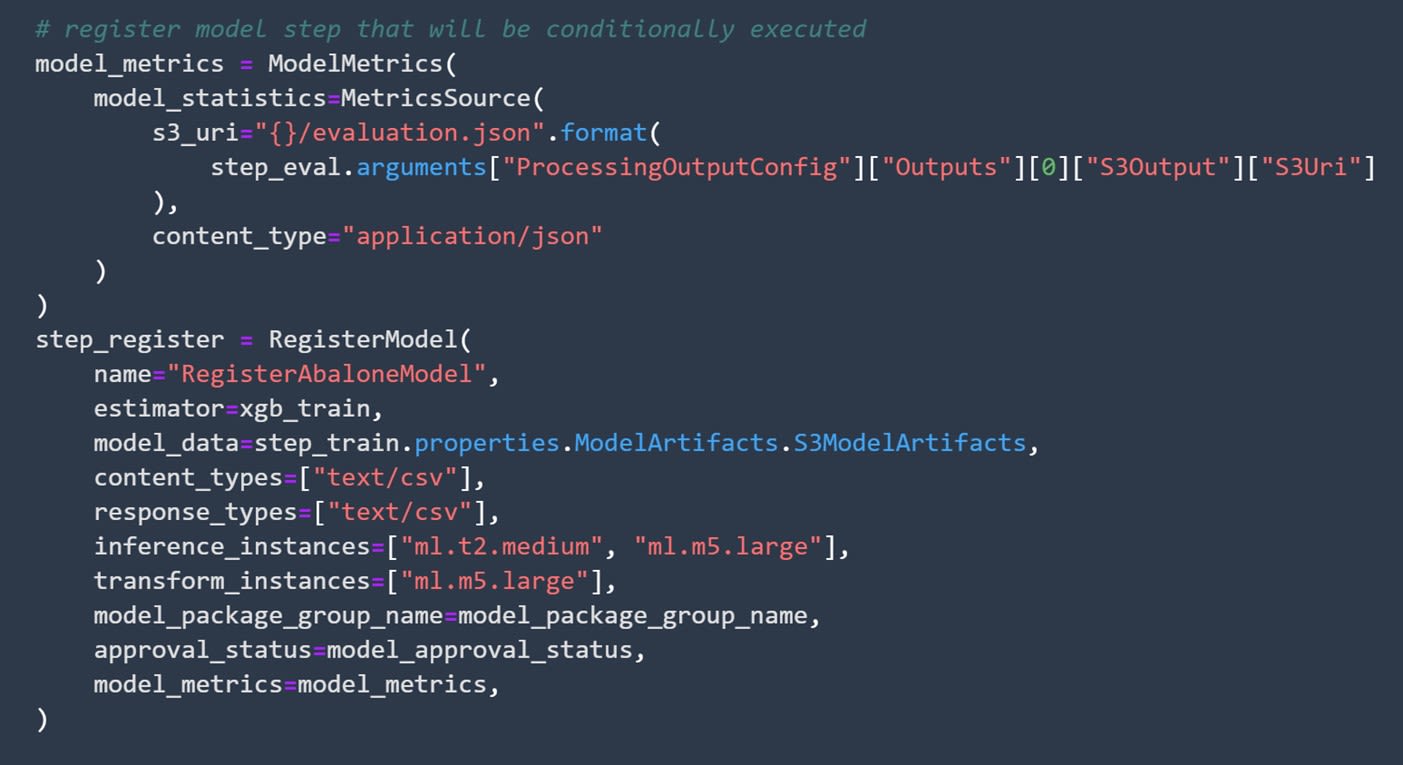
How to Set Registration of Your Models
This is a very important part of your code because it defines how your trained models are going to get registered. Pay special attention to the approval_status variable. It needs to be set to model_approval_status so that your registered models don't get automatically deployed.
Image source: SageMaker Studio, https://aws.amazon.com/sagemaker/getting-started/
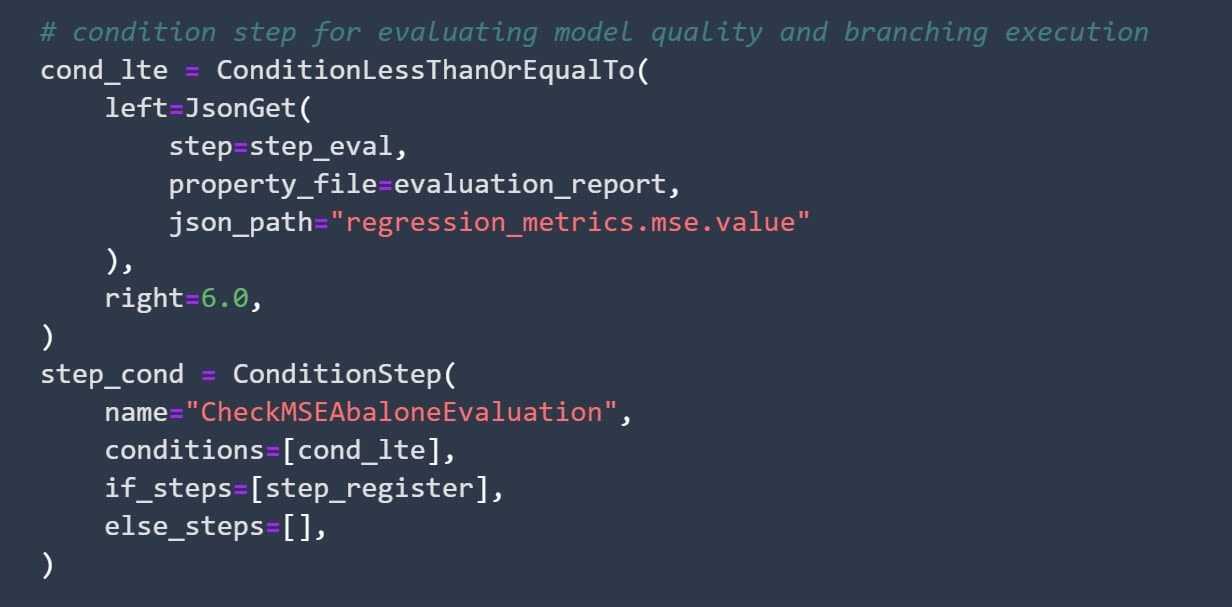
How to Define a Condition for Your Model
This step defines a condition your model needs to satisfy in order to be considered viable. Usually, the condition is in some way connected to the metric you follow. For example, since you are working on a regression problem and are using MSE to determine how well your models perform, you can set the MSE. Your model needs to be lower than 6 for that model to be registered.
Image source: SageMaker Studio, https://aws.amazon.com/sagemaker/getting-started/
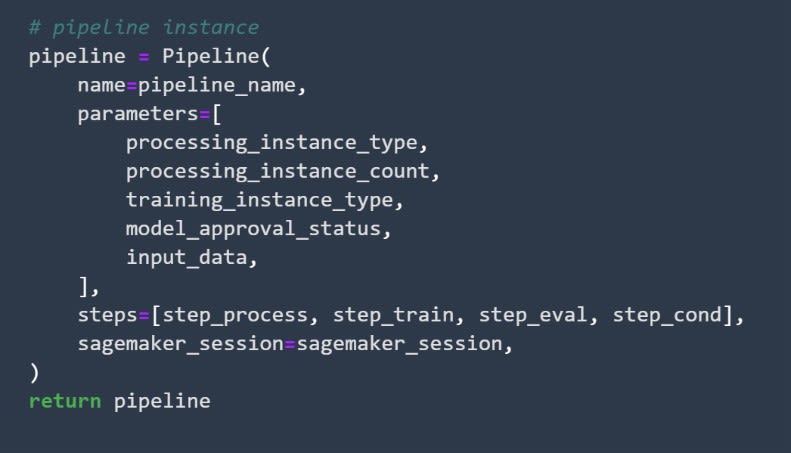
How to Define the Pipeline
After you've defined all the steps that the pipeline will consist of, you need to define the pipeline itself. You'll do that by first defining the parameters of the pipeline and later the order of the steps inside it.
Image source: SageMaker Studio, https://aws.amazon.com/sagemaker/getting-started/
How to Run the Pipeline
Since this code was already prepared, running the template will automatically run the creation process of the pipeline. If you are writing your pipeline from scratch, or modifying an already finished pipeline, you will need to also execute that pipeline.
You can take a look at your pipeline by returning to the project page and clicking on the pipelines tab:
Image source: SageMaker Studio, https://aws.amazon.com/sagemaker/getting-started/
Now your pipeline is ready.
If you try clicking on this tab immediately after creating the project from the template, the pipeline will not be ready. Keep in mind that once defined, SageMaker needs a little time to configure the pipeline.
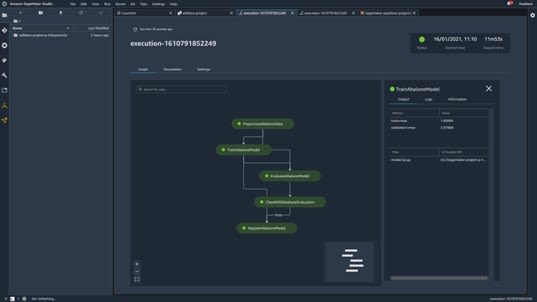
Once everything is ready, SageMaker will automatically execute the pipeline. Once the pipeline is executed, you can click on it to take a look at some details, of which the most important one is the graph of the pipeline.
Image source: SageMaker Studio, https://aws.amazon.com/sagemaker/getting-started/
The first thing you'll notice is that everything is green. This is a good sign because it means that everything has been executed successfully. You can prove that by clicking on different steps.
For example, by clicking the TrainAbaloneModel step, you can see that the model achieves an RMSE of about 2, which satisfies the condition you set when you defined the conditional step in your pipeline.
How to Deploy Your Model
The last thing you'll need to do to complete the whole workflow is to deploy the model. Since you defined that your models need manual approval to be deployed when you set up earlier, your model will not get deployed automatically after being executed.
To deploy the model, you first need to return to the project page and select the model groups tab.
Image source: SageMaker Studio, https://aws.amazon.com/sagemaker/getting-started/
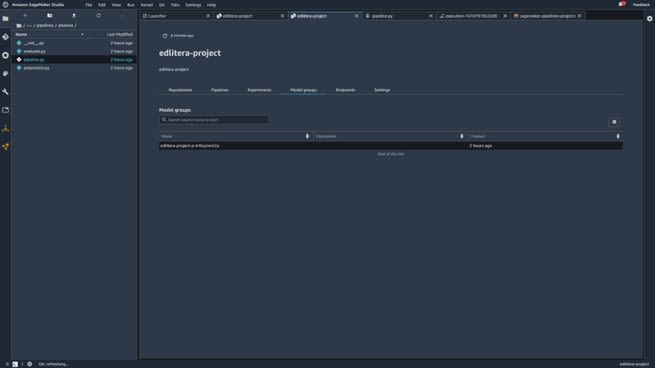
Once you click on Model Groups, you'll be taken to a page that contains your trained models.
Image source: SageMaker Studio, https://aws.amazon.com/sagemaker/getting-started/
Typically, you would only have one model here, since the pipeline is executed only once. However, in this example, I executed the pipeline twice just to demonstrate how it looks when you have multiple models to choose from.
You can see that both models are pending manual approval in the screenshot above.
How to Manually Approve a Model
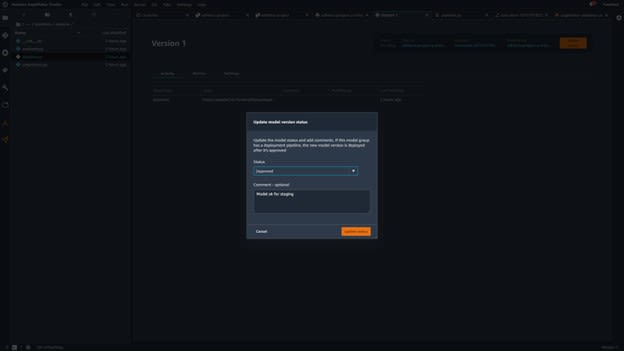
To manually approve a model, you must first go to the page of a model by clicking on a model name:
Image source: SageMaker Studio, https://aws.amazon.com/sagemaker/getting-started/
Once on this page, you can click Update Status to approve your model:
Image source: SageMaker Studio, https://aws.amazon.com/sagemaker/getting-started/
When you approve models, take into account that approving a model will automatically deploy that model. To deploy models, SageMaker uses artifacts from the second repository you cloned in the Model Deployment repository. This will take a little bit of time, as SageMaker needs to set up the endpoint using AWS CloudFormation.
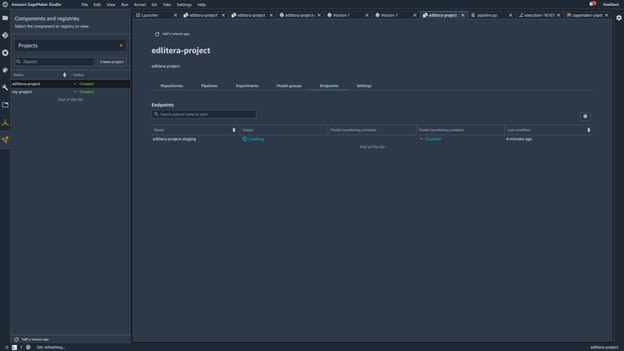
While you wait for SageMaker to deploy your model, return to the page of your project and click the Endpoints tab to see if everything is ready:
Image source: SageMaker Studio, https://aws.amazon.com/sagemaker/getting-started/
Once the status changes from Creating to InService, you are finished.
You've successfully created a full end-to-end SageMaker workflow.
Image source: SageMaker Studio, https://aws.amazon.com/sagemaker/getting-started/
Now, you can rerun the model by just running new executions of the pipeline.
Of course, you can also change model parameters and run executions of some other model, but the structure of the pipeline will stay the same.
How to Clean Up to Avoid Overcharge on What You Don't Use in This Demonstration
After finishing up everything, be sure to delete the assets you created to make sure you don't get billed for things you're not using. This includes stuff like Studio users, Studio itself, endpoints, and more or less everything you just created during this example.
If you are not sure whether you deleted everything that you should, go to the AWS billing page and see if there is any service you'll get billed for that is still running.
Even before the newest additions, AWS was the leading cloud platform for MLOps. Most programmers favor AWS over other platforms, mostly because of how well the different services mesh together. Using a mosaic of tools that need to be modified in order to work with one another is pretty standard for MLOps engineers, so having services seamlessly integrate is a breath of fresh air. With the services added in December of 2020 during the re:Invent conference, creating end-to-end workflows on AWS is simpler than ever.
All of the new services are oriented toward making AWS easier to use, such as Pipelines Simplify CI/CD, Debugger, which allows users to optimize models and optimize resource usage, Edge Manager, which makes managing edge devices a lot less complicated, and Clarify, which is literally created to help with imbalances and bias detection. Getting into AWS is now a very quick and painless process and, judging by the direction in which the way new services are going, will only get less complicated with time.

